Table of Contents
Advertisement
Quick Links
USA office: Fontana
AUS office: Truganina
GBR office: Ipswich
If you're having difficulty, our friendly
customer team is always here to help.
FRA office: Saint Vigor d'Ymonville
USA:cs.us@costway.com
AUS:cs.au@costway.com
GBR:cs.uk@costway.com
FRA:cs.f r @costway.com
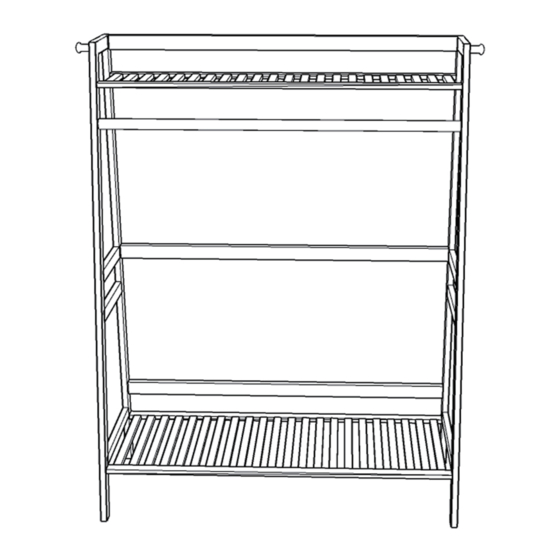
Bamboo Clothes Rack
Portemanteau en Bambou
JZ10116
THIS INSTRUCTION BOOKLET CONTAINS IMPORTANT SAFETY INFORMATION. PLEASE READ AND KEEP FOR FUTURE REFERENCE.
Advertisement
Table of Contents

Related Manuals for Costway JZ10116


Summary of Contents for Costway JZ10116
- Page 1 GBR office: Ipswich FRA office: Saint Vigor d'Ymonville USA:cs.us@costway.com If you're having difficulty, our friendly AUS:cs.au@costway.com customer team is always here to help. GBR:cs.uk@costway.com THIS INSTRUCTION BOOKLET CONTAINS IMPORTANT SAFETY INFORMATION. PLEASE READ AND KEEP FOR FUTURE REFERENCE. FRA:cs.f r @costway.com...
- Page 2 Before You Start Please read all instructions carefully. Retain instructions for future reference. Separate and count all parts and hardware. Read through each step carefully and follow the proper order. We recommend that, where possible, all items are assembled near to the area in which they will be placed in use, to avoid moving the product unnecessarily once assembled.
- Page 3 A x2 B x2 A + B + 1# C x1 D x1 EN: The big hole is facing up, connect the parts A and B, E x3 then fix them with 1# screws. DE: Das große Loch zeigt nach oben, verbinden Sie die Teile A und B und befestigen Sie sie dann mit 1 # Schrauben.
- Page 4 (A + B) + C + 2# D + 2# EN: Fix the C panel in place with 2# screws. EN: Fix the D panel with 2# screws. DE: Befestigen Sie die C-Platte mit 2 # Schrauben. DE: Befestigen Sie das D-Panel mit 2 # Schrauben. FR: Fixez le panneau C en place avec 2 vis #.
- Page 5 F + 2# E + 2# EN: Fix the F rod with 2# screws. EN: Fix the parts E with 2# screws respectively. DE: Befestigen Sie die F-Stange mit 2 # Schrauben. DE: Befestigen Sie die Teile E jeweils mit 2 # Schrauben. FR: Fixez la tige F avec les vis 2#.
- Page 6 G + 2# Assembly Steps of Anti-tipping Kit / Montageschritte des Anti-Kipp-Kits / Étapes de Montage du Kit d'Accessoires Anti-bascule / Pasos de Montaje del Kit de Accesorios Antivuelco / Passi di Montaggio del Kit Antiribaltamento / Etapy montażu zestawu mocującego Wall Wand Pared...
- Page 7 Return / Damage Claim Instructions Wall / Wand / Mur / DO NOT discard the box / original packaging. Pared / Muro / Ściana In case a return is required, the item must be returned in original box. Without this your return will not be accepted.
Need help?
Do you have a question about the JZ10116 and is the answer not in the manual?
Questions and answers