
Summary of Contents for AIRROBO PG100
- Page 1 Pet Grooming Vacuum Thank you for purchasing AIRROBO product. Before using this product, please read the user manual carefully. Please keep the user manual properly for future reference.
-
Page 2: Table Of Contents
USER GUIDE SAFETY INSTRUCTIONS In the box Product Overview How to use How to use accessories How to maintain Common troubleshooting Product main specifications Declaration of Conformity... -
Page 3: Safety Instructions
SAFETY INSTRUCTIONS • This product may be used for domestic use only and may not be used for commercial or industrial purposes. This product should also not be used outdoors or in wet conditions. • When using the product, please ensure that it is used in a safe environment and under the supervision of someone who understands the safe use of the product and its hazards. -
Page 4: In The Box
Grooming Brush *1 Electric Clipper *1 Guide Comb *3 Pet Grooming Vacuum Thank you for purchasing AIRROBO product. Before using this product, please read the user manual carefully. Please keep the user manual properly for future reference. Cleaning Brush *1... -
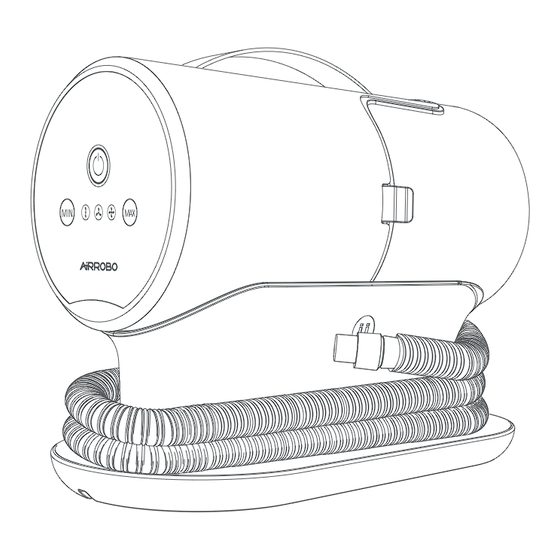
Page 5: Product Overview
Product Overview Dust Cup Flexible Hose Connector Operation Panel key ‒ Power on/off the device. key ‒ Lower the suction level. key ‒ Raise the suction level. Indicators - A total of three levels as in low / medium / high respectively, corresponding to different levels of suction power. -
Page 6: How To Use
How to use Connect the accessory and the vacuum device through the flexible hose. Please be careful to install the connectors at both ends of the hose tightly to avoid air leakage. Plug the power cord of the vacuum device into a power socket. Turn on the power switch of the vacuum device. -
Page 7: How To Use Accessories
How to use accessories Grooming Brush Cleaning Brush Deshedding Brush Electric Clipper Crevice Tool Grooming Brush: It cleans the pet's body of floating hair and the waste inside the coat, making the coat smoother and fluffier. Press the button to clean the hair on the brush. - Page 8 How to use accessories Crevice Tool: It can be used to clean pet hair or dust that falls in the cracks of sofas and beds. Electric Clipper: It is used to finely trim pet hair and draw it into the dust cup. Trimming and grooming and vacuuming are solved at once.
- Page 9 How to use accessories Guide Combs According to the different length of the pet's hair and different trimming and grooming needs, guide combs with different lengths can be replaced and used together with electric clipper. There are 3 guide combs in the package and each guide comb can meet the needs of two different sizes.
-
Page 10: How To Maintain
How to maintain Dust cup maintenance Lift and remove the dust cup slightly in the direction of the arrow. Push the snap to open the dust cup and empty it. Install the dust cup in the direction of the arrow. Notes: •... - Page 11 How to maintain HEPA filter maintenance Remove the dust cup and take out the HEPA filter. Please wash it with tap water and drain the water after washing. Install the HEPA filter back in place after it is Place it in a well-ventilated place for at least 24 completely dry.
- Page 12 How to maintain Sponge filter maintenance Remove the dust cup and take out the sponge filter. Please wash it with tap water and drain the water after washing. Install the sponge filter back in place after it is Place it in a well-ventilated place for at least 24 completely dry.
- Page 13 How to maintain Electric clipper maintenance Remove the cutter head in the direction shown by the arrow. Note: The cutter head is very sharp, please be careful not to cut your hand. The suction port of the flexible hose can be used to pick up the hair and dust from the cutter head and cutter holder.
- Page 14 How to maintain Flexible hose storage Wrap the flexible hose clockwise around the base of the vacuum device. The hose suction port can be fixed on the side of the vacuum device by magnetic connection. Power cord storage The power cord can be wrapped around and stored in the slot at the bottom of the product.
-
Page 15: Common Troubleshooting
Common troubleshooting Frequently Asked Questions Possible causes of failure Suggested solutions Check if the power cord is The product can not be The power cord is not plugged in or there’s plugged in and is the socket powered on. no power to the socket. has power. -
Page 16: Product Main Specifications
Product main specifications Power supply specification 120V~60Hz 600W Power Flexible hose length 1.5m/59inches Power cord length 1.95m/77inches Dust cup capacity Size of vacuum device L320*W160*H225mm/L12.6*W6.3*H8.9inches 2kg/4.4lbs Weight... -
Page 17: Declaration Of Conformity
Declaration of Conformity Federal Communications Commission (FCC) compliance statement: 1.This device complies with part 15 of the FCC Rules. Operation is subject to the following two conditions: (1) This device may not cause harmful interference, and (2) this device must accept any interference received, including interference that may cause undesired operation. 2.Changes or modifications not expressly approved by the party responsible for compliance could void the user's authority to operate the equipment. - Page 18 Declaration of Conformity ISEDC TO CANADIAN USERS CAN ICES-3(B)/NMB-3(B) This device contains licence-exempt transmitter(s)/receiver(s) that comply with Innovation, Science and Economic Development Canada’ s licence-exempt RSS(s). Operation is subject to the following two conditions: (1) This device may not cause interference. (2) This device must accept any interference, including interference that may cause undesired operation of the device.
- Page 20 F r e e a s a b r e e z e...
Need help?
Do you have a question about the PG100 and is the answer not in the manual?
Questions and answers