
Related Manuals for GENDRON 5154DX

Summary of Contents for GENDRON 5154DX
- Page 1 USER MANUAL Bariatric Acute Care Bed Model 5154DX Gendron Inc. 520 W. Mulberry Street –Suite 100 Bryan, Ohio 43506 www.gendroninc.com...
-
Page 3: Table Of Contents
Table of Contents Parts Locator Safety Notes Power Requirements Features Function & Basic Operation Assembly Instructions Bed Controls Diagnostics & Repair Scale Inspection, Cleaning & Maintenance Specifications Warranty... -
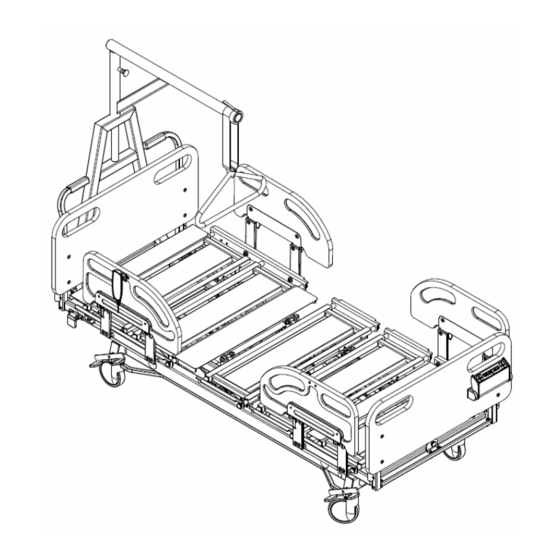
Page 4: Parts Locator
Parts Locator... -
Page 5: Safety Notes
Safety Notes Failure to observe these safety precautions may result in personal injury or mechanical failure. Read all instructions carefully before using the bed. When a patient is left unattended or while transporting a patient it is recommended that the siderails are raised. When raising the siderails make sure it is completely raised and locked. -
Page 6: Power Requirements
Do not service this device without first unplugging the power cord and battery. Bed sections can move even with power cord unplugged because of backup battery. If service is required it is recommended that you contact Gendron customer service at 1-800-537-2521 or your local authorized Gendron dealer. Weight capacity: Never exceed the rated capacity of your bed (combined weight of user and items on bed.) Exceeding weight limit may... - Page 7 Unplug battery to prevent discharge during storage. Failure to do so will reduce battery life. Always allow head section to fully lower when using CPR release. Failure to do so may damage actuator. Disconnect AC power before unplugging any cables on the control module.
-
Page 8: Features
Features - 7-Function articulation 1) Raise and lower head section 2) Raise and lower knee section 3) Raise and lower bed 4) Trendelenburg 5) Reverse Trendelenburg 6) Cardio chair 7) Bed flat - Power functions are powered by 24-volt DC electric actuators. - Electrical Power: 120 volt AC power transformer converts system to 24-volt DC. - Page 9 - Rotating scale display: Scale display rotates down to protect patient privacy while not in use. - Caregiver control panel: Allows caregiver access to bed controls and lockouts for patient pendant control. - Accessory sockets: One IV socket on each corner of bed. - IV Pole (optional –...
-
Page 10: Function & Basic Operation
Function & Basic Operation Patient Pendant Pendant control allows easy operation of bed controls. Press and hold button to operate each function. 1) Raise and lower head section 2) Raise and lower bed deck 3) Raise and lower knee section 4) Cardio chair/bed flat (lowers head, knee and returns bed to lowest height) 5) Trendelenburg/ reverse Trendelenburg... - Page 11 Caregiver Controls Caregiver controls are located at the foot end of the bed, on the side opposite of the rotating scale display. Caregiver Controls...
- Page 12 Lockout control To lock/unlock a function from being used press and hold the button + the button of the function to be locked/unlocked. A yellow LED is lit above the buttons of locked functions. Head/Knee/Bed/Tilt (trendelenburg/ reverse trendelenburg) Press and hold the button of the function desired + Cardio chair position Press and hold the button.
- Page 13 Central Brake/Steer Function The Brake/Steer pedals are located at each corner of the bed Neutral Position When positioning the bed in a small area place the Brake/Steer pedal in the neutral position (pedals level) to release the steer function and brakes.
- Page 14 Push Handles The push handles are located at the head end of the bed, on the headboard, and are used to facilitate moving the bed. Push handles are not available when optional H-frame patient helper is in use. Caution: Do not move the bed using the side rails. Push Handles...
- Page 15 Siderail Operation Siderails are located on each side of the bed. Siderails have a 2-position swing down operation. To raise siderail, grasp top section of rail and lift. Allow release pin to snap into the locked position. Caution: Make sure siderails are securely locked into position to prevent injury.
- Page 16 CPR Release For emergency lowering of head section pull and hold the CPR release handle. The CPR release handle is located at the head end of the bed on both the left and right side. Caution: Always allow head section to fully lower when using CPR release.
- Page 17 Side Extension Using the deck extensions the bed width can be changed from 39” to 48” to 54”. To adjust the side extensions pull the black knob that is at the end of each extension and move to the desired position. Caution: Gently push/pull on the extension to verify that it is locked in position.
- Page 18 Foot Extension Using the foot extension, the bed length can be adjusted from 84” to 92”. To adjust the foot extension, pull the black knob that is at center of the extension (below the footboard) and move to the desired position. Caution: Gently push/pull on the extension to verify that it is locked in position.
- Page 19 A-frame Patient helper The patient helper is intended to help the patient raise his or her upper body. The patient helper handle may be raised or lowered by adjusting the strap. While the patient helper is not in use, the boom can be rotated 90 degrees in either direction and locked.
- Page 20 Battery backup Battery backup allows full use of bed functions when AC power is not available for a limited time. Caution: Disconnect battery to prevent discharge during storage. Failure to do so will reduce battery life. Caution: Recharging a fully discharged battery may take up to 24 hours. Battery cable is located at the head end of bed frame and plugs into the nurse call junction box.
- Page 21 IV Pole (optional – not included) IV pole may be used at any one of the (4) corners of the bed. Rotate the yellow release mechanism to raise or lower IV pole.
- Page 22 H-frame Patient helper (optional) The patient helper is intended to help the patient raise his or her upper body. The patient helper handle may be raised or lowered by adjusting the chain with the hook located near the orange release knob. The handle may also be adjusted to any position along the boom by releasing the orange knob and sliding to the desired position.
-
Page 23: Assembly Instructions
Assembly Instructions Patient helper 1. Assemble patient helper frame to head end of bed frame using 4 bolts and locknuts. 2. Lower patient helper boom onto patient helper frame. Make sure release pin engages frame and holds boom rotation. 3. Slide patient helper handle and strap over end of boom. Note: Optional H-frame patient helper is assembled to the bed in the same manner as the A-frame patient helper. - Page 24 Headboard 1. Insert headboard mounting tubes into the square sockets at the head end of the bed as shown below. Mounting tube Socket...
- Page 25 Footboard 1. Insert footboard mounting tubes into the square sockets at the foot end of the bed. 2. Connect the two electrical cables. Socket Cables Mounting tube Footboard Removal Caution: Disconnect the two electrical cables below the footboard before attempting to remove the footboard. Equipment damage may occur.
- Page 26 Battery 1. Plug battery into nurse call junction. NURSE CALL BATTERY...
-
Page 27: Bed Controls
Bed Controls Linear actuators control head/knee section as well as bed movement. Control module controls all drive components. Battery provides backup power in case of power failure. Under bed light night light illuminates the area under the bed for patient safety. Handset (shown on page 9) gives patient access to bed controls. - Page 28 UNDER BED LIGHT NURSE CALL CONTROL MODULE...
-
Page 29: Diagnostics & Repair
Diagnostics & Repair Problem Cause Solution ______________________________________________________________________ No Functions operate No power to unit Check power cord. Is it plugged into receptacle? Green Power-on light Electrical power cord not does not glow properly plugged into Check cord for breaks. control module Power cord plugged Check for power to receptacle. -
Page 30: Scale
Scale The scale can be used to monitor the patient’s weight, change in weight and to alert the caregiver when the patient exits the bed. The scale display rotates down when not in use for patient privacy. The scale system is powered by the beds electrical system therefore no batteries are required. - Page 31 Bed Exit Alarm press to enable or disable alarm. Use the menu button to program the alarm parameters. The facility nurse call can be activated by the bed exit alarm if desired by using either the DB37 or 1/4” phono jack located at the head end of the bed.
- Page 32 To edit scale system setup: Press Menu Use Up arrow to change menu selection Use Down arrow to toggle value Press Freeze to save changes or Weigh to exit without saving changes The parameters listed below can be changed through the Menu Bed Exit Alarm on 0-45% of patient weight in 5% increments.
-
Page 33: Inspection, Cleaning & Maintenance
- Inspect patient helper frame and strap. If strap is worn replace immediately. - When you are satisfied that the bed is operating properly, instruct all personnel who may be involved in the bed operation. If problems are found, contact Gendron customer service at 800-537-2521 or your authorized Gendron dealer. - Page 34 Cleaning Warning: Before cleaning any portion of the bed, disconnect power cord from the wall outlet. Caution: Before using any cleaning product, test it on the underside of the bed. Never use any volatile or flammable fluid (thinner, gasoline, etc.) that could cause discoloration or deterioration. Use mild soap and water or a nonabrasive hospital-grade detergent disinfectant to clean the bed.
-
Page 35: Specifications
Bed Weight: 710 pounds Note: All dimensions are approximate This bed meets FDA recommendations to reduce entrapment risk detailed in “Hospital Bed System Dimensional and Assessment Guidance to Reduce Entrapment” issued March 10, 2006 when used with Gendron mattress .14884-F & .14884-1F. -
Page 36: Warranty
Gendron, Inc. warrants the bed frame to be free from defects in materials and workmanship for a period of (5) years from date of purchase.
Need help?
Do you have a question about the 5154DX and is the answer not in the manual?
Questions and answers