Table of Contents

Related Manuals for Katadyn Spectra Bimini 300


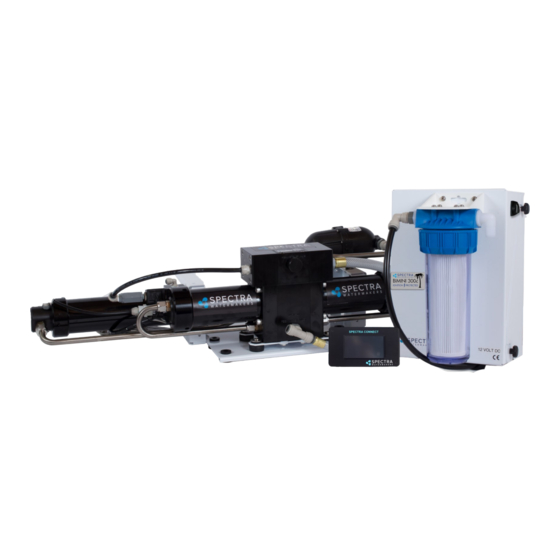
Summary of Contents for Katadyn Spectra Bimini 300
- Page 1 Installation and Operating Manual Spectra Watermakers info@spectrawatermakers.com Katadyn Desalination LLC. www.spectrawatermakers.com 2220 S. McDowell Blvd Ext. Petaluma, CA 94954 Phone: 415-526-2780 Fax: 415-526-2787 Updated April 2020...
- Page 3 Data logging, Fill Tank, Auto Flush, and built-in Maintenance Interval schedules put the Bimini 300 into a class of its own. The Spectra Bimini 300 greatly extends the range and versatility of the modern outboard powered vessel.
- Page 5 Spectra Connect Quick Start Guide When you first power up the system, you will get a warning message, asking if the system has been stored with chemicals. If the system has been pickled, winterized, this is the first startup, or the condition of the sys- tem is unknown, go to COMMISSIONING on page 23 or serious damage may occur.
- Page 7 Thank you for your purchase of a Spectra Bimini 300 system. When properly installed and maintained, it will provide years of trouble free service. Professional installation is strongly rec- ommended. Like any piece of mechanical equipment, the system will require inspection and service, so plan ahead for service access and install “service loops”...
-
Page 9: Table Of Contents
Table of Contents Getting Started ........................11 Installation Basics ......................12 Components ........................13 Bimini Plumbing Schematic & Plumbing Detail .............. 15 Plumbing Detail ......................... 16 Tube Fitting Assembly Procedures ................... 19 Electrical & Remote Display Installation ................20 Tank Switch Wiring and operation ................... 24 Optional Tank Level Sensor Installation ................ - Page 10 Installation Notes...
-
Page 11: Getting Started
Getting Started Unpack the system and inspect it for damage during shipping. Freight damage must be report- ed to the carrier within 24 hours. Refer to the shipping list for your system to ensure you received all of the components listed. Do not discard any packaging until you have found and identified all of the parts. -
Page 12: Installation Basics
Installation Basics Thru-hull • Read the directions! Not Supplied. • Avoid tight hose bends and excessive runs. • Use heavy gauge wire. • Install feed pump module as low as possible. • Boost pump module must be installed below the waterline. •... -
Page 13: Components
Components Sea Strainer and Boost Pump Module: Mount close to the intake through-hull, below the waterline, in a location that can handle water spillage during service. The boost pump power cable will connect to the feed pump module. Fresh Water Flush Module: The fresh water flush module may be located in any convenient location near the feed pump module. - Page 14 Components continued... Remote Touchscreen The remote control panel can be mounted anywhere dry and convenient. Cut a 5-5/8” (12.7 cm) wide by 3-1/4” (7.62 cm) high opening for the panel. The display needs minimum 2 1/2” deep clearance for the cable. Take care not to damage the plugs on the ends of the cable when routing.
-
Page 15: Bimini Plumbing Schematic & Plumbing Detail
Plumbing Schematic From the Clark pump brine discharge con- nector use the supplied 5/8 (16 mm) clear braided vinyl hose with Quick Connect fitting to the brine overboard fitting. Use part of the 25-feet (8 meters) of 1/2-inch vinyl hose, pre-fitted with a 1/2-inch John Guest stem The optional Z-ION will re- fitting, to connect the feed pump... -
Page 16: Plumbing Detail
Plumbing Detail From the intake seacock to the sea strainer/boost pump module, and from the sea strainer/boost pump module to the pre-filter housing on the feed pump module, use the 3/4-inch black, spiral- wound suction hose: Your system includes 25-feet of 1/2-inch vinyl hose with a Quick Connect fitting on one end and a 1/2-inch John Guest stem fitting on the other, both crimped on with ferrules. - Page 17 Plumbing Detail continued... From the feed pump to the Clark Pump feed water inlet, use the remaining 1/2-inch vinyl hose, with the 1/2-inch John Guest stem fitting pre-fitted with a ferrule. Insert the pre-fitted end into the feed pump (Figure 1), and the 1/2” John Guest stem fitting and hose clamp from the instal- lation kit for the Clark Pump feed water inlet (Figure 2).
- Page 18 Product Water Plumbing The 1/4”(6mm) product water tubing is pre-plumbed from the membrane into the electric diversion valve. The diversion valve will reject product water into the overboard brine stream until the Con- nect controller determines the product water is below 750 PPM salinity. Once below 750 PPM, the Connect controller opens the diversion valve and product water is diverted into the fresh water tank.
-
Page 19: Tube Fitting Assembly Procedures
John Guest Super Speedfit Fittings... -
Page 20: Electrical & Remote Display Installation
Electrical The Bimini 300 has a power inlet harness with a terminal block and cover, a boost pump power plug with a yellow band, terminal block for the tank full switch and the optional tank level sen- sor, and a short plug with a green band for the optional Z-Ion. Do not install it in hot or poorly ventilated locations. - Page 21 Electrical continued… Bimini 300 systems are pre-fitted with waterproof connectors for electrical and signal ca- bles. Each connector is different, so it is impossible to connect them incorrectly, and the con- nectors are color-coded. The system has a power inlet harness with a terminal block and cov- er, a 2-conductor boost pump cable, a 5-conductor diversion valve and Rotoflow sensor cable, a 2–conductor fresh water flush solenoid cable, a Z-Ion power and signal cable, and a 100-foot (30.5 M) cable for the Connect display.
- Page 22 Electrical continued… Connect the yellow boost pump connector from the bottom of the feed pump housing to the corresponding connector routed from the boost pump. Mount the main power terminal block in a junction box or on a bulkhead adjacent to the feed pump module.
- Page 23 Installing a Remote Display Route the cable through the vessel in the most direct route possible. Avoid kinking the wire, or sharp corners where the wire can chafe through while the vessel is under way. Turn power OFF to the system. Connect the ethernet cable to back of the display in the open jack.
-
Page 24: Tank Switch Wiring And Operation
Tank Switch Installation Factory Supplied Tank Full Switch Installing the supplied tank full float switch at the top of your water tank al- lows the Spectra Connect to fill your water tank then automatically stop, fresh water flush and return to Auto Store mode with no additional user commands. Note: The float may need to be flipped 180 to work properly. - Page 25 Tank Switch Installation Optional Tank Low Switch Installing the tank low float switch about 2/3rds down from the top of your water tank allows the Spectra Connect to run in Auto Fill mode; automatically filling your water tank, stopping itself, fresh water flushing, returning to Auto Store mode, and then turning itself on again to fill the tank when the water level drops below the Tank Low Switch with no additional user commands.
-
Page 26: Optional Tank Level Sensor Installation
Optional Tank Level Sensor Installation The optional Tank Level sensor allows even greater control of your ship’s fresh water systems. This unique level monitoring system requires no holes to be drilled into your tank while measuring tank volume with greater accuracy than a standard resistive float. Turn off the ship’s domestic water system, close the fresh water supply valve at the water tank, then bleed off the pressure by opening a tap in the galley or head sink. -
Page 27: New Systems Start Up And Testing
Commissioning New System Start-Up and Testing Use this procedure when starting a new watermaker for the first time and whenever the system contains preservative or cleaning chemicals. Avoid running the system if the vessel is in contaminated water, such as a dirty harbor or canal. The system should be fully run tested before leaving on an extended journey. - Page 28 New System Start-Up and Testing continued... 4. The system will start purging and the display will show the progress and time remaining Check the strainer and the brine discharge for water flow. The system should fully prime with- in 60-90 seconds and all air should be out of the feed water hoses. The feed pump will sound smooth.
-
Page 29: Dry Testing With An Artificial Ocean
Dry Testing with an Artificial Ocean If it is not possible to test run the system with the boat in the water, you may test the system with an artificial ocean. You will need 1.3 lbs. of non-iodized salt (rock salt, sea salt, or aquarium salt) to make a 5 gallons (33 grams of salt per liter) of water that is about 33,000 PPM salinity (average seawater salinity). -
Page 30: Sensor Calibration
Sensor Calibration Many of the settings on your system have been pre-calibrated during standard factory testing, however, there are a few settings that will vary based on the installation, vessel, and other onboard conditions. If the system has just been installed you must calibrate the Prefilter Condition before proceeding. - Page 31 Calibration continued... Flush Adjustments Adjustments for your Bimini 300 are typically calibrated from the factory to ensure that sea wa- ter is thoroughly flushed out of the watermaker using the least amount of fresh water. However, due to different lengths of hose runs, different rates of flow, and different pressures in shipboard fresh water systems, the flush duration should be optimized for your boat.
-
Page 32: Tank Level Sensor Calibration
Flush Adjustments continued... 3. Check/Adjust the flush duration Run the watermaker for 10 minutes to fill the system with seawater, confirm that the diversion valve opens and water is diverted to the tanks. Press the ‘Stop’ button. The system will automatically fresh water flush. Allow the fresh water flush to continue to completion. - Page 33 Tank Level Sensor Calibration—Cont’d 5. Measure the approximate height of the water tank in feet and inches (or in meters and cm’s). 6. Press the Feet (Meter) field to enter the tank height in feet (meters). Press the Inch (cm) field to enter the height in inches.
-
Page 34: Salinity Calibration
Salinity Calibration The Salinity probe has been calibrated at the factory during testing and is not normally required during commissioning. If the product quality is not reading accurately, follow calibration steps. 1. Press the Menu Button 2. Press the Calibrate Sensors Button 3. -
Page 35: Product Flow Calibration
Product Flow Calibration The Product Flow sensor has been calibrated at the factory during testing and isn’t normally required during commissioning. If the product flow is not reading accurately, confirm the product flow rate by following the Product Flow calibration steps. 2. -
Page 36: Networking
Networking Your Spectra Connect is equipped with state of the art networking options to allow the maxi- mum user control in a wide variety of installations. The instructions below will help you get the most out of your Spectra Connect. Note: Your Spectra Connect is only available when your device is connected to the same local network as the Spectra Connect control board. - Page 37 Connecting to the existing Network—Cont’d 6. Connect your computer, tablet or smart phone to the local network your Spectra Connect is plugged into. Wired Connection: simply plug your computer’s ethernet port directly into the router or switch where you connected the watermaker. Wireless Connection: make sure your device is connected to the same local wireless network as the Spectra Connect Ship’s Router or...
-
Page 38: Normal Operation
Normal Operation If the system has been pickled or stored with chemicals, use the New System Startup pro- cedure on page 23. Your watermaker will fresh water flush after every use. Remember that you need to run the system approximately half an hour to make enough fresh water for one flush. You may notice that the system output is higher when charging your batteries. - Page 39 Normal Operation—Cont’d 3. The system will now begin the start sequence. Pressing ‘Stop’ will bring you back to the Main Menu. 4. Once the Boost Pressure reaches the minimum threshold, the system starts operating and you will be taken directly to the Main Dashboard. Diversion Operating Current...
- Page 40 Normal Operation—Cont’d 8. When the Run Cycle completes, or by pressing ’Stop’, the system will start to Fresh Water Flush. You MUST FRESH WATER FLUSH the watermaker AFTER EACH USE, or se- rious damage can occur 8. After Fresh Water Flushing the system will enter the ‘Auto Store’ mode, and the interval timer until the next scheduled flush will show on the screen.
- Page 41 Normal Operation—Cont’d Other Operating Modes Run Low Mode You can toggle back and forth between Run High Mode and Run Low Mode by tapping the ‘High’ toggle button. Run Low Mode may be selected to reduce power consumption or to lower the feed pres- sure.
- Page 42 Normal Operation—Cont’d Auto Store Warning! Proper understanding of the Spectra flush system and the vessel’s fresh water system is mandatory for extended use of Auto Store. The flush cycles must not be allowed to drain all the fresh water from the tank or damage to the vessel’s systems and the watermaker may occur. The Auto Store function flushes the watermaker at programmed intervals.
-
Page 43: Maintenance
Maintenance General Periodically inspect the entire system for leakage and chafing. Repair any leaks as soon as you find them. Some crystal formation around the Clark Pump blocks is normal. Wipe down any salt encrusted areas with a damp cloth. Watermakers are at their best when run regularly. - Page 44 Maintenance Cont’d Leaking Fittings The system has eight high pressure fittings, two on each cylinder on the Clark Pump, two on the pressure vessel end caps, and two 90-degree elbows on the back of the Clark Pump. As the compression fitting is tightened, it compresses a ferrule onto the stainless tubing, fixing the fer- rule permanently to the tube and holding the compression nut captive.
- Page 45 Maintenance Cont’d The Feed Pump and Clark Pump The feed pump and the Clark Pump require no routine maintenance except inspection for leaks. Tighten any hose clamps or fittings that show signs of leakage. The high pressure fittings threaded into the Clark Pump have O-ring seals with a straight thread. These should never leak and should never be over-tightened.
-
Page 46: Introduction To Spectra Chemicals
Maintenance Cont’d Introduction to Spectra Chemicals We use four types of chemicals: SC-1, SC-2, SC-3, and propylene glycol antifreeze. SC-1 and propylene glycol are for system storage, while SC-2 and SC-3 are for membrane cleaning. Do not use sodium-bisulfate, citric acid, or any other storage chemical not supplied by Spectra. These chemicals, used to store other watermaker brands, will damage the Clark Pump, mem- brane end plugs, manifolds, and other components. - Page 47 Maintenance Cont’d Introduction to Spectra Chemicals—Cont’d Complete microbial protection requires a 25% solution of propylene glycol, so care must be taken that the solution remaining in the watermaker during long term storage is at least 25%, even if freeze protection is not required. For these reasons Spectra recommends that all pick- ling be carried out with a 60% or greater concentration.
-
Page 48: Storage Procedures
Storage Procedure 1. Close the intake seacock. 2. Push the Fresh Water Flush button to fresh water flush the system. Perform a second fresh water flush in the same way. 3. Remove the quick disconnect fitting from the brine discharge outlet of the Clark Pump, per photo below, and replace it with the quick disconnect brine discharge service hose. -
Page 49: Winterizing With Propylene Glycol
Winterizing with Propylene Glycol See description of propylene glycol formulations, and purging from system, on pages 52-53. 1. Close the intake seacock. 2. Push the Fresh Water Flush button to fresh water flush the system. Perform a second fresh water flush in the same way. 3. -
Page 50: Membrane Cleaning Procedure
Membrane Cleaning Procedure Spectra cleaning compound (SC-2 or SC-3) must be mixed with fresh water at a ratio of 1 container of compound to 3 gallons (12L) of unchlorinated water. A Bimini 300 system requires one container of com- pound per cleaning. 1. -
Page 51: Suggested Spares
Suggested Spares for the Bimini 300 Short term cruising, weekends etc. A basic cruise kit A. This kit consists of six 5 micron filters and two packs of SC-1 storage chemical. Cruising 2 to 6 months at a time. Two basic cruise kits, one replacement charcoal filter, and one replacement feed pump head. -
Page 52: Troubleshooting
Troubleshooting Bimini Systems REMEDY PROBABLE CAUSE SYMPTOMS • • Feed pump runs constant- Turn off manual switch on feed Manual switch in on or ly, will not turn off pump module service position • • Feed pump runs with loud Intake blocked Check thru-hull valve •... -
Page 53: Alarm Override And Manual Operation
Bimini 300 Fault Alarms SYMPTOMS PROBABLE CAUSE REMEDY • • Pressure relief valve open Close pressure relief valve “System Stalled” • • Intake thru-hull closed Check thru-hull (“system stalled” may alarm • • Airlocked system Purge air when using the control pan- •... - Page 54 Alarm Override and Manual Operation In the event of a sensor failure resulting in a shut down due to a false alarm, the failed sensor can be overridden (page 60 Spectra Connect Settings). High Pressure, Service Prefilter, System Stalled (airlock), and Salinity Probe Failed can all be overridden and the system will still run automatically with all other functions intact.
-
Page 55: Bimini Flow Test
Bimini 300 Flow Test The flow test is the most useful diagnostic test for system performance, and should be done before replacing or cleaning your membrane. Changes in production or water quality are normally caused by something other than the membrane, unless the system has been left unused for a long time. Before the flow test, change all filters and clean the sea strainer. - Page 56 1. Product Flow: Product flow is expressed in Gallons Per Hour (GPH) or Liters Per Hour (LPH), by this equation: 3600 ÷ time in seconds x quantity of water in gallons or liters=GPH or LPH There are 3600 seconds in an hour. Example: It took 3 minutes and 35 seconds to collect 1 gallon of product water.
-
Page 57: Poor Water Quality
Poor Product Water Quality With any product water quality issue, you must ensure accurate calibration if you are using a salinity meter. For general quality evaluation, your taste is always good enough. Membranes are not an exact science and two identical systems can have different product quality. -
Page 58: Technical Bulletins
Technical Bulletins The following pages include Spectra’s most commonly-used technical bulletins, covering tests, adjustments, troubleshooting, and common points of confusion. Many more technical bulle- tins are available on the Spectra website, www.spectrawatermakers.com. ACCUMULATOR PRESSURE Your Bimini 300 is supplied with a pressure accumulator tank (PL-ACC-TK) installed in the feed water line between the feed pump and the Clark Pump. - Page 59 PREFILTERS During normal operation, the feed water is filtered in two stages. First it passes through a fine mesh metal sea strainer, which protects the boost pump from foreign materials and sea crea- tures. After passing through the boost pump, the feed water passes the filter housings con- taining the 5 micron element, removing very fine particles that could damage the feed pump or Clark Pump and shorten membrane life.
- Page 60 CHARCOAL FILTERS The charcoal filter element (FT-FTC-CC) removes chlorine from the fresh water flush water supply, as the RO membrane can only handle small amounts of chlorine without permanent damage. The charcoal filter used for the fresh water flush system will not plug up unless you have very dirty domestic water in your boat’s supply tank.
-
Page 61: Introduction
Spectra Connect Settings Your new Spectra Connect is designed to make your watermaker easier than ever to operate, maintain and enjoy. This section will guide you through some of the more advanced settings options available. Always use caution when changing any factory default settings, as serious damage can oc- cur. -
Page 62: User Settings & Fault Alarms
Spectra Connect Settings, Cont’d User Settings LCD Brightness: Set brightness of the hardwired display(s) from 10—100% System Units: Change from US Standard units to Metric Factory Reset: Resets any changed parameters a user has made back to the factory defaults for that configuration. Fault Alarms CAUTION!! Never disable a Fault Alarm without being certain that the issue is with a bad sen- sor. - Page 63 Settings Dealer Access Settings It is highly recommended that users consult with a factory trained technician before altering any settings behind the ‘Dealer Access Point’. Changing this settings without understanding the full effect of each change can void the warranty of your system, and cause irreparable damage. If any settings are inadvertently changed, they can be reverted back to the defaults by using the ‘Factory Reset’...
-
Page 64: Dealer Access Settings
Settings Dealer Access Settings It is highly recommended that users consult with a factory trained technician before altering any settings behind the ‘Dealer Access Point’. Changing this settings without understanding the full effect of each change can void the warranty of your system, and cause irreparable damage. If any settings are inadvertently changed, they can be reverted back to the defaults by using the ‘Factory Reset’... - Page 65 Settings Dealer Access Settings It is highly recommended that users consult with a factory trained technician before altering any settings behind the ‘Dealer Access Point’. Changing this settings without understanding the full effect of each change can void the warranty of your system, and cause irreparable damage. If any settings are inadvertently changed, they can be reverted back to the defaults by using the ‘Factory Reset’...
- Page 66 Fault Handling Faults are hazardous conditions that might occur during running of your watermaker. The control board has the ability to monitor these faults in real time and take necessary actions to prevent damaging your equipment. HIGH PRESSURE FAULT High pressure fault is triggered if Outlet pressure (Feed/Membrane pressure) >...
-
Page 67: Wiring Schematic
Wiring Schematic... -
Page 68: Electrical Specifications
Electrical Specifications Operating voltage limits: 10—32vdc Outputs: 5VDC:– 2000mA Total for all outputs. VLV 1&2: 1 Amp DC priming valve solenoid. AUX 1-3: 1 Amp DC auxiliary output. Never connected anything to the Spectra Connect without factory approval. Serious dam- age can occur! -
Page 69: Exploded Views And Part Numbers
Exploded Views and Part Numbers High Pressure Module PL-MTS-3/8x3/8J PL-TB-HPTPVUL 3/8NPT x 3/8” Tube John Guest Straight Pump to Pressure Vessel PL-HP-1/8 Fitting Upper SS Tube Long 1/8NPT Nylon Hex Plug FT-PV-40 40” High Pressure Vessel PL-MTS-3/8X1/2B 3/8"NPTX1/2"Tube Fitt. St. SO-HPP-CT PL-TEE-1/2TJG PL-TB-HPTPVLL... - Page 70 Part Numbers FT-FHB-3PCSHSS MOLDED FILTER PL-NP-1/2X3/8N BRACKET 1/2"NPT X 3/8"NPT CLOSE NIPPLE NYL PL-HBE-3/4X3/4 3/4” NPT X 3/4” HOSE PL-SWF-1/2X1/2 BARB ELL NYLON 1/2"NPT X 1/2” TUBE SWIVEL ELBOW FT-FTH-10L3PCS 3 PIECE 10” FILTER HOUSING PL-NLT-1/2LP 1/2" LOW PRESSURE TUBE HD-OTH-1/4TS1D 1/4"-20 x 9/16”...
- Page 71 EL-MTR-1/5BLM24 1/5HP BRUSHLESS MO- TOR 24V FM-CT-BDCMAD CATALINA BDC MOTOR BASE PLATE EL-MTR-1/5BLC24 FM-CT-BDCMTBP 1/5HP BRUSHLESS MO- CATALINA BDC MOTOR ADAPTER TOR CONTROLLER 24V PL-PMP-140MAG MAG DRIVE PUMP EL-SWT-DPDT20IP 20A ROTARY SWITCH EL-PS-24V480WDC DP/DT IG PROTECTION DC-DC STEP UP 12V/24V 480W WEATHER GUARD FM-MPC-MPCB MPC BOX...
- Page 72 Part Numbers EL-SSR-ABS ABSOLUTE PRESSUR SENSOR EL-SSR-150 150 PSI PRESSURE SENSOR PL-UNN-3/8x1/4N 3/8”FPT x 1/4” FPT COUPLING NYLON PL-TEE-1/2TJG 1/2” TUBE TEE JG KIT-SC-RMPNLD Display Only PL-STA-12TX38NJ 1/2” TUBE STEM x 3/8” NPT ADAPTER Hoses and Tubes Inlet/Flush Hose Assembly (SUB-CT-Z-HPIBHA): Brass ferrules for 1/2-inch hose (PL-HF-.75lDX1BR) PL-HS-1/2VN...
- Page 73 Part Numbers Boost Pump Module SUB-CT-Z-BPM PL-BHF-3/8TPIEJ 3/8” STEM ELBOW JG PL-BHF-3/8TSTJG EL-FP-BPLDC824 3/8” BULKHEAD FITTING JG 300-1000 BOOSTER PUMP DC 8-24 Volts PL-HBS-3/4X3/4 3/4” HOSE BARB NYL PL-CKV-1M3/4FWS 3/4” CHECK VALVE PL-FHB-1/2X3/4E 1/2"FPT X 3/4"Hose Barb Elbow NYLON SO-STN-6SS SEA STRAINER GASKET FT-STN-6 6”...
- Page 74 Diversion Valve Manifold Assembly PL-MNF-DVMBK1P DIVERSION VALVE MANIFOLD PL-MTE-1/4x1/4J 1/4”x1/4” TUBE FITT. ELBOW EL-SSR-IFM INLINE FLOW METER (0.5-5 L/M) PL-SLN-1/4D12M PL-UNN-3/81/4N DIVERSION VALVE SOLENOID REDUCING COUPING EL-MPC-SP4 SALINITY PROBE PL-CKV-1/4M-F PL-MTE-1/4x3/8J 1/4" PLASTIC CK VALVE (M-F) 1/4”x3/8” TUBE FITT. ELBOW Brine Discharge Quick Connect PL-QDC-BD3/8 3/8”NPT Quick Disc.
- Page 75 HP-TB-VEB-B HP-TB-VB HP-TB-VEB-A HP-CYL-CCA HP-TB-BV HP-CB-CB10 HP-CYL-SST HP-CYL-R HP-CYL-EC Not used...
- Page 76 HD-CPS-5/16X3 SO-HPP-RV HP-TB-ARP KIT-HP-10VSA HP-TB-BV SO-HPP-AR1 HD-CPS-5/162.75 SO-HPP-SP HP-TB-VSP HP-TB-SR SO-HPP-VB SO-HPP-VP SO-HPP-PLP...
- Page 77 Parts SO-HPP-PR10...
- Page 78 Parts Parts HP-CYL-SST HP-CYL-PT PL-MTS-3/8X1/2B HP-CYL-CCA SO-HPP-ECCB HP-CYL-EC HP-CYL-R...
-
Page 80: Warranty, Product Registration , Installation & Commissioning Reports
You must examine the Product upon receipt and notify Katadyn Desalination LLC. if any item is damaged or missing within 30 days from the date of the delivery. Damage due to freight must be reported to Katadyn De- salination LLC. and to the freight carrier within 24 hours of delivery. - Page 81 SOLE WARRANTY THE PRODUCTS AND ARE IN LIEU OF AND EXCLUDE ALL OTHER WARRANTIES, EXPRESS OR IMPLIED, ARISING BY OPERATION OF LAW OR PRODUCTS ARE SPE- CIFICALLY DESIGNED AND/OR MANUFACTURED BYMANUFACTURER FOR YOUR USE OR PUR- POSE. WHAT WE WILL DO TO CORRECT PROBLEMS If You return the defective product during the warranty period and in accordance with the instructions contained herein, shipping prepaid, the Manufacturer shall, at its option and as Your exclusive reme- dy, repair, correct or replace the product at no charge if the product is found by the Manufacturer to...
- Page 82 Spectra Watermakers Technical Support will email the original owner and the authorized distributor with the status of submission. Email: TechSupport@SpectraWatermakers.com Phone: +1(415) 526-2780 Address: Katadyn Desalination Technical Department 2220 S. McDowell Blvd Ext Petaluma, CA 94954 Please keep a copy of these reports for your records.
- Page 84 Spectra Watermakers Installation Report (To be completed by authorized installer) The following checklist is designed to confirm that the watermaker installation meets Spectra standards. Fill out the checklist as completely as possible. Check any boxes that apply and note any concerns. Please document any discrepancies or concerns with photos. INLET □...
- Page 86 Spectra Watermakers Commissioning Report – Page 1 (To be completed by authorized installer) The following checklist is designed to confirm that the watermaker installation meets Spectra standards and that the system is performing at specification. Fill out the below checks as completely as possible. Check any boxes that apply and note any concerns. PURGE □...
- Page 87 Spectra Watermakers Commissioning Report – Page 2 OWNER EDUCATION Owner has been trained on the following: Know locations of □ Seacock/Thru-hull □ Sea strainer module □ Prefilter (and/or) Feed Pump Module □ Freshwater Flush Module □ High Pressure Module □ Clark Pump Pressure Relief valve □...
Need help?
Do you have a question about the Spectra Bimini 300 and is the answer not in the manual?
Questions and answers