Advertisement
- 1 IMPORTANT SAFEGUARDS
- 2 ADDITIONAL IMPORTANT SAFEGUARDS
- 3 INTRODUCTION
-
4
PARTS & ASSEMBLY
- 4.1 PARTS
- 4.2 CONTROL PANEL
- 4.3 After Plugging In
- 4.4 START/STOP
- 4.5 MENU
-
4.6
COOKING PROGRAMS
- 4.6.1 Program 1: Basic
- 4.6.2 Program 2: French
- 4.6.3 Program 3: Whole Wheat
- 4.6.4 Program 4: Quick
- 4.6.5 Baking program 5: Sweet
- 4.6.6 Program 6: Gluten-free
- 4.6.7 Program 7: Rapid Bake
- 4.6.8 Program 8: Dough
- 4.6.9 Program 9: Jam
- 4.6.10 Program 10: Cake
- 4.6.11 Program 11: Sandwich
- 4.6.12 Program 12: Bake
- 4.7 COLOR
- 4.8 LOAF SIZE
- 4.9 DELAY ("TIMEˆ or TIMEˇ")
- 4.10 KEEP WARM
- 4.11 AUTOMATIC DISPENSER FUNCTION
- 4.12 MEMORY
- 5 HOW TO OPERATE
- 6 HELPFUL TIPS
- 7 CLEANING & MAINTENANCE
- 8 Documents / Resources
IMPORTANT SAFEGUARDS

A person who has not read and understood all operating and safety instructions is not qualified to operate this appliance. All users of this appliance must read and understand this Instruction Manual before operating or cleaning this appliance.
When using electrical appliances, basic safety precautions should always be followed, including:
- Read all instructions before operating this appliance.
- DO NOT TOUCH the hot surfaces. Use handles or knobs.
- This appliance is NOT A TOY.
- Unsupervised young children and cognitively challenged individuals should never operate this appliance.
- Close supervision is necessary when any appliance is used by or near children.
- To protect against electrical shock do not immerse cord, plug or any part of this unit in water or other liquids.
- Unplug from outlet when not in use, before removing parts and before cleaning. Allow to cool before putting on or taking off any parts, and before cleaning.
- DO NOT operate any appliance with a damaged cord or plug, or after the appliance malfunctions, or if the appliance has been damaged in any manner. Return the appliance to the nearest repair shop for examination, repair or adjustment.
- The manufacturer does not recommend the use of accessory attachments other than what is provided by the manufacturer. Use of attachments may cause injuries.
- DO NOT use the appliance for other than its intended use.
- DO NOT use outdoors. FOR HOUSEHOLD USE ONLY.
- DO NOT place on or near a hot gas or electric burner, or in a heated oven.
- DO NOT let cord hang over edge of table or counter, or touch hot surfaces.
- NEVER leave unit unattended while in use or when plugged into an outlet.
- Extreme caution must be used when moving an appliance containing hot food.
- Always attach plug to appliance first, then plug cord in the wall outlet. To disconnect, turn any control to "off," then remove plug from wall outlet.
ADDITIONAL IMPORTANT SAFEGUARDS
Operating Safety Precautions
- DO NOT touch hot surfaces. Use handles or knobs.
- Do not touch any moving or spinning parts of the machine when baking.
- Never turn on the appliance without properly attaching the Bread Pan.
- Never hit the Bread Pan on the top or side to remove the loaf, as this may damage the Bread Pan.
- The Kneading Blade is a potential choking hazard. Make sure to remove the Kneading Blade from the bread loaf prior to slicing.
- Do not put any objects other than intended ingredients into the machine.
- Never cover the appliance with a towel or any other material, as heat and steam must be able to escape freely. A fire can be caused if machine is covered by, or comes into contact with, combustible material.
- Always stop any running program to turn machine off, then remove plug from wall outlet.
- Do not operate the appliance for other than its intended use.
- Do not use outdoors.
Instructions for the Electrical Cord and Plug
- This appliance has a polarized plug (one blade is wider than the other). To reduce the risk of electrical shock, this plug is intended to fit into a polarized outlet only one way. If the plug does not fit fully into the outlet, reverse the plug. If it still does not fit, contact a qualified electrician. Do not attempt to modify the plug in any way.
- A short power supply cord is provided to reduce the risk resulting from becoming entangled or tripping over a long cord.
- If a long detachable power-supply cord or extension cord is used:
- Extension cords can be used if care is exercised in their use.
- The marked electrical rating of the cord or extension cord should be at least as great as the electrical rating of the appliance.
- When using a longer cord or extension cord, make sure that the cord does not drape over a countertop or tabletop where it can be pulled on or tripped over unintentionally.
- The manufacturer does not recommend using this machine in countries that do not support 120V AC even if a voltage adapter, transformer, or converter is in use.
SAVE THESE INSTRUCTIONS!
INTRODUCTION
Thank you for purchasing the ELECTRIC BREAD MAKER from Nostalgia Electrics™. With the ELECTRIC BREAD MAKER you create a variety of freshly baked breads, cakes and even jams! Mixing dough for baking pizza or rolls is also easy with this multi-function machine. The variety of uses for the ELECTRIC BREAD MAKER makes it a must-have item for every modern household.
- Bread Maker With LCD Display
- Gluten Free Menu Options
- Auto Fruit And Nut Dispenser
- 12 Digital Programs
- 13-Hour Programmable Delay Timer
- Loaf Sizes: 1.5 lbs. & 2 lbs.
- 60 Minutes "Keep Warm" Function
- Dishwasher-Safe: Non-Stick Bread Pan & Kneading Blade
- Accessories: Measuring Cup, Measuring Spoon, Hook Fork
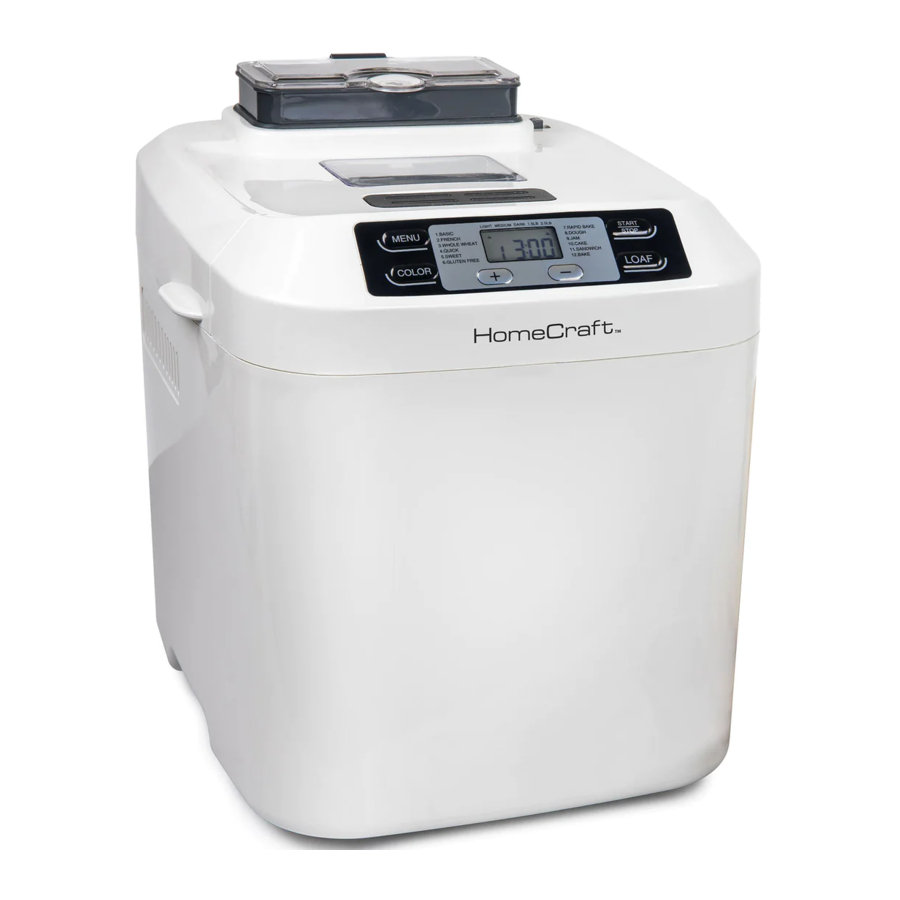
PARTS & ASSEMBLY
PARTS

CONTROL PANEL

After Plugging In
As soon as the bread maker is plugged into the outlet, a beep will be heard and "13:00" will be displayed. Program 1 is the default program and "2.0 LB" and "MEDIUM" are the default settings.
START/STOP
The START/STOP button is used for starting and stopping the selected baking program.
To start a program, press the START/STOP button once. A short beep will be heard, the indicator light will turn on, the colon in the digital display will begin to flash and the program will start. All buttons except the START/STOP button will deactivate after a program has begun.
To stop the program, press the START/STOP button for approx. 3 seconds, then a beep will be heard, indicating that the program has been switched off. This feature will help to prevent any unintentional disruption to the operation of a program.
MENU
The MENU button is used to set different programs. Each time it is pressed you will hear a short beep and the program will change. Press the button continuously and you will see the 12 cooking programs cycle through on the digital display. Select your desired program.
COOKING PROGRAMS
Program 1: Basic
Kneading, rising and baking normal bread. You may also add ingredients to increase flavor.
Program 2: French
Kneading, rising and baking with a longer rise time. The bread baked in this menu wlil have a crispier crust and lighter texture.
Program 3: Whole Wheat
For breads with heavy varieties of flour that require a longer phase of kneading and rising (for example, whole wheat flour and rye flour). The bread will be more dense.
Program 4: Quick
This setting is similar to Program 1: Basic, but takes less time. The bread baked on this setting is usually smaller, with a dense texture.
Baking program 5: Sweet
For breads with ingredients such as fruit juices, grated coconut, raisins, dried fruit, chocolate or sugar. Due to a longer phase of rising, the bread will be light and airy. You may add ingredients to alter the flavor.
Program 6: Gluten-free
Kneading, rising and baking gluten-free bread. You may also add ingredients to add flavor.
Program 7: Rapid Bake
Kneading adding, rising and baking in the shortest amount of time. Usually the bread is made smaller and rougher than that made using the QUICK program.
Program 8: Dough
Has kneading and rising cycles, but no baking cycle. Remove the dough and use for making bread rolls, pizza, etc.
Program 9: Jam
For boiling jams and marmalades. Fruits and vegetables must be chopped before putting them into the bread pan.
Program 10: Cake
Has kneading, rising and baking cycles for recipes that use baking soda or baking powder instead of yeast.
Program 11: Sandwich
For baking lightly textured bread with a thinner crust.
Program 12: Bake
For additional baking of breads that are too light or not baked through. In this program there is no kneading or rising.
COLOR

With the button you can select light, medium or dark color for the crust. This button is not applicable for the following program: DOUGH or JAM.
LOAF SIZE

Select the weight (1.5lb, 2.0lb). Press the LOAF SIZE button to choose the desired weight.
This button is not applicable for the following program: QUICK, DOUGH, JAM, CAKE or BAKE.
DELAY ("TIMEˆ or TIMEˇ")
If you do not want the program to start immediately, you can use the TIME buttons to set and delay the start time.
You can program how long you want the program to take by pressing the "TIMEˆ or TIMEˇ" button. Please note that the delay time should include the baking time of program. At first the program and degree of browning must be selected, then press "TIMEˆ or TIMEˇ" to increase or decrease the delay time in 10 minute increments. The maximum delay is 13 hours.
Example: It is 8:30 p.m and you would like your bread to be ready at 7 o'clock the next morning (in 10 hours and 30 minutes). Select MENU, COLOR, LOAF SIZE, then press the "TIMEˆ or TIMEˇ" to add the time until 10:30 appears on the Digital Display. Then press the START/STOP button to activate the delay program and the indicator will light up. The Digital Display will count down to show the remaining time. The bread will be fresh and ready at 7:00 a.m.. If you don't want to take out the bread immediately, it will stay warm inside the machine for one hour.
NOTE: For time delayed baking, do not use any easily perishable ingredients such as eggs, fresh milk, fruits, onions, etc.
KEEP WARM
Bread will be automatically kept warm for 60 minutes after baking. If you would like to take the bread out at any time after the program ends, switch the program off with the START/STOP button.
AUTOMATIC DISPENSER FUNCTION

Put the fruit or nut into ingredient pan before you start the program. When making bread, the program will put the ingredients in the bread bucket automatically.
MEMORY
If the power supply is interrupted during the course of the bread making, the bread making process will be continued automatically within 10 minutes, even without pressing the START/STOP button. If the break
time exceeds 10 minutes, the memory will not save and the bread maker must be restarted. If the dough is no further than the kneading phase when the power supply breaks off, press the START/STOP button to restart the program from the beginning.
HOW TO OPERATE
Before first use
- Unpack ELECTRIC BREAD MAKER and check to make sure that all parts and accessories are included and undamaged.
- Clean all the parts according to the CLEANING AND MAINTENANCE section.
- Set the bread maker on BAKE mode and bake empty for about 10 minutes. Then let it cool down and clean all the detached parts again.
- Dry all parts thoroughly and assemble them. The appliance is now ready for use.
How to make bread
- Place the Bread Pan inside the Main Unit, and then turn it clockwise until it clicks into the correct position. Fix the Kneading Blade onto the drive shaft. It is recommended to fill the hole with margarine prior to putting the Kneading Blade on in order to avoid the dough sticking to the Kneading Blade. This will also make the Kneading Blade easier to remove for cleaning.
- Place ingredients into the Bread Pan. Add water or liquid ingredients first, then add sugar, salt and flour. NOTE: Always add yeast or baking powder as the last ingredient.

- Make a small indentation on the top of flour with your finger, add yeast into the indentation, making sure it does not come into contact with the liquid or salt.
- Close the Lid gently and plug the power cord into a wall outlet.
- Press the MENU button until your desired program is selected.
- Press the COLOR button to select the desired crust color.
- Press the LOAF SIZE button to select the desired size.
- Set the delay time by pressing the "TIMEˆ or TIMEˇ" button. This step may be skipped if you want the bread maker to start working immediately.
- Press the START/STOP button once to start the baking cycle, and the indicator will light up.
- Beeps will be heard during the Basic, French, Whole Wheat, Quick, Sweet, Rapid Bake and Sandwich programs, 10 beep sounds will be heard during operation. This is to prompt you to add ingredients. Open the Lid and add ingredients according to the recipe. It is possible that steam will escape through the vent in the lid during baking. This is normal.
- Once the program has completed, 10 beeps will be heard. Press the START/STOP button for approx. 3 seconds and take out the bread. Open the Lid and while using oven mitts or potholders. Turn the Bread Pan in counter-clockwise and take out the Bread Pan.

The Bread Pan and bread may be very hot! Always handle with care.
- Let the Bread Pan cool down before removing the bread. Then use a nonstick spatula to gently loosen the sides of the bread from the pan.
- Turn Bread Pan upside down onto a wire cooling rack or clean cooking surface and gently shake until bread falls out.
- Let the bread cool for about 20 minutes before slicing. It is recommended to slice bread with electric cutter or serrated knife. Do not use a butter knife, paring knife or other kitchen knife, as bread will not slice as evenly.
- If you do not press the START/STOP button at the end of the program, the bread will automatically be kept warm for 1 hour. At the end of the hour-long warming cycle, one beep will be heard.
- Make sure that Main Unit is unplugged when program is complete or when not in use.
NOTE: Before slicing the loaf, remove the Kneading Blade from inside the bottom of the loaf. Wait until loaf has fully cooled. If bread is hot, do not use your hand to remove the Kneading Blade.
HELPFUL TIPS
SMOKING
The appliance may emit a little smoke and a characteristic smell when you turn it on for the first time. This is normal and will soon stop. Make sure the appliance has sufficient ventilation.
BREAD SIZE
If the loaf of bread is too large or begins to overflow during cooking, you may have added too much yeast, flour or water. High temperature can also cause dough to rise too quickly. Make sure that you measure ingredients properly, following directions in RECIPES section.
If the loaf of bread is too small after baking, you may not have added enough yeast or the yeast may not be active enough. Make sure that you test the yeast before adding. Do not use expired yeast.
CRUST
If the crust is too thick, you may not have taken the bread out soon enough. If you leave the bread in the machine for too long after cooking, it will lose water and become too dense, causing the crust to harden.
If crust is too dark, it may be a result of sugar in the recipe. If you are making sweet bread with sugar in the recipe, press the START/STOP button 5-10 minutes prior to the recommended finish time. Keep the bread in the machine for 20 minutes after pressing the button, then remove immediately.
HOLLOW OR DENSE BREAD
If the bread is hollow after slicing, you may have added too much water, yeast or salt. Reduce the amount of water, yeast or salt in your recipe and make sure that water temperature is not too high when added to the dough.
If bread is too dense, you may have added too much flour or not enough water. Some recipes that call for fruit or use whole wheat flour also have a tendency to create dense breads. Reduce the amount of flour in your recipe or add a bit more water. For recipes that call for wheat flour, you may want to slightly increase the amount of yeast added to the dough.
STIRRING
If you hear the motor whirring, but the dough is not being stirred, make sure that the Bread Pan is properly inserted. Also make sure that you have set the program menu properly for the type of bread that you are making. If dough is too thick, it also may not stir properly.
"HHH" or "LLL" or "EE0" IN MENU DISPLAY
If the Digital Menu Display reads "HHH" it means that the temperature in the bread maker is too high for the machine to operate. Make sure that you allow the machine to cool down between baking loaves. Press the START/STOP button, unplug bread maker, open the cover and take Bread Pan out until the machine has cooled completely.
If the Digital Menu Display reads "LLL" after pressing the START/STOP button (except on the BAKE program), the temperature is too low. Press the START/STOP button, open the lid, and let the machine rest fro 10 to 20 minutes to return to room temperature.
If the Digital Menu Display reads "EE0" after pressing the START/STOP button, the temperature sensor is disconnected. Please have the sensor checked by an authorized expert.
STORING BREAD
Store bread in a sealed plastic bag or container. Bread can be stored for about three days at room temperature. If you need to store bread for longer than three days, place it in the refrigerator. Refrigerated bread can keep for at most ten days in a sealed bag or container. Homemade bread does not contain preservatives, so it does not keep as long as store bought bread.
CLEANING & MAINTENANCE
Disconnect the machine from the power outlet and let it cool down before cleaning.
- Bread Pan: remove the Bread Pan by turning it in counter-clockwise, then lift by pulling the handle. Wipe inside and outside of Bread Pan with a damp, non-abrasive cloth or sponge. The pan must be dried completely before reinstalling.
- Kneading Blade: Make sure that the Kneading Blade is removed from the bread prior to slicing. Wipe the Kneading Blade carefully with a non-abrasive, damp cloth or sponge. Both the Bread Pan and Kneading Blade are dishwasher safe.
- Main Unit: Gently wipe the outside of Main Unit with a damp, non-abrasive cloth or sponge. Do not use any abrasive cleaners on the machine. Never immerse the ELECTRIC BREAD MAKER in water.
NOTE: It is not recommended that you remove the Lid for cleaning.
- Make sure that ELECTRIC BREAD MAKER is completely cooled, clean and dry with a closed Lid before storing.

Documents / ResourcesDownload manual
Here you can download full pdf version of manual, it may contain additional safety instructions, warranty information, FCC rules, etc.
Download Nostalgia HomeCraft HCPBMAD2WH - 2 Lb. Maker W/Fruit & Dispenser Manual
Advertisement


Need help?
Do you have a question about the HomeCraft HCPBMAD2WH and is the answer not in the manual?
Questions and answers