
Summary of Contents for Netstor NA255A-G4
- Page 1 NA255A-G4 External PCIe 4.0 to GPU Desktop Chassis User Manual First edition, Feb. 2023...
-
Page 2: Table Of Contents
1. Unpack the NA255A-G4 2. Expansion Chassis Description 2.1 Panel Layout 2.2 NP952AG4 Backplane Layout 2.3 Switches Function on NP952AG4 Backplane 2.4 LED Status on NP970AG4-H Host card and NP970AG4-T Target card 3. Install Graphics/Third-party PCIe Cards in NA255A-G4 3.1 Procedure for Card Installation 3.2 Cooling Fan Speed Adjustment... -
Page 3: Unpack The Na255A-G4
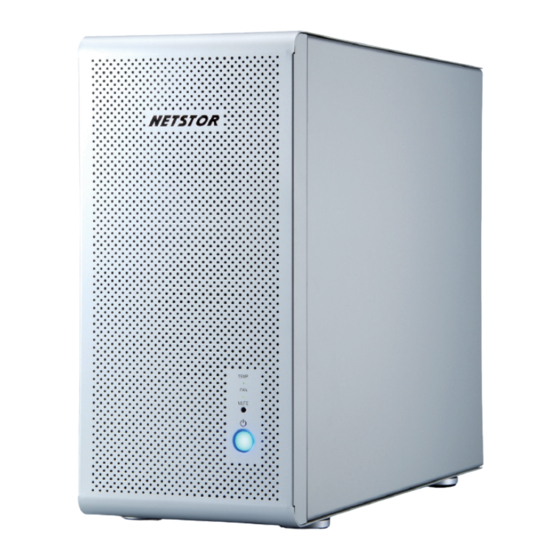
1. Power on/off LED button 。Blue - power on Side Note: when set at mode of powering on/off NA255A-G4 manually, to power on/off Netstor unit, press and hold the power LED button for over two seconds until the LED button shows blue light or goes off. - Page 4 7. Four SFF-8644 connectors for host connection 。Make straight cable connection between NP970AG4-T target card in NA255A-G4 and NP970AG4-H host card in server. Do NOT make crossed cable connection. 8. Thumbscrews to loosen/ tighten the side door 6. PCIe slots 5.
-
Page 5: Np952Ag4 Backplane Layout
2.2 NP952AG4 Backplane Layout 1. Slot 1 (Upstream) PCIe ×16 connector (×16 signal) target card already installed in this slot 2. Slot 5 (Downstream) PCIe ×16 connector (×16 signal) 3. Slot 4 (Downstream) PCIe ×16 connector (×16 signal) 4. Slot 3 (Downstream) PCIe ×16 connector (×16 signal) 5. -
Page 6: Switches Function On Np952Ag4 Backplane
2.3 Switches Function on NP952AG4 Backplane Go to Chapter 4. 。To set NA255A-G4 as power on/off by host computer, turn SW1 switch to right position labeled Power on/off by Host. (default) 。To set NA255A-G4 as power on/off manually, turn SW1 switch to left position labeled Power on/off by Manual. -
Page 7: Led Status On Np970Ag4-H Host Card And Np970Ag4-T Target Card
2.4 LED Status on NP970AG4-H Host card and NP970AG4-T Target card 。LED 1: Turns on when Retimer EEPROM load is complete. 。LED 2: Retimer heartbeat, flashes at 4 Hz (0.25 second for one flash) once firmware is successfully loaded. 。LED 3: PCIe link status: PCIe 4.0: 4 Hz (0.25 second for one flash) PCIe 3.0: 2 Hz (0.5 second for one flash) PCIe 2.0: 1 Hz (1 second for one flash) -
Page 8: Install Graphics/Third-Party Pcie Cards In Na255A-G4
Two conditions A and B for connection are listed below: If computer’s PCIe slot to be linked with NA255A-G4 is PCIe 4.0 ×16 or PCIe 4.0 x8, you don’t need to make any change to the switch setting on NA255A-G4 backplane because NA255A-G4 is already set to work with computer’s PCIe 4.0 x16/x8 slot by default. - Page 9 3. Remove the L shape metal bracket at rear of NA255A-G4 through loosening the screw on metal bracket by screwdriver. 4. Install one graphics/third-party PCIe card into a PCIe ×16 slot within NA255A-G4 chassis and fasten the card with screw by screwdriver.
- Page 10 NOTICE When long length and heavy weight graphics card is to be installed in NA255A-G4, it’s strongly recommended the graphics card holder is utilized/installed to add stability to heavy weight GPU card within the chassis. The steps for card holder installation are given as follows: (A) Hold the supplied graphics card holder.
- Page 11 7. Connect one end of SFF-8644 to SFF-8644 data cable to connector 1 at Netstor NP970AG4-T target card at rear of NA255A-G4. 8. Connect the other end of SFF-8644 to SFF-8644 data cable to connector 1 at Netstor NP970AG4-H host card at server/host computer.
- Page 12 10. Connect one end of power cord to NA255A-G4’s power receptacle and the other end of power cord to grounded outlet or power strip. Go Top ↑...
-
Page 13: Cooling Fan Speed Adjustment
3.2 Cooling Fan Speed Adjustment 1. There are two hot-swappable 12×12 cm cooling fans for ventilation inside NA255A-G4. The cooling fans can be drawn out by pulling the L type metal handle on the fan modules. 2. The front 12×12 cm cooling fan speed can be adjusted. Pull out the fan module; there will be three sets of pins marked with 8V, 10V, and 12V from top to bottom on the fan connector board. -
Page 14: Powering On/Off Na255A-G4
4. Powering On/Off NA255A-G4 When NA255A-G4 is set as powering on/off by host (this is the default setting), the NA255A-G4 unit will be automatically powered on and off with the host server. Provided that NA255A-G4 is set as powering on/off manually, the standard powering on/off (go to Section 2.3,... -
Page 15: Verification
2. Open ACPI x64-based PC >> Microsoft ACPI-Compliant System >> PCI Express Root Complex. Then open PCI Express Root Port >> PCI standard PCI-to-PCI bridge. The graphics/third-party PCIe cards installed within NA255A-G4 will appear under the PCI standard PCI-to-PCI bridge. - Page 16 4. No software or driver is required for the NA255A-G4 itself. As a graphics/third-party PCIe card is installed in NA255A-G4, the request for the driver of the graphics/third-party PCIe card will be prompted at Windows operating system. Please follow the driver installation instructions given by the manufacturer of the graphics/third-party PCIe card to complete the driver installation.
-
Page 17: Macos / Tower Mac Pro
2. As pane of Utilities pops up, double click on the icon of System Information. 3. When at pane of System Information, click PCI in the left column, and it will show the graphics/third-party PCIe cards that are currently installed within the NA255A-G4 chassis. Go Top ↑... - Page 18 4. After graphics/third-party PCIe cards’ drivers are installed at macOS, the graphics/third-party PCIe cards within NA255A-G4 will be ready to work with tower Mac Pro. If you have any questions, please contact your regional distributor, or Netstor Technology, Taiwan. Netstor Technology Co. Ltd.
Need help?
Do you have a question about the NA255A-G4 and is the answer not in the manual?
Questions and answers