Table of Contents
Advertisement
Available languages
Available languages
Advertisement
Chapters
Table of Contents

Summary of Contents for fanttik X8 APEX
- Page 1 材质:105g铜版纸 尺寸:129 x80 mm 印刷:单黑 装订:骑马钉 注:封面背面不印刷...
- Page 2 X8 APEX AIR INFLATOR User Manual Model: X8 APEX...
- Page 4 Contents 1.English 01~22 2.Español 23~47 WARRANTY CARD...
-
Page 5: Table Of Contents
Thank you for choosing Fanttik. Thank you for purchasing the Fanttik X8 APEX air inflator. With its large LED screen and easy-to-use interface, this is a highly capable inflator fit for a wide range of tasks. Contents 1. PRODUCT OVERVIEW 2. - Page 6 10. INFLATING 11. DISCO NNECTING THE AIR TUBE 12. POWER BANK FUNCTION 13. TROUBLESHOOTING 14. SPECIFICATIONS 15. SAFETY INSTRUCTIONS - 02 -...
-
Page 7: Product Overview
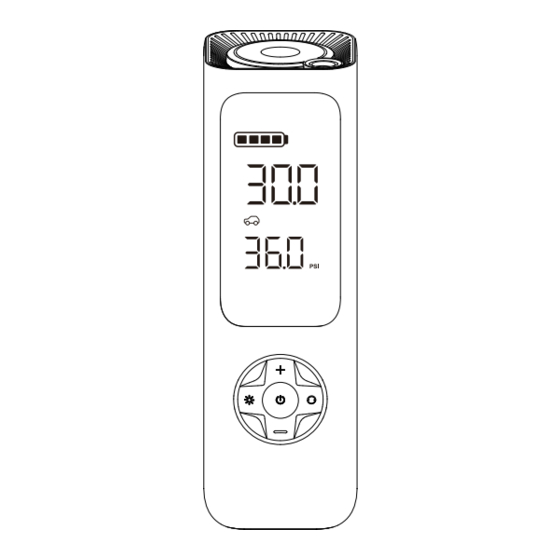
1. PRODUCT OVERVIEW 1. Battery indicator 2. Real-time pressure value 3. Target pressure value 4. Power button 5. Light button 6. Preset mode 7. Pressure unit 8. “+” button 9. Mode button 10. “-” button 11. Air outlet 12 13 12. -
Page 8: Package Contents
2. PACKAGE CONTENTS USB charging Air tube × 1 Needle valve cable × 1 adaptor × 1 X8 Apex Air User manual × 1 Storage bag × 1 Schrader-Presta inflator × 1 valve adaptor × 1 - 04 -... -
Page 9: Battery Level Indicator & Charging
3. BATTERY LEVEL INDICATOR & CHARGING Battery Level Indicator The battery level is shown by four bars, with each bar representing 25%. 1 bar = under 25% 2 bars = between 25% and 50% 3 bars = between 50% and 75% 4 bars = between 75% and 100% Note:The battery indicator will flash when the battery level is below 20%. - Page 10 3 bars solid, 4th bar flashing = 75% and 100% All 4 bars solid = fully charged The inflator will automatically switch off if left inactive for 5 minutes after being fully charged. Note: • The inflator cannot be used while it is charging. •...
-
Page 11: Turning The Inflator On/Off
4. TURNING THE INFLATOR ON/OFF Long-press for 1.5 seconds to turn on. When the inflator is turned on, long press 1.5 seconds to turn off. The inflator will automatically turn off in the cases below: 1. After 3 minutes of inactivity. 2. -
Page 12: Connecting The Air Tube And Nozzle
5. CONNECTING THE AIR TUBE AND NOZZLE Connecting the Air Tube Connect one end of the air tube (with screw thread) to the inflator before inflating. Schrader Valve Tires on cars, motorcycles, e-bikes, and most mountain bikes use a Schrader valve. Valve Type To inflate: The inflator can be directly connected to a Schrader valve to start inflating. - Page 13 Presta Valve Adapter Road bicycles and certain mountain bikes use a Presta valve which requires the included presta valve adapter to be used. Valve Type To inflate: 1. Connect the Presta valve adapter to the Schrader valve of the air tube. 2.
-
Page 14: Detecting The Current Pressure
Needle Valve Adapter To inflate balls like basketballs and footballs, the included needle valve adapter will need to be used. To inflate: Screw the needle valve adapter onto the Schrader valve Valve Type adapter, then insert the needle into the valve of the ball to start inflating. To deflate: Insert the needle valve adapter into the valve of the ball, and gently apply pressure to the ball to release air. -
Page 15: Determining The Right Pressure Value
7. DETERMINING THE RIGHT PRESSURE VALUE To avoid injuries from bursting items due to over-inflation, make sure you are aware of the maximum inflation pressure before you start. Tires The recommended air pressure of tires for cars, bicycles, and motorcycles is indicated on the tire's sidewall. The recommended tire pressure for cars is also indicated on the inside of the driver's side door. - Page 16 Air Pressure Reference Table Recommended Category Type Pressure Range Electric Folding Bike tires 10 - 50psi 12-, 14-, & 16-inch bicycle tires 30 - 50psi 20-, 22-, & 24-inch bicycle tires Bicycles 40 - 50psi 26-, 27.5-, & 29-inch mountain bike tires 45 - 65psi Electric Scooter tires 40 - 50psi...
-
Page 17: Preset Pressure Value
Note: Pressure range values are for reference only. Always refer to the instructions or manual of the item being inflated for actual inflation pressure specifications. 8. PRESET PRESSURE VALUE Switch Modes Click the Mode button to switch between the five inflation modes below. Long press the Mode button to cycle through psi/bar/kPa. - Page 18 Bicycle Mode: Default 45psi Ball Mode: Default 8psi Adjustable Range: 30-145psi Adjustable Range: 4-16psi Note: When you have finished inflating an item, the manual mode will remeber the target pressure value as its default pressure value. For the best inflating experience, we suggest you inflate items like balls via the ball mode. Adjusting the Preset Pressure After selecting a mode, press + or - to increase or decrease the target pressure value.
-
Page 19: Light
9. LIGHT Press the light button to turn the inflator's light on/off. The light makes it easy to see in the dark when you have on any tasks, such as connecting the air compressor to a valve. When the light is on, press the light button to cycle through Spotlight, SOS and OFF. - Page 20 Stop Inflating Once the target pressure value has been reached, the inflator will automatically stop inflating. The inflator can also be manually stopped at any time by pressing the power button while inflating. Caution Items such as balloons, beach balls, and swim rings cannot be automatically inflated because they have an air pressure requirement below the air compressor's minimum pressure range.
- Page 21 11. DISCONNECTING THE AIR TUBE The air compressor's air hose may get very hot after inflating. To prevent injuries, exercise caution when disconnecting it from a valve. Some air may leak out of the valve when disconnecting the air compressor. To avoid pressure loss, quickly disconnect the air hose from the valve.
- Page 22 13. TROUBLESHOOTING Problem Solution 1. Check whether the air compressor's battery level is sufficient. 2. Check whether the air hose is leaking. Slow inflation speed 3. Check whether both ends of the air hose are securely connected. 4. Check whether the item that is being inflated is leaking 1.
- Page 23 Problem Solution Air leakage after connecting Make sure the air hose is securely connected. the air tube The lithium battery's voltage level significantly drops when The battery level indicator is discharging power, causing the battery level indicator to have a different when inflating different display when inflating compared to standby state.
- Page 24 14. SPECIFICATIONS Name Air Inflator Model X8 APEX Executive Standard QXMQJ0002-2019 Dimensions 200.5×63.5×63.5mm(Excluding air tube) Inflation Pressure Range 3-150psi / 0.2-10.3bar Operating Temperature Charging:0℃~45℃,Discharging:-10℃~45℃ Storage Temperature -10℃~45℃ Air Valve Dimensions Length 460mm Battery Capacity 2600mAh(28.86 Wh) Working Noise Lower than 80dB within 1 meter...
- Page 25 15. SAFETY INSTRUCTIONS • This product is not a toy and should not be used by children. Users should be above 16 years old. • Keep a safe distance between children and the inflator while inflating. There is a built-in lithium battery inside the product.
- Page 26 • Before setting the inflation pressure value, make sure the pressure unit is correctly selected. Mixing up psi and bar could lead to dangerous overinflation. • Unit conversion: 1bar = 14.5psi, 1bar = 100kPa • Do not leave the inflator unattended while it is in operation. •...
- Page 27 Gracias Por Elegir Fanttik. Gracias por comprar el inflador de neumáticos Fanttik X8 Apex. La gran pantalla LED y el diseño de interfaz fácil de uasr lo convierten en un inflador de gran capacidad apto para una amplia gama de tareas.
- Page 28 10. LA INFLACIÓN 11. DESCONECTAR EL TUBO DE AIRE 12. FUNCIÓN DE BANCO DE ENERGÍA 13. SOLUCIÓN DE PROBLEMAS 14. ESPECIFICACIONES 15. INSTRUCCIONES DE SEGURIDAD - 24 -...
-
Page 29: Descripción General Del Producto
1. DESCRIPCIÓN GENERAL DEL PRODUCTO 1. Indicador de batería 2. Valor de presión en tiempo real 3. Valor de presión objetivo 4. Botón de encendido 5. Botón de luz 6. modos preestablecidos 7. Unidad de presión 8. "+" botón 9. Botón de modo 10. -
Page 30: Contenido Del Paquete
2. CONTENIDO DEL PAQUETE cable de carga Tubo de aire × 1 Needle valve usb × 1 adaptor × 1 X8 Apex Inflador Manual de Bolsa de Válvula de aguja de neumáticos × 1 usuario × 1 alamacenamiento × 1 adaptador ×... -
Page 31: Indicator De La Batería Y La Carga
3. INDICADOR DE LA BATERÍA Y LA CARGA Indicación del nivel de la batería Hay 4 rejillas para indicar el nivel de batería restante del inpisos': 1 rejilla se ilumina: 0%<nivel de batería≤25% 2 rejilla se iluminan: 25%<nivel de batería≤50% 3 rejillas iluminadas: 50%<nivel de batería≤75% 4 luces de rejilla: 75%<nivel de batería≤100% Nota: El indicador de la batería parpadea cuando la electricidad está... - Page 32 3 barras siempre encendidas, cuarta paradea: 75%-100% 4 barras siempre encendidas: carga completa El inflador se apagará automáticamente sin ninguna operación durante 5 minutos después de la carga completa completamente cargado Note: • No utilizar el inflador durante la carga. •...
-
Page 33: Encender Y Apagar El Inflador De Nuemático
4. ENCIENDA/APAGUE EL INFLADOR Encendido Mantenga pulsado durante 1,5 segundos para encenderlo. Apagado En el estado de encendido, mantenga presionado durante 1,5 segundos para apagarlo El inflador se apagará automáticamente en los casos lo siguientes: 1. Después de 3 minutos de inactividad. 2. -
Page 34: Conexión Del Tubo De Aire Y La Tobera
5. CONEXIÓN DEL TUBO DE AIRE Y LA BOQUILLA Conexión del tubo de aire Conecte un extremo del tubode aire (con rosca de tornillo) al inflador antes de inflarse Válvula Schrader Los neumáticos de coches, motocicletas, bicicletas electrónicas y la mayoría de los baberos de montañautilizan una válvula Schrader. - Page 35 Adaptador de válvula Presta Las bicicletas de carretera y ciertas bicicletas de montaña utilizan una válvula Presta que requiere el uso del adaptador de válvula Presta incluido. Tipo de Para inflar: válvula 1. Conecte el adaptador de la válvula Presta a la válvula Schrader del tubo de aire.
-
Page 36: Detectar Valor Actual De Presión
Adaptador de válvula de aguja Para inflar pelotas como pelotas de baloncesto y fútbol, será necesario utilizar el adaptador de válvula de aguja incluido. Para inflar: Atornille el adaptador de la válvula de aguja en el adaptador Tipo de de la válvula válvula Schrader y luego inserte la aguja en la válvula de la bola para iniciar la inflación. -
Page 37: Determinar Correcto Valor De Presión
7. DETERMINAR CORRECTO VALOR DE PRESIÓN Para evitar lesiones causadas por la explosión de artículos debido a un inflado excesivo, asegúrese de conocer la presión máxima de inflado antes de comenzar. Neumáticos La presión de aire recomendada de los neumáticos de automóviles, bicicletas y motocicletas se indica en la pared lateral del neumático. - Page 38 bolas La presión de aire recomendada para balones de fútbol, baloncesto, voleiboles y otras bolas se indica cerca de la válvula de aire de la pelota. - 34 -...
- Page 39 Tabla de referencia de la presión del aire recomendado categoría tipo Rango de presión 10 - 50psi Neumáticos de bicicleta plegable eléctrica 30 - 50psi Neumáticos para bicicletas de 12, 14 y 16 pulgadas Bicicletas 40 - 50psi Neumáticos para bicicletas de 20, 22 y 24 pulgadas Neumáticos de bicicleta de montaña de 26, 27,5 y 29 pulgadas 45 - 65psi Neumáticos de Electric Scooter...
-
Page 40: Valor De Presión Preestablecido
Note: Pressure range values are for reference only. Always refer to the instructions or manual of the item being inflated for actual inflation pressure specifications. 8. VALOR DE PRESIÓN PREESTABLECIDO Cambiar el modo Haga clic en el botón Modo para cambiar entre los cinco modos de inflación siguientes. Mantenga presionado el botón Mode para alternar entre psi / bar / kPa. - Page 41 Modo de bicicleta: 45psi por defecto Modo de balón: 8psi por defecto Rango ajustable: 30 - 145psi Rango ajustable: 4 - 16psi Nota: Cuando termina la inflación en el modo manual, el valor de presión objectivo se guarda como valor de presión for defecto. Para una mejor experiencia de inflado, le sugerimos inflar objetos como pelotas a través del modo de balón Ajuste de la presión preestablecida...
-
Page 42: La Luz Del Inflador
9. LA LUZ DEL INFLADOR Presione el botón de luz para encender / apagar la luz del inflador. La luz le permite ver fácilmente en la oscuridad cuando realiza cualquier operación (como conectar el inflador a una válvula). Cuando la luz esté encendida, presione el botón de luz para alternar entre Spotlight, SOS y OFF. - Page 43 10. LA INLFACIÓN. INFL Iniciar la inflación Presione el botón de encendido para iniciar el inflado. La presión actual se muestra en tiempo real durante el inflado. Al inflar, el inflador puede tener un volumen de 75 a 80 dB. Por favor, tome las precauciones apropiadas para proteger su audición.
- Page 44 Precaución No puede inflar automáticamente artículos como globos, pelotas de playa y anillos de natación cuales requicitos de presión de aire inferior al rango de presión mínima del inflado. Solo puede inflar estos elementos manualmente con cuidado. Información de la batería La batería del Inflador dura unos 40 minutos con una carga completa funcionando sin carga a una temperatura ambiente de 25°C.
- Page 45 12. FUNCIÓN DEL BANCO DE ENERGÍA Este inflador se puede utilizar como el banco de energía de 5V / 2A cuando no se está cargando e inflando otros dispositivos. Se requiere cierto nivel de electricidad cuando el inflador se trabaja como un banco de energía. Nota: El inflador debe estar encendido cuando se usa como banco de energía.
- Page 46 13. SOLUCIÓN DE PROBLEMAS Problema Solución 1. Compruebe si la eletricidad de la batería es suficiente. 2. Compruebe si la manguera de aire tiene fugas. Velocidad de inflado 3. Compruebe si ambos extremos de la manguera de aire están lenta conectados de forma segura.
- Page 47 Problema Solución Asegúrese de que la manguera de aire esté conectada de forma Fuga de aire después de segura. conectar el tubo de aire El indicador de nivel de El nivel de voltaje de la batería de litio disminuye significativa- batería es diferente al inflarse mente al descargar energía, lo que hace que el indicador de nivel en comparación con...
- Page 48 14. ESPECIFICACIONES Inflador de neumáticos Nombre Modelo X8 APEX Estándar Ejecutivo QXMQJ0002-2019 Dimensiones 200,5×63,5×63,5mm (tubo de aire no incluido) Rango de Presión de Inflado 3 - 150psi / 0.2 - 10.3bar Temperatura de Trabajo Cargando: 0ºC - 45ºC; Descargando: -10ºC - 45ºC Temperatura de Almacenamiento -10°C~45°C...
- Page 49 15. INSTRUCCIONES DE SEGURIDAD • Este producto no es un juguete, y no debe ser utilizado por los niños. Los usuarios deben tener más de 16 años. Los usuarios deben tener más de 16 años. Mantenga una distancia segura entre los niños y el inflador durante el inflado.
- Page 50 inflador inmediatamente. • Antes de configurar el valor de presión de inflado, asegúrese de que la unidad esté seleccionada correctamente. Las unidades de presión confusas pueden provocar un inflado excesivo peligroso. • Conversión de unidades: 1 bar = 14,5 psi, 1 bar = 100 kPa •...
- Page 51 Precaución: para reducir el riesgo de descarga eléctrica, no lo exponga a la lluvia. Almacenar en interiores. "nunca coloque las pilas en la boca. Si las ingiere, comuníquese con su médico o con el centro local de control de envenenamiento". - 47 -...
- Page 52 We will repair or replace any defective your return package. product (due to manufacturing fault) within the warranty period. Purchase Name: How to Return Your Fanttik Product Contact support@fanttik.com with your order number. Order Number: We will issue you a return label for your return.
- Page 53 +1-516-927-8658 www.fanttik.com support@fanttik.com ACE FARMER LLC 11833 Cutten Rd suite 300 Houston TX 77066 US...
Need help?
Do you have a question about the X8 APEX and is the answer not in the manual?
Questions and answers
How Do I charge the battery