Advertisement
Quick Links
Advertisement

Related Manuals for Breville BCG820


Summary of Contents for Breville BCG820
- Page 1 Smart Grinder ™ Instruction Book - BCG820...
-
Page 2: Table Of Contents
• Do not place the Breville Smart Grinder™ Pro near the edge of a bench or table BREVILLE during operation. • Do not place the Breville Smart RECOMMENDS Grinder™ Pro on or near a hot SAFETY FIRST gas burner, electric element... - Page 3 • To protect against electric long operation. shock, do not immerse the grinder base, power cord or • Do not use the Breville power plug in water or allow Smart Grinder™ Pro for any moisture to come in contact other purpose than grinding with these parts.
- Page 4 Return the entire appliance to • The appliance is not intended the nearest authorised Breville to be operated by means of Service Centre for examination an external timer or separate and/or repair.
-
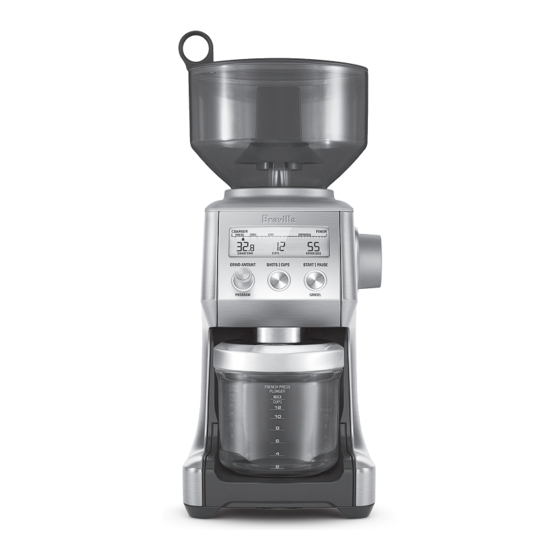
Page 5: Components
Components... - Page 6 ACCESSORIES Bean Hopper Lid Air tight seal to maximise bean freshness. Portafilter Cradle 50–54mm Bean Hopper Portafilter Cradle 58mm 450g bean hopper with locking system for easy removal and bean transfer. Conical Burr Cleaning Brush Precision Conical Burrs Grinds Container Maximises particle size for full flavour For storing ground coffee.
-
Page 7: Functions
Percolator, Filter or Plunger, there is a range of all promotional labels and packing materials grind size settings. Between each Brew Method attached to your Breville product. the grind size settings will differ. This is due to Wash hopper, cradles, grind container,... - Page 8 Grinding for Espresso Coffee STEP 2: Selecting your SHOTS|CUPS NOTE Select the desired amount of ground coffee This machine is designed only for whole roasted coffee beans. Avoid grinding required by pressing the SHOTS|CUPS button. unroasted green and under-roasted coffee beans.
- Page 9 STEP 3: Grinding into Grinds Container or Coffee Filter Select your Grind Size STEP 1: For espresso, we recommend selecting Grind Remove cradle by sliding out from under the Size setting 12 as a starting point and moving grind outlet. the Grind Size dial Coarser or Finer to adjust the flow of espresso as required.
- Page 10 FEATURES OF YOUR BREVILLE • Press the START|PAUSE|CANCEL button to start grinding operation. SMART GRINDER™ PRO Automatic Grinding Grinding automatically allows you to grind hands-free. The grinder will automatically stop when the preset amount of coffee is dispensed. GRIND AMOUNT...
- Page 11 Pause Function Manual Grinding You can pause the grinder during operation Grinding manually allows you to have allowing you to collapse or settle the coffee in complete control over how much coffee is the portafilter. dispensed. • ‘Press & Release’ the •...
- Page 12 ADJUSTING YOUR GRIND AMOUNT NOTE The GRIND AMOUNT dial gives you the To RESET the grind amount/time to the ability to modify the preset SHOTS|CUPS default settings, ‘press & hold’ the amounts to deliver more or less ground coffee SHOTS|CUPS button until a long beep into your Portafilter or Grinds Container.
- Page 13 ADJUSTING CONICAL BURRS Some types of coffee may require a wider grind range to achieve an ideal extraction or brew. A feature of your Smart Grinder™ Pro is the ability to extend this range with an adjustable upper burr. We recommend making only one adjustment at a time. AIR TIGHT CONTAINER Unlock hopper...
-
Page 14: Care & Cleaning
Care & Cleaning CARE, CLEANING & STORAGE NOTE 1. Empty beans from the hopper and grind Do do not use alkaline or abrasive cleaning out any excess beans (see below). agents, steel wool or scouring pads, as these 2. Unplug power cord from power outlet can damage the surface. -
Page 15: Tips
Tips MAKING BETTER QUALITY COFFEE PLUNGER COFFEE • Freshly ground coffee is the key to making Follow these easy steps for a great cup: coffee with more flavour and body. 1. Using a variable temperature kettle, heat • Coffee flavour and strength is a personal the appropriate volume of water to 95˚C. -
Page 16: Troubleshooting
Troubleshooting PROBLEM POSSIBLE CAUSE WHAT TO DO Grinder does • Grinder not plugged in. • Plug power cord into not start after Grinder has overheated. power outlet. pressing START| • Bean hopper not attached • Remove power plug from power PAUSE|CANCEL correctly. - Page 17 Notes...
- Page 18 Notes...
- Page 19 Notes...
- Page 20 Web: Web: www.breville.com www.breville.com Breville, the Breville Logo are trademarks of Breville Pty Ltd (“Breville”) and Breville's products are distributed in Australia and New Zealand under license. Copyright Breville Pty. Ltd. 2023. Due to continued product improvement, the products illustrated/photographed in this brochure may vary slightly from the actual product.
Need help?
Do you have a question about the BCG820 and is the answer not in the manual?
Questions and answers