Table of Contents
Advertisement
Quick Links
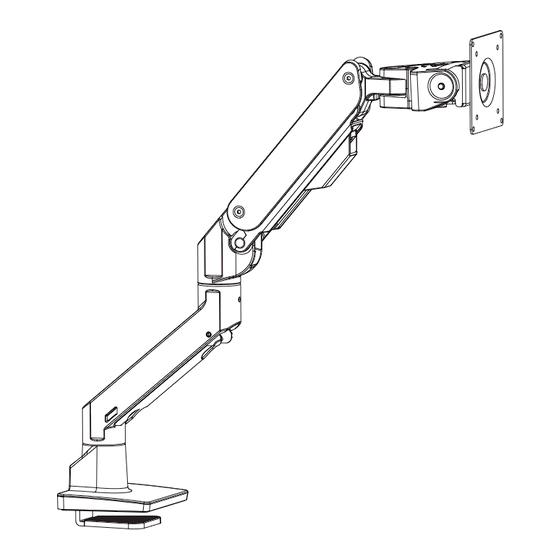
BEWISER Heavy Duty Monitor Arm S1020
Please scan QR code for
installation video.
If you have any questions or concerns about this product. Please feel free to email us at support@bewiserdesign.com
①
Parts List
VESA Assembly
(X1)
Base
Upper Arm
(X1)
(X1)
INSTALLATION MANUAL
34"-49"
75x75 100x100
22 to 44 lbs
FLAT/CURVED
(10 to 20 kg)
200x100 200x200
Lower Arm
M4x9mm
M4x12mm
(X1)
(X4)
(X4)
M6x14mm
Base Lock Screw
Allen Wrench
(X2)
(X1)
(X2)
②-01
Clamp Installation
Desk Thickness: 0.8-2.4"(20-60mm)
③
Arm Installation
Adjust the small screws on the arms to
adjust the arm rotation tightness.
④
Monitor Installation
Install your monitor.
Ensure the monitor is
facing the right way up.
For Monitors up to 44 lbs/20 kg,
Not for monitors lighter than 22 lbs/10 kg.
⑤
VESA Assembly Installation
(3mm)
(5mm)
Attach the VESA Assembly to the Upper Arm
and secure it with the two M6x14mm screws.
②-02
(5mm)
Tighten
(3mm)
NOTE: the two mechanical springs inside the VESA Assembly are stiff. It is not
necessary to straighten the VESA Plate tilt by hand before connecting to the monitor.
Adjust tilt after the monitor, VESA Assembly and Upper Arm are all installed.
M6×14mm
Grommet Installation
Use Allen Wrench to separate
(5mm)
Base and Clamp
(5mm)
Tighten
Desk Thickness: 0.8-2.4" (20-60mm)
Grommet Hole Diameter: min 2" (50mm)
M4x9mm screw is the default VESA
screw size for most monitors and is
designed to be hand-tightened.
M4x12mm screw is provided to
accommodate monitors requiring
longer VESA screws.
The monitor tilt can now be easily
adjusted by hand.
Advertisement
Table of Contents

Summary of Contents for BEWISER S1020
- Page 1 ②-01 ②-02 Clamp Installation Grommet Installation INSTALLATION MANUAL Use Allen Wrench to separate (5mm) BEWISER Heavy Duty Monitor Arm S1020 Base and Clamp Desk Thickness: 0.8-2.4”(20-60mm) (5mm) Tighten (5mm) Tighten Please scan QR code for installation video. Desk Thickness: 0.8-2.4” (20-60mm) Grommet Hole Diameter: min 2”...
- Page 2 ⑥ ⑧ Adjust Arm Tension Cable Management To avoid any damage and facilitate easy adjustment, hold the arm in a horizontal position during tension adjustment. Upper Arm Cable Cover: counter-clockwise (+) By using the Allen Wrench you can adjust the gas spring tension in the Upper Arm. Adjust the screw remove by pushing cover clockwise (-) increase gas spring tension.
Need help?
Do you have a question about the S1020 and is the answer not in the manual?
Questions and answers