Chapters
Table of Contents
Troubleshooting

Related Manuals for Singer Fashion Mate 3333


Summary of Contents for Singer Fashion Mate 3333
- Page 1 Questo manuale d’istruzione è fornito da trovaprezzi.it. Scopri tutte le offerte per Singer Fashion Mate 3333 cerca il tuo prodotto tra le migliori offerte di Macchine da Cucire INSTRUCTION MANUAL 3333...
-
Page 2: Introduction
2. Assistance on the web at www.singerco.com 3. Personal assistance via email: talktous@singerco.com 4. Live, one-on-one help from one of our SINGER Sewing Assistants, ® at 1-800-474-6437. (North America Only) We’re ready to help and hope that you enjoy your SINGER sewing machine. ® Happy Sewing! - Page 3 INTRODUCTION Important Safety Instructions This household sewing machine is designed to comply with IEC/EN 60335-2-28 and UL1594. IMPORTANT SAFETY INSTRUCTIONS When using an electrical appliance, basic safety precautions should always be followed, including the following: Read all instructions before using this household sewing machine. Keep the instructions in a suitable place close to the machine.
- Page 4 INTRODUCTION Important Safety Instructions oxygen is being administrated. - To disconnect, turn all controls to the off (“O”) position, then remove plug from outlet. - Do not unplug by pulling on cord. To unplug, grasp the plug, not the cord. - The foot control is used to operate the machine.
- Page 5 INTRODUCTION Important Safety Instructions SERVICING OF DOUBLE INSULATED PRODUCTS In a double-insulated product, two systems of insulation are provided instead of grounding. No ground means is provided on a double-insulated product, nor should a means for grounding be added to the product. Servicing of a double- insulated product requires extreme care and knowledge of the system and a double-insulated product must be identical to those parts in the product.
-
Page 6: Table Of Contents
To ensure that you are always provided with the most modern sewing capabilities, the manufacturer reserves the right to change appearance, design or accessories of this sewing machine when considered necessary. SINGER & Singer is Sewing Made Easy is a registered trademark of The SINGER ® ®... -
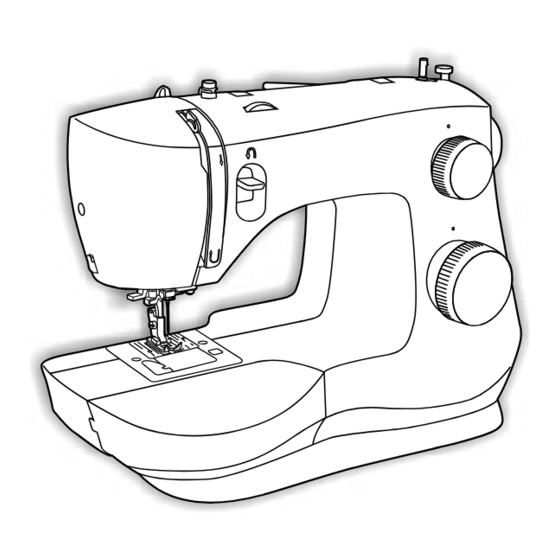
Page 7: About Your Machine
ABOUT YOUR MACHINE Main Parts of the Machine Front THREAD TENSION DIAL allows you to select just the right tension for your stitch, thread and fabric. (See Page 18) THREAD TAKE-UP LEVER THREAD CUTTER is conveniently located for trimming thread ends at the end of sewing. PRESSER FOOT holds fabric against feed teeth, drawing fabric under the foot for you as you sew. -
Page 8: Main Parts Of The Machine Back
ABOUT YOUR MACHINE Main Parts of the Machine Back HORIZONTAL SPOOL PIN holds the thread spool and spool cap for the upper thread. BOBBIN WINDING SPINDLE holds bobbin as it winds. (See Page 12) HOLE FOR SECOND SPOOL PIN is used to hold an additional spool pin, for thread spools to be used in upright position or for using two spools at once for twin needle sewing. -
Page 9: Needle And Presser Foot Area
ABOUT YOUR MACHINE Needle and Presser Foot Area NEEDLE THREADER LEVER is used to engage the automatic needle threader mechanism. NEEDLE THREADER GUIDE holds thread securely before placing it in hook pin. THREAD GUIDE controls movement of upper thread. NEEDLE holds thread during stitch formation. PRESSER FOOT SCREW secures the presser foot holder (shank) onto the presser bar. -
Page 10: Removable Storage Compartment And Accessories
Seam Ripper/Brush (remove stitches/brush out lint) f. Edge/Quilting guide (for straight & accurate quilting) g. Pack of Needles (replacement needles) h. Spool Holders (2 sizes for various thread spool styles) Bobbins (SINGER ® Class 15 transparent bobbins) L-Screwdriver (to remove needle plate for cleaning) k. -
Page 11: Getting Ready To Sew
For machine with a polarized plug (one blade is wider than the other). To reduce the risk of Do not modify the plug in any way. ⚠ Your SINGER ® machine is adjusted to provide the best stitch results at normal room... -
Page 12: Winding The Bobbin
GETTING READY TO SEW Winding the Bobbin This machine uses SINGER ® Class 15 transparent bobbins. Use only this style of bobbin when purchasing additional bobbins for your machine. Do not substitute with metal bobbins. 1. Place thread spool and corresponding size spool holder onto spool pin. -
Page 13: Inserting The Bobbin
GETTING READY TO SEW Inserting the Bobbin ⚠ Turn power switch off before inserting or removing the bobbin. 1. When inserting or removing the bobbin, the needle and presser foot must be fully raised. 2. Remove the bobbin cover plate and bobbin. 3. -
Page 14: Threading The Upper Thread
GETTING READY TO SEW Threading the Upper Thread ⚠ For safety, turn off the power before threading the machine. 1. Start by turning the handwheel (A) toward you to raise the needle (B) and the thread take up lever (C). You should be able to see the take up lever. -
Page 15: Automatic Needle Threader
GETTING READY TO SEW Automatic Needle Threader ⚠ For safety, turn off the power before using the automatic needle threader. 1. Raise the needle to its highest position by turning the handwheel toward you. If you turn the handwheel backward, the machine will jam when you start to sew. -
Page 16: Drawing Up The Bobbin Thread
GETTING READY TO SEW Drawing Up the Bobbin Thread ⚠ For safety, turn off the power before threading the machine. (C) and then raising the needle (D). 2. As you turn the handwheel, gently pull the upper thread, which will bring a loop of the bobbin thread up through the hole of the needle plate (E). -
Page 17: Start Sewing
START SEWING Before You Start Sewing Now that your machine is threaded, we will show how to set up the machine for basic sewing techniques such as: sewing a straight stitch, sewing a decorative stitch, sewing a stretch stitch, sewing a buttonhole and sewing a button. With each technique, you have the opportunity to sew along. -
Page 18: Stitch Formation
START SEWING Stitch Formation Surface How Stitches Form Stitches are formed when the upper thread and the bobbin thread interlock between the Reverse fabric layers. Stitching is well balanced when side the needle thread appears on the top and the bobbin thread appears on the bottom. -
Page 19: Stitch Selector Dial
START SEWING Stitch Selector Dial Stitch Length Dial Stitch Selector Dial The Stitch Selector Dial is used to select the stitch you want to sew. The dial can be turned to the left or to the right. For Sewing the Grey Stitch Patterns: 1. -
Page 20: Sewing A Straight Stitch
START SEWING Sewing a Straight Stitch Stitch Selector Dial Stitch Length Dial A straight stitch is used for sewing seams and topstitching. HOW TO: Set the machine for Straight Stitch by setting the Stitch Selector Dial to straight stitch. (see page 19) The Stitch Length Dial control can be set at the stitch length that you desire. -
Page 21: Sewing A Decorative Stitch
START SEWING Sewing a Decorative Stitch Stitch Selector Dial Stitch Length Dial (Go to www.singerco.com to view other decorative stitches that can be used). HOW TO: Set the machine to the desired stitch by setting the Stitch Selector Dial to one of the decorative stitches. -
Page 22: Sewing A Stretch Stitch
START SEWING Sewing a Stretch Stitch Stitch Selector Dial Stitch Length Dial A stretch stitch is used for stretch knit fabrics. This type of seam will stretch with the fabric. (Go to www.singerco.com to view other stretch stitches that can be used). HOW TO: Set the machine to the desired stitch by setting the Stitch Selector Dial to one of the stretch stitch settings. -
Page 23: Sewing A 4-Step Buttonhole
START SEWING Sewing a 4-Step Buttonhole Stitch Selector Dial Stitch Length Dial This machine has a built-in buttonhole feature, allowing you to sew buttonholes in 4 easy steps. The Stitch Selector Dial shows the buttonhole settings in grey. HOW TO: Set the machine to the desired stitch by setting the Stitch Selector Dial to the buttonhole stitches. -
Page 24: Sewing A Button
START SEWING Sewing a Button Stitch Selector Dial Stitch Length Dial This machine includes a Button Sewing Foot, allowing you to attach buttons to your projects easily and quickly. HOW TO: 1. Set the machine to Straight Stitch by turning the Stitch Selector Dial to the Straight Stitch Symbol. (see page 19) 2. -
Page 25: Inserting And Changing Needles
Generally, the needle should be replaced after every 4 projects or approximately every 16 hours of sewing time. It is also important to use the right needle for the fabric you are sewing. (Go to www.singerco.com to view the Stitch Reference Guide) For best results, use SINGER branded needles in your SINGER ® ®... -
Page 26: Changing The Presser Foot
START SEWING Changing the Presser Foot ⚠ For safety, turn off the power before changing the presser foot. Before changing the presser foot, raise the presser foot lifter. The presser foot holder (b) is attached to the presser bar (a). The presser foot (e) has a presser foot pin (d) that connects to the presser foot holder, sometimes called a shank (b). -
Page 27: Troubleshooting And Maintenance
TROUBLESHOOTING AND MAINTENANCE Troubleshooting Thread Loops on Underside of Fabric Bobbin Thread Showing on Top of Fabric Upper Thread Breaking Thread is Shredding Thread Bunching at Beginning Skipping Stitches Bobbin Thread Breaking Needles Breaking 10. Stitches Distorted 11. Fabric Puckers 12. -
Page 28: Troubleshooting
TROUBLESHOOTING AND MAINTENANCE Troubleshooting 3. UPPER THREAD BREAKING Possible Cause: Thread path obstructed. Solution: Check if thread is caught on thread spool (rough spots on the spool itself) or behind spool pin or spool cap (if the thread has fallen behind the spool cap and therefore cannot feed freely through the machine path). - Page 29 Possible Cause: Wrong bobbins being used. Solution: Use SINGER ® bobbins that are the same style as those that come with the machine – don’t substitute. Your machine comes with SINGER ® Class 15 transparent bobbins. 9. NEEDLES BREAKING Possible Cause: Bent, dull or damaged needle.
- Page 30 TROUBLESHOOTING AND MAINTENANCE Troubleshooting 10. STITCHES DISTORTED Possible Cause: “Pushing” or “pulling” the fabric. Solution: Don’t manually push/pull fabric in order to sew, but allow the machine’s feed teeth to draw fabric under presser foot as you guide it. Possible Cause: Incorrect stitch length setting. Solution: Check for correct stitch length setting.
- Page 31 Solution: Needle all the way up in needle clamp (See Page 25) Possible Cause: Needle is bent. Solution: Remove bent needle, insert new needle. (See Page 25) Possible Cause: Hook pin damaged. Solution: Needle Threader needs replacement; contact authorized SINGER ® service center: Visit www.singerco.com.
-
Page 32: Maintenance
TROUBLESHOOTING AND MAINTENANCE Maintenance Cleaning the Feed Teeth and Hook Area ⚠ Before cleaning the machine, disconnect the power supply by removing the plug from the electrical outlet. Turn the hand wheel to raise the needle to its highest position. Raise the presser foot lifter. -
Page 33: Appendix - Glossary
APPENDIX - GLOSSARY Glossary of Key Sewing Terms Backstitch Backstitching is most commonly used at the beginning and ending of seams to lock the stitching so it does not come undone. Start sewing the beginning of the seam about 3-4 stitches, then sew in reverse for 3-4 stitches. - Page 34 SINGER is a registered trademark of The SINGER ® ® ©2016 The SINGER...
- Page 35 MANUAL DE INSTRUCCIONES 3333 SINGER la costura hecha fácil. ™...
- Page 36 INSTRUCCIÓN Bienvenido Bienvenido(a) a la familia SINGER y ¡FELICITACIONES por la adquisición ® de su nueva máquina de coser SINGER ® La marca SINGER tiene una posición de calidad en el área de costura por ® más de 160 años. Diseñamos máquinas para entusiastas de la costura de todos los niveles de habilidades, creaciones, que podrá...
- Page 37 INSTRUCCIÓN Instrucciones Importantes de Seguridad Esta máquina de coser doméstica ha sido diseñada de conformidad con las normas IEC/EN 60335-2-28 y UL1594. INSTRUCCIONES DE SEGURIDAD IMPORTANTES Cuando utilice un aparato eléctrico, debe respetar siempre las precauciones de seguridad básicas, incluyendo las siguientes: Lea todas las instrucciones antes de utilizar esta máquina de coser doméstica.
- Page 38 INSTRUCCIÓN Instrucciones Importantes de Seguridad - Apague la máquina de coser (“O”) cuando realice ajustes en la zona de la aguja, como enhebrar la aguja, cambiarla, hacer canilla, cambiar el prensatelas, etc. - No deje caer ni introduzca objetos en las aberturas. - No utilice la máquina al aire libre.
- Page 39 INSTRUCCIÓN Instrucciones Importantes de Seguridad una persona responsable de su seguridad. Evite que los niños jueguen con la máquina de coser. El nivel de ruido en condiciones de funcionamiento normales es inferior a 75 dB (A). La máquina solamente se debe usar con un pedal de tipo KD-1902, FC-1902 (110-120V area) / KD-2902, FC-2902A, FC-2902C, FC-2902D (220-240V area) fabricado por ZHEJIANG FOUNDER MOTOR CORPORATION LTD.
- Page 40 TPara asegurar que siempre contará con las más modernas capacidades de costura, el fabricante se reserva el derecho a cambiar la apariencia, diseño o accesorios de esta máquina de coser cuando lo considere necesario. SINGER & Singer la costura hecha fácil es una marca registrada de The SINGER ® ®...
-
Page 41: Acerca De Su Máquina
ACERCA DE SU MÁQUINA Partes Principales del Frente PALANCA ENSARTADOR DE AGUJA se usa para accionar el ensartador automático. (ver página 18) PALANCA TIRA HILO CORTADOR DE HILO PRENSATELAS sostiene la tela en el mecanismo de avance, jalando la tela debajo del pie conforme cose. -
Page 42: Partes Principales De La Parte De Atrás
ACERCA DE SU MÁQUINA Partes Principales de la Parte de Atrás PORTA CARRETE HORIZONTAL sostiene el carrete de hilo y tapa carrete del hilo superior. EJE DEVANADOR DE BOBINA sostiene la bobina mientras se devana. (ver página 12) ORIFICIO PARA SEGUNDO PORTA CARRETE se usa para colocar un porta carrete adicional, para hilos en posición vertical o que usan dos hilos a la vez con aguja doble. -
Page 43: Área Del Prensatelas Y Aguja
ACERCA DE SU MÁQUINA Área del Prensatelas y Aguja PALANCA ENSARTADOR AGUJA se usa para accionar el ensartador automático. GUÍA ENSARTADOR AGUJA GUÍA HILO controla el movimiento del hilo superior. AGUJA sostiene el hilo durante la formación de la puntada. TORNILLO PRENSATELAS asegura el sujeta prensatelas (zanco) en la barra presionadora. -
Page 44: Compartimiento Removible Y Accesorios
Guía de Acolchar Borde (para acolchar recta y precisa) g. Paquete de Agujas (agujas de remplazo) h. Sujeta Carretes (2 tamaños para diferentes estilos de carretes de hilo) Bobinas (SINGER ® Clase 15 bobinas transparentes) Destornillador en L (para quitar la placa para limpieza) k. -
Page 45: Preparándose Para Coser
Si no que instale un tomacorriente polarizado. ⚠ Su máquina de coser SINGER ® se ha ajustado para ofrecer el mejor resultado de puntada con una temperatura ambiente normal. El calor y el frío extremos pueden afectar al resultado de la... -
Page 46: Devanando La Bobina
PREPARÁNDOSE PARA COSER Devanando la Bobina Esta máquina usa bobinas transparentes SINGER ® Clase 15. Use sólo este tipo de bobina cuando compre bobinas adicionales para su máquina. No las sustituya por bobin de metal. 1. Coloque el carrete de hilo y el sujeta carrete correspondiente en el poste. -
Page 47: Insertando La Bobina
PREPARÁNDOSE PARA COSER Insertando la bobina ⚠ Apague la máquina antes de insertar o remover la bobina. 1. Al insertar o extraer la bobina, la aguja y el prénsatelas se deben levantar. 2. Empuje el pestillo en la tapa de la bobina hacia la derecha y retire la tapa de la bobina. -
Page 48: Ensartando El Hilo Superior
PREPARÁNDOSE PARA COSER Ensartando el Hilo Superior ⚠ Por seguridad, apague la alimentación antes de ensartar la máquina. 1. Comience girando el volante (A) hacia usted para levantar la aguja (B) y la palanca tira hilo (C). Debe poder ver la palanca tira hilo. IMPO Levante el alza prensatelas. -
Page 49: Ensartador Automático De Aguja
PREPARÁNDOSE PARA COSER Ensartador Automático de Aguja ⚠ Por seguridad, apague la máquina antes de usar el ensartador automático. 1. Levante la aguja a su posición más alta girando el volante hacia usted. Si gira el volante hacia atrás, la máquina se atascará cuando comience a coser. -
Page 50: Jalando El Hilo Bobina
PREPARÁNDOSE PARA COSER Jalando el Hilo Bobina ⚠ PRECAUCIÓN: Por seguridad, apague la máquina antes de ensartar la máquina. 1. Sostenga el extremo del hilo superior con la mano izquierda (A). Gire el volante hacia usted (B), bajando primero (C) y luego levantando la aguja (D). 2. -
Page 51: Comenzando A Coser
COMENZANDO A COSER Antes de Comenzar a Coser básicas de costura, tales como: coser puntada recta, coser puntada decorativa, coser puntada stretch, hacer un ojal y pegar un botón. Con cada técnica, tendrá la oportunidad de seguir cosiendo. Guía de Referencia de Puntadas, visite www.singerco.com. He aquí... -
Page 52: Como Se Forman La Puntadas
COMENZANDO A COSER Como se forman la Puntadas Cómo se forman las puntadas Las puntadas se forman cuando el hilo superior y el hilo bobina se enganchan entre Lado las capas de tela. La puntada está bien reverso balanceada cuando el hilo aguja aparece en la parte superior y el hilo bobina aparece en la Hilo superior parte de abajo. -
Page 53: Perilla Selectora De Puntada
COMENZANDO A COSER Perilla Selectora de Puntada Perilla Largo Puntada Perilla Selectora de Puntada La perilla Selectora de Puntada se usa para elegir la puntada que desea coser. La perilla puede girarse a la izquierda o a la derecha. Para coser Patrones de Puntada Gris: 1. -
Page 54: Cosiendo Una Puntada Recta
COMENZANDO A COSER Cosiendo una Puntada Recta Perilla Selectora de Puntada Perilla Largo Puntada Una puntada recta se usa para costura normal y pespunte. CÓMOHACERLO: Coloque la máquina para Puntada Recta con la Perilla Selectora de Puntada Recta (ver página La Perilla Largo Puntada puede ajustarse en el largo puntada que desee. -
Page 55: Cosiendo Una Puntada Decorativa
COMENZANDO A COSER Cosiendo una puntada Decorativa Perilla Selectora de Puntada Perilla Largo Puntada Una puntada decorativa se usa para embellecer costuras y añadir estilo a sus proyectos de costura. (Vaya a www.singerco.com para ver otras puntadas decorativas que pueden ser usadas). CÓMOHACERLO: Coloque la máquina en la puntada deseada colocando la Perilla Selectora de Puntada en una de las puntadas decorativas (ver página 19) -
Page 56: Cosiendo Una Puntada Stretch
COMENZANDO A COSER Cosiendo una Puntada Stretch Perilla Selectora de Puntada Perilla Largo Puntada Una puntada stretch se usa para tejidos de punto. Este tipo de costura se estirará con la tela. (Vaya a www.singerco.com para ver otras puntadas elásticas que pueden ser usadas) CÓMOHACERLO: Coloque la máquina en la puntada deseada con el Selector de Puntada a una de las puntadas stretch (ver página 19) -
Page 57: Coser Un Ojal 4 En Pasos
COMENZANDO A COSER Coser un ojal en 4 pasos Perilla Selectora de Puntada Perilla Largo Puntada Esta máquina tiene una característica para hacer ojales, permitiéndole hacer ojales en 4 sencillos pasos. La Perilla Selectora de Puntada muestra los ajustes de ojal en gris. CÓMOHACERLO: Coloque la máquina en la puntada deseada con la Perilla Selectora de Puntada en la puntadas de ojales. -
Page 58: Pegando Un Botón
COMENZANDO A COSER Pegando un Botón Perilla Selectora de Puntada Perilla Largo Puntada Esta máquina incluye un pie de pegado de botones que le permite pegar botones en sus proyectos fácil y rápido. CÓMOHACERLO: 1. Coloque la máquina en puntada recta colocando la Perilla Selectora en (ver página 19) 2. -
Page 59: Insertando Y Cambiando Agujas
También es importante usar el tipo correcto de aguja para la tela que este cosiendo (Vaya a www. singerco.com para ver la guía de puntadas) Para mejores resultados, use agujas SINGER en su máquina de coser SINGER ®... -
Page 60: Cambiando El Prensatelas
COMENZANDO A COSER Cambiando el Prensatelas ⚠ Apague la máquina antes de cambiar el prensatelas. Antes de cambiar el prensatelas, levante el alza prensatelas. El sujeta prensatelas (b) está sujeto a la barra presionadora (a). El prensatelas (e) tiene un perno (d) que une con el sujeta prensatelas, algunas veces llamado zanco (b). -
Page 61: Corrección De Fallas Y Mantenimiento
CORRECCIÓN DE FALLAS Y MANTENIMIENTO Consejos de Corrección de Fallas El hilo hace bucles por el lado de abajo de la tela El hilo bobina aparece en la parte superior de la tela El hilo superior se rompe El hilo se deshilacha El hilo se amontona al inicio Se saltan las puntadas Se rompe el hilo bobina... - Page 62 CORRECCIÓN DE FALLAS Y MANTENIMIENTO Consejos de Corrección de Fallas 3. SE ROMPE EL HILO SUPERIOR Causa Posible: Ruta de hilo obstruida. Solución: Revise si hay hilo atrapado en el carrete de hilo (nudos y bolas en el carrete) o detrás del poste carrete o tapa carrete (si el hilo se ha salido detrás de la tapa carrete no puede alimentarse con libertad por la ruta de la máquina).
- Page 63 Causa Posible: Se usan bobinas equivocadas. Solution: Use bobinas SINGER del mismo estilo que las que vienen con su máquina, no las ® sustituya. Su máquina viene con bobinas transparentes SINGER ® Clase 15. 9. SE ROMPE LA AGUJA Causa Posible: Aguja doblada, mellada o dañada.
- Page 64 CORRECCIÓN DE FALLAS Y MANTENIMIENTO Consejos de Corrección de Fallas 10. PUNTADAS DISTORSIONADAS Causa Posible: Está “empujando” o “jalando” la tela. Solución: No empuje o jale manualmente la tela, permita que los impelentes de la máquina jalen la tela debajo del prensatelas conforme usted la guia. Causa Posible: Ajuste incorrecto de largo puntada.
- Page 65 Causa Posible: La aguja está doblada. Solución: Quite la aguja doblada, inserte una nueva. (ver página 25) Causa Posible: Perno gancho dañado. Solución: El Ensartador de Aguja necesita remplazo; contacte a un centro de servicio SINGER® autorizado. Visite www.singerco.com. 15. MUCHO RUIDO CUANDO COSE Causa Posible: El hilo no está...
-
Page 66: Mantenimiento
CORRECCIÓN DE FALLAS Y MANTENIMIENTO Mantenimiento Limpiando el Impelente y Área del Gancho ⚠ Antes de limpiar la máquina, desconecte la alimentación quitando la clavija del tomacorriente. Gire el volante para levantar la aguja a su posición más alta. Levante el alza prensatelas. Para lograr la mejor operación posible, es necesario mantener las partes esenciales limpias. -
Page 67: Apéndice - Glosario
APÉNDICE - GLOSARIO Glosario de Términos Usados Costura de refuerzo puntadas no se suelten. Al inicio de la costura realice 3-4 puntadas, luego cosa en reversa otras 3-4 puntadas. Comience a coser hacia adelante de nuevo y continúe la costura hasta Hilvanado El hilvanado es una costura temporal, cosida con un puntada recta y poca tensión. - Page 68 Si se abandonan aparatos eléctricos en un vertedero, pueden producirse fugas de sustancias peligrosas en el terreno y llegar a la cadena alimentaria, dañando su salud y bienestar. SINGER es una marca registrada de The SINGER ® ® ©2016 The SINGER...
- Page 69 MANUEL D’INSTRUCTION 3333 SINGER ™ vous facilite la couture.
- Page 70 2. De l’aide est aussi disponible sur le Web à www.singerco.com. 3. Aide personnalisée à talktous@singerco.com. 4. Si vous préférez nous parler directement, pour de l’aide personnalisée, appeler un de nos assistants de coutures SINGER au 1-800-474-6437. ® (Amérique du Nord Seulement) Nous sommes prêts à...
- Page 71 INTRODUCTION Importantes Consignes de Sécurité Cette machine à coudre à usage domestique est conçue pour répondre aux normes IEC/EN 60335-2-28 et UL1594. CONSIGNES DE SÉCURITÉ IMPORTANTES Lors de l’utilisation d’un appareil électrique, les précautions de sécurité essentielles doivent toujours être respectées, y compris les suivantes : Lisez attentivement toutes les instructions avant d’utiliser cette machine à...
- Page 72 INTRODUCTION Importantes Consignes de Sécurité - Portez des lunettes de sécurité. - Éteignez la machine (interrupteur sur “O”) lors des réglages au niveau de de la canette, changement de pied presseur, etc. - Ne faites jamais tomber, ni glisser un objet dans les ouvertures. - N’utilisez pas la machine à...
- Page 73 INTRODUCTION Importantes Consignes de Sécurité réduites ou un manque d’expérience et de connaissances, sauf si une personne responsable de leur sécurité les surveille ou les aide à utiliser la machine à coudre. Ne laissez pas les enfants jouer avec la machine à coudre. Le niveau sonore en conditions normales est inférieur à...
- Page 74 Pour nous assurer que l’on vous fournit toujours les dernière tendances de couture, le fabricant se réserve le droit de changer l’apparence, la conception ou les accessoires de cette machine à coudre lorsque considéré nécessaire. SINGER & Singer vous facilite la couture est une marque enregistré de The SINGER ® ®...
-
Page 75: À Propos De Votre Machine
À PROPOS DE VOTRE MACHINE Parties Avant Principales de la Machine LE CADRAN DE LA TENSION DU FIL vous permet de sélectionner la tension appropriée pour le LE RELEVEUR DE FIL LE COUPE-FIL LE PIED PRESSEUR retient le tissu contre le mécanisme d’entraînement, faisant déplacer le tissu, pour vous, en dessous du pied lorsque vous cousez. - Page 76 À PROPOS DE VOTRE MACHINE Parties Arrière Principales de la Machine LE PORTE-BOBINE HORIZONTAL supérieur. L’AXE DU BOBINEUR supporte la canette lorsqu’elle se rempli. (Voir Page 12) LE TROU POUR LE DEUXIÈME PORTE-BOBINE est utilisé pour introduire un porte-bobine LE VOLANT (TOUJOURS LE FAIRE TOURNER VERS VOUS), ccontrôle le mouvement de L’INTERRUPTEUR MOTEUR/LUMIÈRE met, simultanément, la machine en marche tout en allumant la lumière.
-
Page 77: La Surface De L'aiguille Et Du Pied Presseur
À PROPOS DE VOTRE MACHINE La Surface de l’Aiguille et du Pied presseur LE LEVIER DE L’ENFILEUR DE CHAS D’AIGUILLE d’aiguille. LE GUIDE DE L’ENFILEUR DE CHAS D’AIGUILLE LE GUIDE-FIL L’AIGUILLE LA VIS DU PIED PRESSEUR sécurise le support du pied presseur sur la barre du pied presseur. LE PIED PRESSEUR retient le tissu contre le mécanisme d’entrainement tout en cousant. -
Page 78: Le Compartiment De Rangement Amovible
Guide Matelassé (Pour des coutures droites et précises) g. Paquet d’Aiguilles (aiguilles de remplacement) h. Chapeaux de Bobine (2 grandeur pour les différents types de bobine) Canettes (de Classe 15 transparente de SINGER ® Tournevis en “L” (pour enlever la plaque d’aiguille lors du nettoyage) k. -
Page 79: Préparatifs De La Couture
Déplacez l’interrupteur principal (A) dans la position “ I ” pour alimenter la machine et la lumière. ⚠ ⚠ Votre machine à coudre SINGER ® température ambiante normale. Les températures extrêmement élevées ou basses peuvent affecter le résultat de couture. -
Page 80: Remplissage De La Canette
PRÉPARATIFS DE LA COUTURE Remplissage de la Canette Cette machine utilise des canettes SINGER ® de Classe 15 transparente. Utilisez seulement ce type de canette, pour votre machine, lorsque vous désirez en achetés de surplus. Ne jamais utilisé des canettes en métal. -
Page 81: Mise En Place De La Canette
PRÉPARATIFS DE LA COUTURE Mise en Place de la Canette ⚠ Placez l’interrupteur de la machine en position (“O”) avant de retirer la canette. 1. Lors de l’insertion ou le retrait de la canette, l’aiguille et le pied-presseur doivent être complètement relevées. 2. - Page 82 PRÉPARATIFS DE LA COUTURE ⚠ machine. 1. Pour débuter, faites tourner le volant vers vous jusqu’à ce que l’aiguille soit dans sa position la Soulevez le pied presseur. Ceci correctement. sur le porte-bobine horizontal. dans le guide de pré-tension. contourner la partie du bas et remonter dans la rainure de gauche.
- Page 83 PRÉPARATIFS DE LA COUTURE ⚠ Par mesure de sécurité, placez l’interrupteur de la machine en position (“O”) avant d’utiliser 1. Amenez l’aiguille en position haute en tournant le volant vers vous. Si vous tournez le volant dans le sens contraire, la machine pourrait ce coincé...
-
Page 84: Rappel Du Fil Inférieur
PRÉPARATIFS DE LA COUTURE Rappel du Fil Inférieur ⚠ machine. (B), l’aiguille doit descendre en premier lieu (C) et continuer de tourner jus jusqu’à ce que l’aiguille atteigne sa position la plus haute (D). 2. Pendant que vous faite tourner le volant, tirez le trou de la plaque d’aiguille (E). -
Page 85: Débuter La Couture
DÉBUTER LA COUTURE Avant de Débuter la Couture machine pour les techniques de couture de base telle: la couture au point droit, la couture de point décoratif, la couture de point extensible, la confection de boutonnière et la couture de bouton. Pour chaque technique, vous avez l’occasion de coudre. -
Page 86: Réglage Du Point
DÉBUTER LA COUTURE Réglage du Point Endroit Comment les Points ce Forme Envers tissu. La couture est bien équilibrée quand le Fil supérieur Fil de la Canette Le cadran de Réglage de Tension du Fil Le Cadran de Réglage de Tension du Fil se règle entre 0 et 9. -
Page 87: Cadran De Sélection Des Motifs
DÉBUTER LA COUTURE Cadran de Sélection des Motifs Cadran de la Longueur du Point Cadran de Sélection des Motifs Le Cadran de Sélection des Motifs est utilisé pour choisir le motif que vous voulez coudre. Le cadran peut être tourné vers la gauche ou la droite. Pour Coudre les Motifs de Couleur Gris: 1. -
Page 88: Couture Au Point Droit
DÉBUTER LA COUTURE La Couture au Point Droit Cadran de Sélection des Motifs Cadran de la Longueur du Point Le point droit est utilisé pour la couture et la surpiqûre. COMMENT: Réglez la machine pour faire un Point Droit en déplaçant le Cadran de Sélections des Motifs sur le point droit. -
Page 89: Couture D'un Point Décoratif
DÉBUTER LA COUTURE Couture D’un Point Décoratif Cadran de Sélection des Motifs Cadran de la Longueur du Point Un point décoratif est utilisé pour embellir des coutures et ajouter du style à vos projets de couture. (Voir www.singerco.com pour plus de points décoratifs qui peuvent être utilisés.) COMMENT: Sélectionnez le point désiré... -
Page 90: Couture D'un Point Extensible
DÉBUTER LA COUTURE Couture d’un point extensible Cadran de Sélection des Motifs Cadran de la Longueur du Point Le point extensible est utilisé pour les tricots. Ce type de couture s’étirera avec le tissu. (Voir www.singerco.com pour plus de points extensible qui peuvent être utilisés.) COMMENT: Réglez la machine sur le point désiré... -
Page 91: Couture D'une Boutonnière 4 En Étapes
DÉBUTER LA COUTURE Couture d’une Boutonnière en 4-étapes Cadran de Sélection des Motifs Cadran de la Longueur du Point Cette machine comporte un mécanisme incorporé pour confectionner des boutonnières, vous permettant de coudre des boutonnières en 4 étapes facile. Vous pouvez voir les réglages en gris, pour la boutonnière sur le Cadran de Sélection des Motifs. -
Page 92: Couture D'un Bouton
DÉBUTER LA COUTURE Couture d’un Bouton Cadran de Sélection des Motifs Cadran de la Longueur du Point facilement et rapidement. COMMENT: 1. Réglez la machine sur le point droit en déplaçant le Cadran de Sélections des Motifs sur le point droit. - Page 93 Il est aussi important d’utiliser la bonne aiguille pour le tissu à coudre. (Visiter www.singerco.com pour voir le Guide de Reference des Points) Pour de meilleurs résultats, utilisez des aiguilles de marque SINGER dans votre machine à coudre SINGER ® ®.
-
Page 94: Remplacer Le Pied Presseur
DÉBUTER LA COUTURE Remplacement du Pied Presseur ⚠ Placez l’interrupteur de la machine en position (“O”) avant de remplacer le pied. Soulevez le levier du pied presseur, avant de remplacer le pied presseur. s’insère dans le support du pied presseur (b). Le support du pied presseur à une rainure (c) à l’avant, qui maintient le pied presseur en place. -
Page 95: Dépannage & Entretien
DÉPANNAGE & ENTRETIEN Dépannage Le Fil fait des Boucles en Dessous. Le Fil de la Canette Apparait sur le Dessus du Tissu. Le Fil Supérieur Casse Le Fil s’Emmêle au début Points Sautés Le Fil de la Canette se Brise Les Aiguilles se Cassent 10. -
Page 96: Dépannage
DÉPANNAGE & ENTRETIEN Dépannage 3. LE FIL SUPÉRIEUR CASSE Cause Possible: Solution: du chapeau de bobine et ainsi ne peut alimenter la machine librement). (Voir page 14) Cause Possible: Solution: page 14) Cause Possible: la tension supérieure est trop grande. Solution: 4. - Page 97 Cause Possible: pas le bon type de canette. Solution: utilisez des canettes SINGER ® du même type que celle fourni avec la machine – n’utilisez pas de substitue. Votre machine est livrée avec des canettes transparente SINGER ® type Classe 15. 9. LES AIGUILLES SE CASSENT Cause Possible: l’aiguille est courbée, émoussée ou endommagée.
- Page 98 DÉPANNAGE & ENTRETIEN Dépannage 10. LES POINTS SONT DÉFORMÉS Cause Possible: Cause Possible: “poussez” ou “tirez” le tissu. Solution: ne poussez / ne tirez pas sur le tissu lorsque vous cousez, laissez plutôt les griffes d’entraînement de la machine déplacer le tissu en dessous du pied presseur tout en le guidant simplement.
- Page 99 Solution: assurez-vous que le cordon d’alimentation et/ou le rhéostat est brancher correctement. (Voir page 11) Cause Possible: la canette utilisée n’est pas la bonne. Solution: utilisez seulement des canettes de marque SINGER ® qui sont identique à celle fourni avec votre machine. (Voir page 10)
-
Page 100: Entretient
DÉPANNAGE & ENTRETIEN Entretient Nettoyage des Griffes & Autour de la Navette ⚠ Avant de nettoyer la machine, débrancher la machine de la prise électrique murale. Élevez l’aiguille le plus haut possible en tournant le volant vers vous. Soulevez le levier du pied presseur. Pour vous assurer du bon fonctionnement de votre machine, il est essentiel de garder toutes les pièces principales propres. -
Page 101: Annexe - Glossaire
ANNEXE - GLOSSAIRE Lexique des Termes de Machine à coudre Point Arrière qu’elle ne se défasse. Commencez à coudre le début de la couture environ 3-4 points, coudre ensuite en marche-arrière 3-4 points. Coudre vers l’avant de nouveau pour terminer la couture, ensuite coudre en marche-arrière 3-4 points, coudre de nouveau vers l’avant pour terminer. - Page 102 Le dépôt d’appareils électriques dans une décharge municipale présente le risque de fuite de substances dangereuses dans les nappes phréatiques, qui peuvent ensuite s’introduire dans la chaîne alimentaire, devenant ainsi un risque pour votre santé et votre bien-être. SINGER est une marque enregistré de The SINGER ® ® ©2016 The SINGER ®...
Need help?
Do you have a question about the Fashion Mate 3333 and is the answer not in the manual?
Questions and answers