Emeril Lagasse Blender & Beyond Plus HB2248, HB2248S Manual
- Owner's manual (20 pages)
Advertisement
Before You Begin
The Emeril Lagasse Blender & Beyond Plus™ will provide you many years of delicious family meals and memories around the dinner table. But before you begin, it's very important that you read this entire manual, making certain that you are totally familiar with this appliance's operation and precautions.
IMPORTANT SAFEGUARDS

PREVENT INJURIES! CAREFULLY READ ALL INSTRUCTIONS BEFORE USE!
When using electrical appliances, basic safety precautions should be followed, including the following:
- Read all instructions before using.
- To protect yourself from electric shock, never immerse the appliance or the power cord in water or other liquids.
- Avoid contact with moving parts.
- Do not operate any appliance if it has a damaged cord or plug, if it is not working properly, or if it has been damaged or dropped. Return the appliance to an authorized service facility for examination, repair, or adjustment.
- The use of attachments not recommended or sold by the manufacturer may cause fire, injury, or electric shock.
- Do not use outdoors.
- Do not let the power cord hang over the edge of the table or counter or touch hot surfaces, including the stove.
- The blades are sharp. Handle carefully.
- The appliance will not work with a 220-volt power supply and should not be used with a converter. Using the appliance with a converter could damage the appliance, the converter, and the outlet. Using a converter will invalidate the guarantee and any protection plan policy.
- Do not plug the appliance into the power supply until it is fully assembled.
- This appliance is not intended for use by children or by people with reduced physical, sensory, or mental capabilities or lack of experience and knowledge. Close supervision is necessary when any appliance is used near children. Children should be supervised to ensure that they do not play with the appliance.
- Close supervision is necessary when any appliance is used by or near children.
- Keep hands and utensils out of the container while blending to reduce the risk of severe injury to persons or damage to the appliance. A scraper may be used but must be used only when the appliance is not running.
- Remove the beaters from the appliance before washing.
- Keep hands and utensils away from moving blades or discs while processing food to reduce the risk of severe injury to people or damage to the food processor.
- A scraper may be used but must be used only when the food processor is not running.
- To reduce the risk of injury, never place the cutting blade or discs on base without first putting the bowl properly in place. Be certain the cover is securely locked in place before operating the appliance. Never feed food by hand. Always use the food pusher.
- Do not fill the bowl above the maximum marked capacity to avoid risk of injury due to damage to the cover or bowl.
- Keep hands and utensils away from the cutting blade while chopping food to reduce the risk of severe injury to people or damage to the food chopper. A scraper may be used but only when the food chopper is not running.
- Do not attempt to defeat the cover interlock mechanism.
- Keep your hands, hair, and clothing – as well as spatulas and other utensils – away from beaters during operation to reduce the risk of injury to persons and/or damage to the appliance.
Electrical Safety
- Do not use an extension cord. Plug the charger directly into an electrical outlet. Use only with the charger provided with the appliance. Do not attempt to use this charger with any other product. Likewise, do not attempt to charge this appliance with any other charger.
- This appliance should be serviced only by qualified service technicians. Contact Customer Service using the information located on the back of this manual.
- Failure to follow these instructions can result in death, fire, or electrical shock.
- DO NOT clean with metal scouring pads. Pieces can break off the pad and touch electrical parts, creating risks of electric shock.
- This appliance is for home use only. If the appliance is used improperly or for professional or semi-professional purposes or if it is not used according to the instructions in the user manual, the guarantee becomes invalid and HPC Brands will not be held liable for damages.
- Do not incinerate this appliance even if it is severely damaged. The batteries can explode in a fire.
- Use only with a Listed Class 2 Power Unit.
- SAVE THESE INSTRUCTIONS.
SAVE THIS INSTRUCTION MANUAL.
FOR HOUSEHOLD USE ONLY.
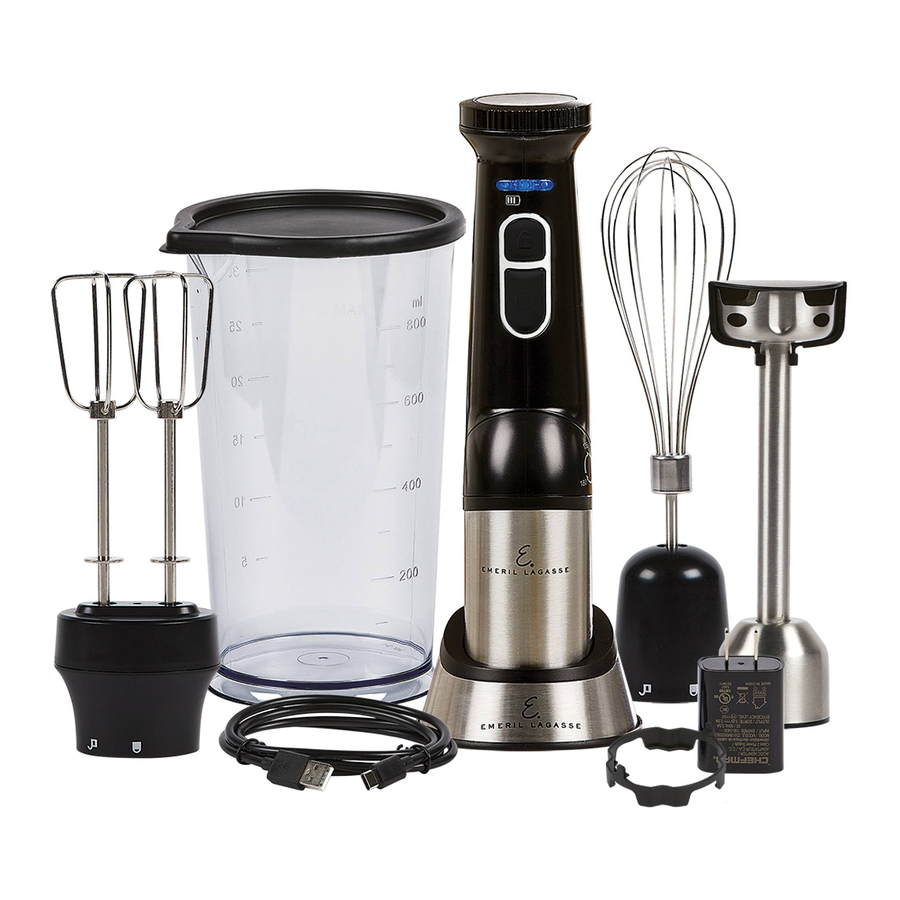
Parts & Accessories

- Variable Speed Controller
- Indicator Lights
- Unlock Button
- Power Button
- Motor Housing
- Angle Adjustment Button (on the back)
- Blending Shaft
- Blending Guard*
- Storage Guard
- Whisk Holder
- Whisk
- Beater Gear Box
- Beaters
- Frother*
- To-Go Cup*
- To-Go Cup Lid*
- USB/AC Adaptor
- USB-C Power Cord
- Charging Base
- Blending Jar Lid
- Blending Jar (800 mL)
- Chopper Bowl Lid*
- Chopper Bowl (500 mL)*
- Chopper Blade*
- Chopper Bowl Feet*
- Masher Holder*
AA. Masher Shaft*
AB. S-Blade*
AC. Food Processor Bowl*
AD. Food Processor Bowl Feet*
AE. Slicer*
AF. Spiralizer*
AG. Shredder Disc*
AH. Pusher*
AI. Food Processor Bowl Lid*

* Some accessories may be sold separately.
NOTE: Unpack all listed contents from the packaging. Contents vary by model. Please remove any clear or blue protective film on the components before use.
Instructions for Use
Before First Use
- Read all material, warning stickers, and labels.
- Unpack all listed contents from the packaging. Please make sure that your appliance has been shipped with the components that you ordered. Some accessories listed may be sold separately. Check everything carefully before use. If any part is missing or damaged, do not use this product. Contact HPC Brands, LLC using the customer service number located on the back of this manual.
- Remove all packing materials, stickers, and labels from the appliance. Remove any clear or blue protective film on the components before use. Wash the components with soap and water.
Charging the Appliance


- The appliance can be charged either by loading it into the Charging Base or by plugging a USB-C charger into the appliance.
- When charging the appliance, the Indicator Lights show the appliance's power level:
- Three Indicator Lights: 100% power.
- Two Indicator Lights: 75% power.
- One Indicator Light: 40% power.
- When the last Indicator Light is flashing, the battery power is less than 30% and should be recharged soon.
General Use
- Make sure the appliance is fully charged prior to use.
- To start the appliance, first press the Unlock Button. The Indicator Lights will turn red. Then, press and hold the Power Button. The Indicator Lights will turn blue. If you release the Power Button, the appliance will stop operating but remain ready to use for 10 seconds. While the Indicator Lights are blue, you can release and press the Power Button as needed, such as to pulse. After 10 seconds, the Indicator Lights will turn off. In this state, you will need to press the Unlock Button again before pressing the Power Button to continue using the appliance.
- Use the Variable Speed Controller to set the speed of the appliance. Set the Variable Speed Controller to a low speed before starting the appliance. Once the appliance is running, adjust the speed as needed.
NOTE: During use, it is normal for suction to increase at the bottom of the container. - When blending is complete, release the Power Button before removing the appliance from the mixture. ƒ
- The recommended time of use for the appliance is 1 minute of continuous use.
Indicator Lights
When you press the Unlock Button, one Indicator Light will turn red. When you press the Power Button within 10 seconds, the Indicator Lights will turn blue. The number of lights displayed indicates the appliance's battery charge (see the "Charging the Appliance" section).
Operating Tips
- Cut solid foods into ½-inch (13 mm) pieces for easier mixing or chopping. ƒ
- Use an up and down motion for blending and pureeing.
- ƒ If using the blender directly in a saucepan, be sure to remove the pan from the heat before using the blender.
Adjusting the Appliance's Orientation
The appliance can be angled to make different activities easier. To adjust the orientation of the appliance:

- Press the Angle Adjustment Button.
- Rotate the bottom half of the appliance until the appliance clicks into place in the desired orientation.
- The appliance can be rotated to three different angles: 180°: Ideal for immersion blending. 135°: Ideal for whisk blending. 90°: Ideal for beating.
Using the Blender
Use the hand blender for preparing dips, sauces, soups, mayonnaise, and baby food; mixing milkshakes; and crushing ice. You can blend in the Pitcher or most other vessels.

- Attach the Blending Shaft to the Motor Housing and twist until they lock into place.
- Attach the Blending Guard to the end of the Blending Shaft. The Blending Guard helps prevent the edges of the Blending Shaft from scratching cookware.
- Lower the appliance into the vessel containing your ingredients. Adjust the Variable Speed Controller to select a low speed. Press the Unlock Button and then press and hold the Power Button to start. Adjust the Variable Speed Controller as needed.
- When you are done, release the Power Button to stop. After 10 seconds, the Indicator Lights will turn off.
Using the Accessories
Using the Beaters

- Attach the Beaters to the Beater Gear Box.
- Attach the Beater Gear Box to the Motor Housing and twist until they lock into place.
- Lower the appliance into the vessel containing your ingredients. Use the Variable Speed Controller to select a speed. Press the Unlock Button and then press and hold the Power Button to turn on the appliance.
- When you are done, release the Power Button to stop. After 10 seconds, the Indicator Lights will turn off.
Using the Whisk

- Attach the Whisk to the Whisk Holder and then the Motor Housing and twist until they lock into place.
- Lower the appliance into the vessel containing your ingredients. Use the Variable Speed Controller to select a speed. Press the Unlock Button and then press and hold the Power Button to turn on the appliance.
- When you are done, release the Power Button to stop. After 10 seconds, the Indicator Lights will turn off.
Using the Frother

- Attach the Frother to the Whisk Holder and then the Motor Housing and twist until they lock into place.
- Lower the appliance into the vessel containing your ingredients. Use the Variable Speed Controller to select a speed. Press the Unlock Button and then press and hold the Power Button to turn on the appliance.
- When you are done, release the Power Button to stop. After 10 seconds, the Indicator Lights will turn off.
Using the Chopper
Do not use to chop ice cubes or extremely hard food, such as nutmeg, coffee beans, and grains.

- Before chopping, carefully remove the plastic cover from the blade. The blade is very sharp, so always hold the blade by the upper plastic part.
- Place the Chopper Blade on the center pin of the Chopper Bowl. Press down on the blade and lock the blade in place. Always place the Chopper Bowl on the anti-slip base.
- Place your ingredients in the Chopper Bowl.
- Place the Chopper Bowl Lid on the Chopper Bowl.
- Attach the Motor Housing to the Chopper Bowl Lid and twist until they lock into place.
- Use the Variable Speed Controller to select a speed. Press the Unlock Button and then press and hold the Power Button to turn on the appliance. While the appliance is running, hold the Motor Housing with one hand and hold the Chopper Bowl with the other.
- When you are done, release the Power Button to stop. After 10 seconds, the Indicator Lights will turn off.
Using the Slicer, Spiralizer, and Shredder
Do not slice, spiralize, or shred more than 17 oz (500 g) of food at once. Do not use these attachments with meat.


- Place the Shredder Disc on the center pin of the Food Processor Bowl. Press down on the blade and lock the blade in place. Always place the Food Processor Bowl on the anti-slip base.
- To spiralize, attach the Spiralizer to the top of the Shredder Disc. To slice, attach the Slicer to the top of the Shredder Disc. To shred, do not add any attachment to the Shredder Disc.
- Place the Food Processor Bowl Lid
- Attach the Motor Housing to the Food Processor Bowl Lid and twist until they lock into place.
- Press the Unlock Button and then press and hold the Power Button to turn on the appliance.
- Carefully use the Pusher to guide food into the feeder tube. Never use your finger or a utensil to guide food into the feeder tube.
- When you are done, release the Power Button to stop. After 10 seconds, the Indicator Lights will turn off.
Using the S-Blade

- Place the S-Blade on the center pin of the Food Processor Bowl. Press down on the blade and lock the blade in place. Always place the Food Processor Bowl on the anti-slip base.
- Place the Food Processor Bowl Lid over the Food Processor Bowl and twist to lock the lid in place.
- Attach the Motor Housing to the Food Processor Bowl Lid and twist until they lock into place.
- Use the Variable Speed Controller to select a speed. Press the Unlock Button and then press and hold the Power Button to turn on the appliance.
- Carefully use the Pusher to guide food into the feeder tube. Never use your finger or a utensil to guide food into the feeder tube.
- When you are done, release the Power Button to stop. After 10 seconds, the Indicator Lights will turn off.
Using the Masher

- Attach the Masher Shaft to the Masher Holder and twist until they lock into place.
- Attach the Masher Holder to the Motor Housing and twist until they lock into place.
- Lower the appliance into the vessel containing your ingredients. Use the Variable Speed Controller to select a speed. Press the Unlock Button and then press and hold the Power Button to turn on the appliance.
- To adjust your speed, turn the Variable Speed Controller. To pulse, press and release the button.
- When you are done, release the Power Button to stop. After 10 seconds, the Indicator Lights will turn off.
Processing Information
Choosing a Speed for All Functions
Recommendation: Start at a low speed and increase as needed after you begin.
| Tool/ Attachment* | Function | Speed | Maximum Capacities | Size | Operation Time |
| S-Blade | Food Processor | High | 300 g/10.58 oz raw beef | 2–2.5 cm.78 in–.98 in | 15 seconds |
| 200 g/7 oz nuts | N/A | 15 seconds | |||
| 200 g/7 oz vegetables, such as carrots, potatoes | 2–3 cm.78 in–1.18 in | 15 seconds | |||
| 200 g/7 oz Parmesan (hard) cheese | 1–2 cm.39 in–.78 in | 15 seconds | |||
| 200 g/7 oz baking chocolate | 1–2 cm.39 in–.78 in | 15 seconds | |||
| S-Blade | Food chopper | High | 150 g/5.29 oz raw beef | 2–2.5 cm.78 in–.98 in | 15 seconds |
| 100 g/3.5 oz nuts | N/A | 15 seconds | |||
| 100 g/3.5 oz vegetables, such as carrots, potatoes | 2–3 cm.78 in–1.18 in | 15 seconds | |||
| 100 g/3.5 oz Parmesan (hard) cheese | 1–2 cm.39 in–.78 in | 15 seconds | |||
| 100 g/3.5 oz baking chocolate | 1–2 cm 39 in–.78 in | 15 seconds | |||
| Masher | Masher | High | To process 1000 g boiled potatoes using a large bowl | 1–2 cm 39 in–.78 in | 1 minute |
| Slicer/ shredder blade | Slicing/ shredding food and vegetables, such as carrots | High | 500 g/17.63 oz vegetables, such as carrots, cabbage, potatoes The Slicer and Shredder Disc are not suitable for cutting hard meat and cheese. | N/A | Until a batch is shredded |
* Some accessories may be sold separately.
Care & Cleaning
Cleaning
- Power off and unplug the appliance before cleaning.
- All blades are very sharp. Handle carefully. ƒ
- Use only a damp cloth to clean the Motor Housing and Chopper Bowl Lid. ƒ
- Do not immerse the Motor Housing in water.
- Remove the Blade Guard before cleaning the Blender Shaft.
- After processing salty food, rinse the parts that were used immediately. ƒ
- When processing colorful food, the plastic parts of the appliance can become discolored. Wipe these parts with vegetable oil before cleaning.
Storage
- ƒ Always place the plastic guard on the Chopper Blade before storing. Store the appliance and its parts in a clean, dry place.
Unit Specifications
| Model Number | Battery Type | Battery Voltage | Speed (Min.-Max.) | Blending Jar Capacity | USB Type |
| HB2248S | 18650 2000mAh | 7.4V DC | 10,000–15,000 r/min | 800 mL | C |
| HB2248 | 18650 2000mAh | 7.4V DC | 10,000–15,000 r/min | 800 mL | C |
When using electrical appliances, basic safety precautions should always be followed. Do not use the Emeril LagasseTM Blender & Beyond PlusTM until you have read this manual thoroughly.


Documents / ResourcesDownload manual
Here you can download full pdf version of manual, it may contain additional safety instructions, warranty information, FCC rules, etc.
Download Emeril Lagasse Blender & Beyond Plus HB2248, HB2248S Manual
Advertisement

Need help?
Do you have a question about the Blender & Beyond Plus HB2248 and is the answer not in the manual?
Questions and answers