Advertisement
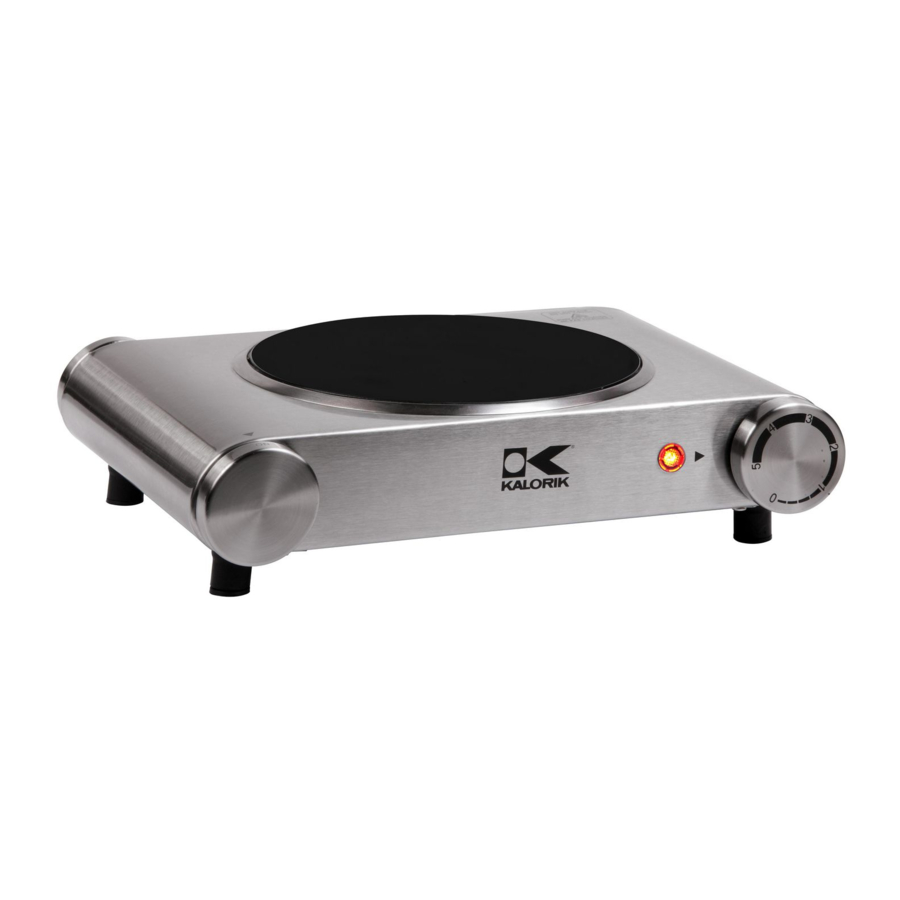
PARTS DESCRIPTION

- Power Dial (On/Off)
- Heating surface
- Indicator light
- Temperature dial
IMPORTANT SAFEGUARDS
When using electrical appliances, basic safety precautions should always be followed, including the following:
- READ ALL INSTRUCTIONS.
- Check that your voltage in your home corresponds to what is stated on the appliance.
- Do no touch hot surfaces. Use handles or knobs.
- To protect against electrical shocks do not immerse cord, plugs, or the appliance in water or any liquid.
- Close supervision is necessary when any appliance is used near children. This appliance is not recommended for children to use.
- Unplug from outlet when not in use and before cleaning. Allow to cool before cleaning the appliance or moving the appliance.
- Never leave the appliance unattended, while it is operating.
- Do not operate any appliance with a damaged cord or plug, or after the appliance malfunctions, or has been damaged in any manner. Return appliance to the nearest authorized service facility for examination, repair or adjustment.
- The use of accessory attachments not recommended by the appliance manufacturer may cause injuries.
- Do not use outdoors.
- Do not place the food directly on the heating surfaces.
- Do not clean with metal scrubbing parts. Pieces can break off the pad and short electrical parts, creating a possibility of electric shock.
- Do not use appliance for other than intended use.
- Do not let cord hang over edge of table or counter, or touch hot surfaces.
- Do not place on or near a hot gas or electric burner, or in a heated oven or microwave oven.
- Extreme caution must be used when moving an appliance containing hot liquids.
- A fire may occur if the cooking plate is covered or touching flammable material, including curtains, draperies, walls, and the like, when in operation.
- To disconnect, turn any control to "0" or "OFF", then remove plug from wall outlet.
- Do not pull on the power cord to disconnect, pull on the head of the plug.
- Always place on a flat, level and heat-resistant surface.
SAVE THESE INSTRUCTIONS HOUSEHOLD USE ONLY
3-PRONG PLUG INSTRUCTIONS
For your personal safety, this appliance must be grounded. This appliance is equipped with a power supply cord having a 3-prong grounding plug. To minimize possible shock hazard, the cord must be plugged into a mating 3-prong, grounding type, wall receptacle, grounded in accordance with the National Electrical Code ANSI/NFPA 70 latest edition and all local codes and ordinances. If a mating wall receptacle is not available, it is the personal responsibility and obligation of the customer to have a properly grounded, 3-prong, wall receptacle installed by a qualified electrician.
SHORT CORD INSTRUCTIONS
A short power supply cord is provided to reduce the hazards resulting from becoming entangled in, or tripping over a longer cord. Extension cords may be used if care is exercised in their use.
- The electrical rating of the extension cord should be at least that of the appliance. If the electrical rating of the extension cord is too low, it could overheat and burn.
- The resulting extended cord should be arranged so that it will not drape over the counter top or tabletop where it can be pulled on by children or tripped over.
BEFORE THE FIRST USE
- Place on a dry, flat, level, and heat-resistant surface and close to an electric socket.
- For proper ventilation provide at least 4-6 in (10-15 cm) of space above and around the appliance.
- Make sure the temperature dial (4) is set in "0" position, and that the power dial (1) is set to "OFF", before plugging in.
- Plug into a 120 Volt A.C. wall outlet.
- Turn the ON/OFF knob to the ON position by turning clockwise.
- The invisible protective coating must be removed before you can use the appliance. To do this, set the controls to the maximum setting and heat at the "5" level for approximately 10 minutes. Smoke may develop, so make sure that the room is ventilated.
- Set the temperature dials to "0", switch off the cooking plate with the power dial and allow cooling down completely. The cooking plate is now ready for use.
- Keep the surface of the heating element (2) clean and dry.
OPERATING INSTRUCTIONS
- Select a suitable position close to an electric socket, on a dry, flat, level, and heat-resistant surface.
- Make sure the temperature dial (4) is in the "0" position, and the power dial (1) is in the "OFF" position, before plugging in the power outlet.
- Plug into a 120 Volt A.C. wall outlet.
- For maximum heat efficiency, always use flat-bottomed cookware, which makes full contact with the cooking plates. Ideally, the pan's base should be of the same size as the cooking plate that it is placed on.

Do not place food directly on the heating plates!
- Place filled cookware on the burner. NOTE: DO NOT operate the burner without filled cookware on the burner.
- Turn the ON/OFF knob to the ON position by turning clockwise.
- Turn the Temperature Control Knob clockwise to the desired setting. NOTE: "5" is the highest setting. The indicator light (3) will illuminate at first, then blink on and off as the temperature is reached and regulated by the thermostat.

The metal surface will become hot! Do not touch while in use.
- After use, turn temperature dial back to "0", turn the power dial back to "OFF", and unplug the appliance from the electrical outlet. Allow the unit to cool before moving or cleaning.
- Due to the cooking plate construction, residual heat will remain after switching off. This may be used to keep food warm for a short period. Be careful not to touch the heating elements until they have completely cooled down, at least for 1 hour.
HINTS AND TIPS
- Do not use with unstable pans or pans that do not have a flat bottom.
- Never switch the unit on without a pan being placed on the heating elements, as it may damage the appliance
CLEANING AND MAINTENANCE
- Before cleaning, unplug the appliance and wait for it to cool down completely.
- Wipe with a damp cloth. Dry after cleaning.
- To clean the ceramic glass surface, use a ceramic glass cooktop cleaner. Cleaners adapted to this type of surface allow a deepcleaning of the cooking plate, without risk of damage.
- Do not clean the housing with abrasive scouring pads or steel wool as this will damage the finish. Also, pieces can break off the pad and short electrical parts, creating the possibility of electric shock.
- Do not immerse in water or any other liquid.
- All servicing, other than cleaning, should be performed by an authorized service representative.

Documents / ResourcesDownload manual
Here you can download full pdf version of manual, it may contain additional safety instructions, warranty information, FCC rules, etc.
Download Kalorik EKP 43255 - Ceramic Glass Cooking Plate Manual
Advertisement


Need help?
Do you have a question about the EKP 43255 and is the answer not in the manual?
Questions and answers