Advertisement
- 1 IMPORTANT SAFEGUARDS
- 2 Parts Diagram
- 3 Cleaning and Set Up Instructions
- 4 OPERATING INSTRUCTIONS
- 5 CHOOSING FOOD TO DEHYDRATE
- 6 PRE-TREATMENT OF FOODS
- 7 DEHYDRATING TIPS
- 8 REHYDRATING
- 9 MAKING JERKY
- 10 STORING JERKY
- 11 DRYING FLOWERS AND CRAFTS
- 12 RECIPES
- 13 DEHYDRATING SAUSAGE
- 14 FRUIT ROLL-UPS
- 15 TROUBLESHOOTING
- 16 Documents / Resources
IMPORTANT SAFEGUARDS

Read and understand all safety instructions prior to use. Your safety is most important! Failure to comply with procedures and safe guards may result in serious injury or property damage. Remember: Your personal safety is your responsibility.
When using electrical appliances, basic safety precautions should always be followed including the following:
- CHECK FOR DAMAGED PARTS. Before using the Dehydrator, check that all parts are operating properly and perform the intended functions. Check for alignment of moving parts, binding of moving parts, mounting and any other conditions that may affect the operation. Do not use if power cord is damaged or frayed. Do not operate the Dehydrator with a damaged cord or plug or after the appliance malfunctions or has been damaged in any manner. Return appliance to the nearest authorized service facility for examination, repair, or adjustment.
- Reduce risk of unintentional starting. Make sure the power switch is in the "OFF" position before connecting the Dehydrator to the power source.
- ALWAYS DISCONNECT the Dehydrator from the power source before servicing, changing accessories or cleaning the unit. Unplug the Dehydrator when not in use. Allow to cool before putting on or taking off parts.
- KEEP CHILDREN AWAY. NEVER LEAVE THE APPLIANCE UNATTENDED.
- The Manufacturer declines any responsibility in the case of improper use of the Dehydrator. Improper use of the Dehydrator voids the warranty.
- Electrical repair must be done by an authorized dealer. Use only factory original parts and accessories. Modification of the Dehydrator voids the warranty.
- DO NOT pull the power cord to unplug. Use care when using extension cords. Do not let cord hang over edge of table or counter.
- Be sure the Dehydrator is stable during use. All four feet should be secure on a level surface. The Dehydrator should not move during operation. To disconnect, turn the power switch and the temperature control knob to "off", then remove plug from wall outlet.
- DO NOT operate the Dehydrator outdoors or near any flammable or combustible materials.
- DO NOT block the air vents at the rear of the Dehydrator. Keep the Dehydrator at least 6" (15 cm) away from any wall to allow for proper air circulation.
- DO NOT operate the Dehydrator on flammable surfaces such as carpeting.
- To prevent electric shock, DO NOT IMMERSE CORD, PLUGS, OR THE WHOLE MACHINE IN WATER OR LIQUID. Serious injury and electric shock could result. DO NOT use this machine with wet hands or bare feet. DO NOT operate near running water.
- NEVER open or remove the back panel of the Dehydrator.
- After cleaning, make sure Dehydrator is completely dry before reconnecting to the power source – if not; ELECTRIC SHOCK may result.
- DO NOT operate the Dehydrator on a hot stove-top or inside an oven. DO NOT allow the power cord to drape over the Dehydrator or on hot surfaces. Do not place on or near a hot gas or electric burner, or in a heated oven.
- BEWARE! Some surfaces may become very hot during use! Serious injury may result!
Do not touch hot surfaces. Use knobs. - DO NOT use while under influence of drugs or alcohol.
- Household use only. Do not use the Dehydrator for other than intended use.
- Extreme caution must be used when moving the Dehydrator containing hot oil or hot liquids.
- The use of accessory attachments not recommended by the appliance manufacturer may cause injuries.
Save these Instructions
Disconnect from power source before cleaning the components of this machine.
READ ALL DIRECTIONS on how to clean this Dehydrator before attempting to clean it.
The warnings, cautions, and instructions discussed in this instruction manual cannot cover all possible conditions or situations that could occur.
It must be understood by the operator that common sense and caution are factors which cannot be built into this product, but must be supplied by the operator.
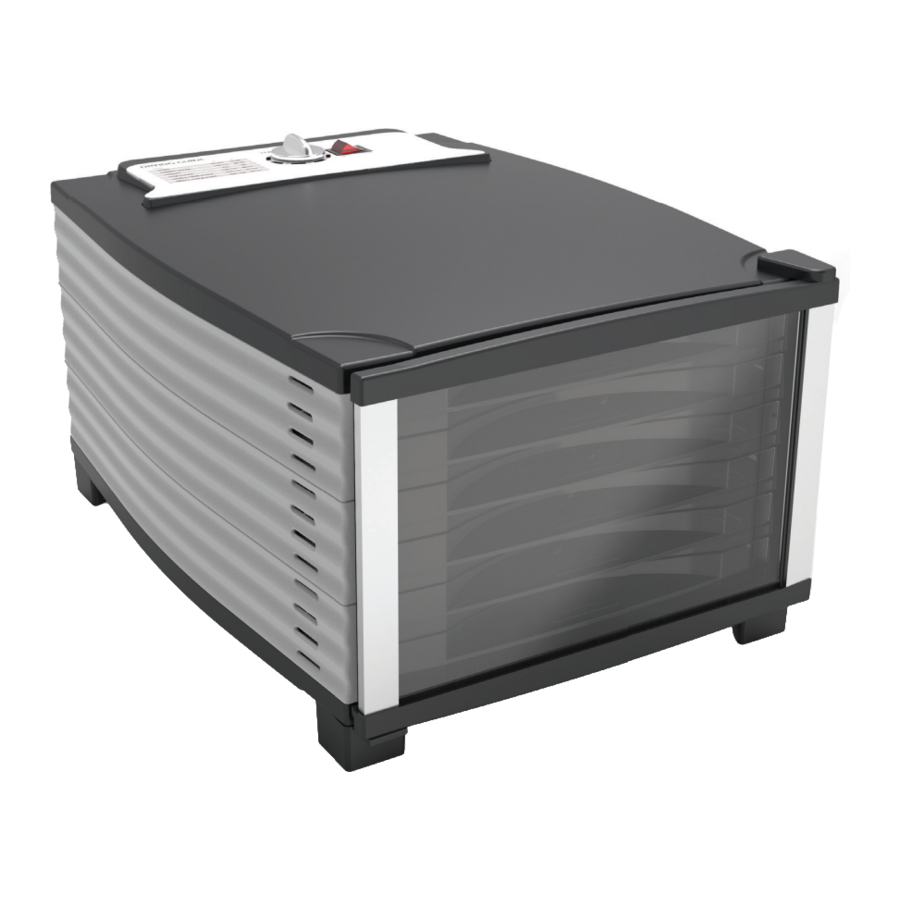
Parts Diagram

Control Panel

| Diagram Number | Description |
| 1 | Temperature Control Knob |
| 2 | Dehydrator Tray |
| 3 | Dehydrator Door |
Cleaning and Set Up Instructions
Prior to cleaning or doing any maintenance on the dehydrator, make sure it is unplugged and the power switch is in the "off" position.
Prior to your first use of the Dehydrator, clean the trays and inside of the cabinet.
- Prior to set up verify you have enough space with 6" of clearance around entire unit to ensure proper air circulation.
- It is recommended to use an additional thermometer to periodically check the dehydrator temperature, especially if the room you are dehydrating in is less than 55°F(13°C).
- It is recommended to use an external timer while drying food in the dehydrator.
- The air quality of the environment can affect the taste of the food being dehydrated.
- Disconnect electrical cord and make sure dehydrator power switch is in the "Off" position.
- Let the Dehydrator cool down before cleaning.
- Remove the trays from the Dehydrator.
- Wipe the Dehydrator clean (inside and out) with a damp sponge or soft cloth. Be careful not to get the heating element wet (located behind the screening on the back of the cabinet) during cleaning. Water can damage the heating element and increases the risk of electric shock. DO NOT immerse the dehydrator in water.
- Clean the dehydrator trays with warm, soapy water. Rinse trays thoroughly with clean water and dry immediately.
- Remove the Teflon® drip sheet and wipe clean. Dry immediately.
Grounding
This appliance must be grounded while in use to protect the operator from electric shock. The appliance is equipped with a 3-conductor cord and a 3-prong grounding type plug to fit the proper grounding-type receptacle. The appliance has a plug that looks like Figure A. An adaptor, Figure B, should be used for connecting Figure A plugs to two-prong receptacles. The grounding tab which extends from the adaptor must be connected to a permanent ground such as a properly grounded outlet box as shown in Figure C using a metal screw.
DO NOT modify the plug in any way.

EXTENSION CORDS
Use only 3-wire extension cords which have 3-prong grounding-type plugs and a 3-pole cord connector that accepts the plug from the appliance. Use only extension cords having an electrical rating not less than the rating of the appliance. DO NOT use damaged extension cords. Examine extension cord before using and replace if Damaged. DO NOT abuse extension cord and do not yank on any cord to disconnect. Keep cord away from heat and sharp edges. DO NOT allow the cord to drape over the edge of the workspace.
OPERATING INSTRUCTIONS
Please completely read and understand the operating instructions prior to using the Dehydrator.
- Place the Dehydrator on a clean, dry surface.
- Plug the Dehydrator into a standard 120 volt, 60 Hz wall outlet. Remember to clean and dry all trays prior to use.
- Position the Dehydrator at least 6" from any other wall or object to allow proper air flow. DO NOT block the air vents in anyway.
- Turn the Dehydrator ON. The power switch will illuminate.
- Preheat the Dehydrator for 5 minutes prior to loading food into the Dehydrator.
- Remove any excess water from the food. Excess water will increase dehydrating time, pat dry with a clean paper towel.
- Load the Dehydrator Trays with the food to be dehydrated. Make sure the food pieces do not touch each other and make sure there is ample space between each piece.
- If water forms on the surface of food during dehydrating, pat dry with a clean towel or paper towel. DO NOT touch walls of Dehydrator.
- Drying times may vary depending on several factors. Humidity, air temperature and size of food to be dehydrated are just a few of the things that can change the time it takes for the food to be dried to the desired level.
General Food Safety Rules for Making Jerky
When raw meat or poultry is dehydrated at home – either in a warm oven or a food dehydrator – to make jerky which will be stored on the shelf, pathogenic bacteria are likely to survive the dry heat of a warm oven and especially the 130 to 140°F of a food dehydrator. Included here is the scientific background behind drying food to make it safe and the safest procedure to follow when making homemade jerky.
| What is Jerky? | This product is a nutrient-dense meat that has been made lightweight by drying. A pound of meat or poultry weighs about four ounces after being made into jerky. Because most of the moisture is removed, it is shelf stable and can be stored without refrigeration – making it a handy food for backpackers and others who don't have access to refrigerators. Jerky is a food known at least since ancient Egypt. Humans made jerky from animal meat that was too big to eat all at once, such as bear, buffalo, or whales. North American Indians mixed ground dried meat with dried fruit or suet to make "pemmican." "Biltong" is dried meat or game used in many African countries. Our word "jerky" came from the Spanish word "charque." |
| How Can Drying Meat Make it Safe? | Drying is the world's oldest and most common method of food preservation. Canning technology is less than 200 years old and freezing became practical only during this century when electricity became more and more available to people. Drying technology is both simple and readily available to most of the world's culture. The scientific principal of preserving food by drying is removing moisture, enzymes cannot efficiently contact or react with the food. Whether these enzymes are bacterial, fungal, or naturally occurring autolytic enzymes from the raw food, preventing this enzymatic action preserves the food from biological action. |
| What are the Types of Food Drying? | There are several types of food drying. Two types of natural drying – sun drying and "adiabatic" (shade) drying – occur in open air. Adiabatic drying occurs without heat. Solar drying sometimes takes place in a special container that catches and captures the sun's heat. These types of drying are used mainly for fruits such as apricots, tomatoes, and grapes (to make raisins). Drying from an artificial heat source is done by placing food in either a warm oven or a food dehydrator. The main components of an electric food dehydrator include:
|
| Why is Temperature Important When Making Jerky? | Illnesses due to Salmonella and E. coli O157:H7 from homemade jerky raise questions about the safety of traditional drying methods for making beef and venison jerky. The USDA Meat and Poultry current recommendation for making jerky safely is to heat meat to 160°F before the dehydrating process. This step assures that any bacteria present will be destroyed by wet heat. But most dehydrator instructions do not include this step, and a dehydrator may not reach temperatures high enough to heat meat to 160°F. After heating to 160°F, maintaining a constant dehydrator temperature of 130 to 140°F during the drying process is important because:
|
| Why is it a Food Safety Concern to Dry Meat Without First Heating it to 160°F? | The danger in dehydrating meat and poultry without cooking it to a safe temperature first is that the appliance will not heat the meat to 160°F – a temperature at which bacteria are destroyed – before it dries. After drying, bacteria become much more heat resistant. Within a dehydrator or low-temperature oven, evaporating moisture absorbs most of the heat. Thus, the meat itself does not begin to rise in temperature until most of the moisture has evaporated. Therefore, when the dried meat temperature finally begins to rise, the bacteria have become more heat resistant and more likely to survive. If the surviving bacteria are pathogenic, they can cause food borne illness to those consuming the jerky. |
| What are the USDA Meat and Poultry Recommendations for Making Homemade Jerky? | Additionally, safe handling and preparation methods must always be used, including:
|
| Are There Special Considerations for Wild Game Jerky? | Yes, there are other special considerations when making homemade jerky from venison or other wild game. "Venison can be heavily contaminated with fecal bacteria – the degree varying with the hunter's skill, wound location, and other factors. While fresh beef is usually rapidly chilled, deer carcasses are typically held at ambient temperatures, potentially allowing bacteria multiplication." |
CHOOSING FOOD TO DEHYDRATE
- Use the highest quality foods. Produce in peak season has more flavor and more nutrients. Meats, fish and poultry should be lean and fresh.
- Do not use food with bruises and blemishes. Bad produce can spoil the entire batch.
- Remove as much fat as possible from meats prior to dehydrating. You can use a paper towel under meat when dehydrating to absorb fat.
PRE-TREATMENT OF FOODS
With most types of cooking, preparation is important for the best results. Following a few basic guidelines will help the quality of your dried foods and decrease dehydration time.
Foods that are prepared correctly prior to dehydration will taste better and have a better appearance. There are many ways to pre-treat foods to prevent oxidation, which will discolor apples, pears, peaches and other foods while drying.
- Remove all cores, pits and skins.
- Cut, shred or dice the food uniformly. Slices should be between ¼" and ¾" thick. Meats should not be thicker than 3/16".
- Steam or roast meat to 160°F (71°C) and poultry to 165°F (74°C) as measured with a food thermometer before dehydrating.
- The temperature of the Dehydrator must be maintained at 130-140°F (55°C-60°C) throughout the dehydrating process.
- Drying fish into jerky requires a lot of preparation. It must be cleaned and de-boned properly. Rinse the fish thoroughly to ensure all the blood is washed away. Steam or bake the fish at 200°F (93°C) until flaky before dehydrating.
- Soak cut fruit in either lemon or pineapple juice for a few minutes before dehydrating.
- Ascorbic acid can be purchased from most health food stores or pharmacies. It may come in either tablet or powder form. Dissolve approximately 2-3 tablespoons in 1 quart of water. Soak the fruit in the solution for 2-3 minutes, they place in the dehydrator.
- Waxy fruits, (such as peaches, grapes, blueberries, etc.) should be dipped in boiling water to remove the wax. This allows moisture to escape easily during dehydration.
- Blanching can be used to pre-treat foods for dehydration. There are two ways to blanch food:
- Steam Blanching: Using a steamer pot, bring 2-3" (5-7 cm) of water to a boil. Place food in steamer basket for 3-4 minutes. Remove steamed food carefully, be cautious of hot foods, and place on dehydrating trays.
- Water Blanching: Fill a large pan half full with water. Bring the water to a boil. Place food directly into boil water and cover for 3 minutes. Remove food and place it on dehydrating trays. Remember to use caution when handling hot foods.
DEHYDRATING TIPS
- Do not overlap foods. Make sure foods are flat when placing on dehydrating trays. Overlapped foods can greatly increase drying time.
- Check dryness after 6 hours, and then check every 2 hours until desired dryness.
- Make sure foods are completely dry before removing. If you are not sure, cut a sample down the middle to check for internal dryness.
- Make sure to label containers when you store your dehydrated food.
- Proper storage helps maintain quality food. Package the food when cool. Foods can be kept longer if stored in a cool, dark and dry place. The ideal storage temperature is 60°F (16°C) or lower.
- Place dehydrated foods in plastic freezer bags before storing in metal or glass containers.
Remove as much air as possible before sealing. - Vacuum sealing is the best way to keep dehydrated foods.
- Food will shrink approximately ¼ to ½ their original size and weight during dehydration. Make sure not to cut pieces of food to be dehydrated too small.
REHYDRATING
Although it is not necessary to reconstitute your dried foods, you can do so with ease. Vegetables can be used as a side dish or in recipes very easily after being reconstituted in the following way.
- Dehydrated food can be re-hydrated by soaking in cold water for a period of 3-5 minutes. Use 1 cup of water for 1 cup of dehydrated food. Once re-hydrated, the food can be cooked as usual. Using warm water to soak the food will speed up the process; however, this may result in a loss of flavor.
- Dehydrated fruits and vegetables can soaked in cold water for 2-6 hours in the refrigerator. WARNING! Soaking foods at room temperature allows harmful bacteria to grow.
- Adding sugar or salt during re-hydration may alter the flavor of the food. It is recommended that you do not add seasoning during this process.
- To make stewed fruits or vegetables after they have been dehydrated, add 2 cups of water and simmer until tender.
- Use dehydrated foods as soon as possible once the storage container is opened. Keep any unused portions in the refrigerator to avoid contamination
MAKING JERKY
Choose the leanest possible meat for making jerky. Using lean meat will help the food dry faster and help in clean up by decreasing fat drippings. Ground meat should be 80%-90% lean. Ground turkey, venison, buffalo and elk are all great choices for jerky.
Jerky seasonings for all tastes are available at Cabela's. You can also get creative and make your own. Whenever you make jerky, you should cure the mixture with cure (sodium nitrate). The cure is used to help prevent botulism. Make sure to follow the manufacturer's directions on the cure packet.
Keep raw meat and their juices away from other foods. Marinate meats in the refrigerator. DO not leave meat un-refrigerated. Prevent cross-contamination by storing dried jerky away from raw meat. Always wash your hands thoroughly with soap and water prior to working with meat products. Make sure all utensils and equipment are clean.
Meat and poultry should be kept at 40°F (5°C) or slightly below. Use or freeze ground meat or poultry within 2 days; whole red meats with 3-5 days. Defrost frozen meat in the refrigerator, not on the kitchen counter.
Special consideration should be used when working venison or other wild game, as it can become contaminated during field dressing. Venison is often held at temperatures that could potentially allow bacteria to grow, such as during transportation. Refer to the USDA Meat and Poultry Department for further questions or information on meat and food safety.
When using a dehydrator, check the temperature of the dehydrator with a dial thermometer (available at Cabela's) before drying jerky. The minimum recommended temperature for drying meats is 145°F (63°C).

It is highly recommended that you heat the meat to 160°F (71°C) beginning the dehydrating process. This step ensures that any bacteria present will be destroyed by wet heat. After heating to 160°F (71°C), maintaining a constant dehydrator temperature of 130-140°F (55-60°C) during the drying process is important because:
- The process must be fast enough for the food to dry before it spoils; and
- It must remove enough water so the microorganisms are unable to grow.
If you are using a marinade, shake off excess liquid before placing the meat evenly in a single layer on the dehydrating trays. Make sure to leave a space of approximately ¼" (.64 cm) between the pieces of meat.
Dry meat in the dehydrator at 145-150°F (63-66°C) for 4-7 hours. You may need to blot fat droplets with a paper towel from the surface of the meat occasionally. Drying times may vary based on many circumstances including but not limited to: the relative humidity of the room, the temperature of the meat at the start of the frying process, the amount of meat in the dehydrator, leanness of meat, etc.
Always allow jerky to cool before tasting.
STORING JERKY
Place jerky in a jar with a tight lid or wrap jerky in aluminum foil and store in a thick plastic food storage bag. Avoid storage in plastic containers or bags without first wrapping in aluminum foil or waxed paper. Jerky should be stored in a dark, dry place between 50-60°F (10-16°C). You can store properly dried jerky at room temperature for 1 to 2 months. You can store jerky in the freezer to extend the shelf life up to 6 months. Remember to label and date all packages.
DRYING FLOWERS AND CRAFTS
- Choose flowers that have reached their maximum bloom. At this stage the petals should be fully opened to allow drying to occur faster.
- Trim flowers so that leaves are removed and the stem is as short as possible.
- Place flowers in single layers on the dehydrator trays with the flowers evenly spaced. This will ensure that your flowers dry evenly.
- Allow flowers to dry overnight in the dehydrator rotating the trays periodically. Dry on the lowest setting.
- Dough art and beads can be dried in the dehydrator, temperatures may vary.
RECIPES
Jeff's Best Beef Jerky
Ingredients
- 2 pounds beef round steak, cut into thin strips
- 1/4 cup soy sauce
- 2 tablespoons Worcestershire sauce
- 2 tablespoons liquid smoke
- 2 tablespoons brown sugar
- 2 teaspoons salt
- 1 teaspoon ground black pepper
- 1 teaspoon meat tenderizer
- 1 teaspoon garlic powder
- 1 teaspoon onion powder
Directions
- Place beef strips in the bottom of a large bowl. Pour soy sauce, Worcestershire sauce, liquid smoke, brown sugar, salt, pepper, meat tenderizer, garlic powder, onion powder, and paprika over beef. Mix to assure all the meat is evenly coated. Cover and marinate in the refrigerator for 8 hours or overnight.
- Remove meat from bowl and place between two pieces of plastic wrap; pound to 1/8- inch thickness.
- Arrange the meat strips on the tray of a dehydrator and dry at your dehydrator's highest setting until done to your liking, at least 4 hours. Store in an airtight container or resealable bags.
Lou's Deer Jerky
Ingredients
- 1 pound boneless venison roast
- 4 tablespoons soy sauce
- 4 tablespoons Worcestershire sauce
- 2 tablespoons liquid smoke flavoring
- 1 tablespoon ketchup
- 1/4 teaspoon pepper
- 1/4 teaspoon garlic powder
- 1/4 teaspoon onion salt
- 1/2 teaspoon salt
Directions
- Slice meat into long strips, 1 inch wide and 1/8 inch thick. In a large releasable plastic bag, combine soy sauce, Worcestershire sauce, liquid smoke, ketchup, pepper, garlic powder, onion salt and salt. Place meat in, and close bag. Refrigerate overnight. Knead occasionally, to evenly distribute marinade.
- Preheat oven to 160 degrees F (70 degrees C). Place a pan on the bottom of oven to catch drips, or line with aluminum foil.
- Place meat strips on a rack so that they do not touch each other, and dehydrate for 6 to 8 hours in the oven, or until desired consistency is achieved.
DEHYDRATING SAUSAGE
- Preheat the dehydrator to 145°F. Verify the dehydrator is holding the temperature, proceed to the next step.
- Lay the sausage on a cutting board. Slice to desired thickness, we recommend 1/4-inch strips.
Sausage that is too thick can greatly increase drying time. - Put the sausage on the dehydrator trays with at least ½" space between pieces.
- Dehydrate the sausage for four to 10 hours, checking on it regularly. When the sausage is pliable but not brittle, it is ready.
- Put the sausage in a plastic bag or a glass jar and leave it open. Let it continue to dry for 24 hours before sealing.
FRUIT ROLL-UPS
- Select ripe or slightly over-ripe fruits. Wash and remove blemishes, pits and skin.
- Puree in a blender. Add yogurt, sweeteners or spices as desired. The puree should be hick in consistency.
- Cover the dehydrator trays with plastic wrap.
- Pour 1-1/2 to 2 cups of the puree onto the covered trays. Carefully place the Trays in the Dehydrator.
- The edges will dry quicker than the center; pour the puree thinner at the center of the tray.
- The average dry time for fruit roll-ups is 4 to 6 hours.
- Once the fruit roll-ups are shiny and non-sticky to the touch, remove
TROUBLESHOOTING
| Symptom | Probable Cause | Remedy |
| Machine does not turn on |
|
|
| Fan is working but there is no heat |
|
|
| Heater is working but the fan is not working |
|
|
| Not dehydrating |
|
|
| Water drops on the door |
|
|
| Over heating or little heating |
|
|
| Foods are not evenly dehydrated |
|
|
| Foods are not evenly dehydrated |
|
|
| Abnormal sound from the fan |
|
|

Documents / ResourcesDownload manual
Here you can download full pdf version of manual, it may contain additional safety instructions, warranty information, FCC rules, etc.
Advertisement
Need help?
Do you have a question about the PKFD52 and is the answer not in the manual?
Questions and answers