Advertisement
OPERATOR'S MANUAL
Edger
Model 592
IMPORTANT: READ SAFETY RULES AND INSTRUCTIONS CAREFULLY
Warning:
This unit is equipped with an internal combustion engine and should not be used on or near any unimproved forest-
covered, brush-covered or grass-covered land unless the engine's exhaust system is equipped with a spark arrester meeting
applicable local or state laws (if any). If a spark arrester is used, it should be maintained in effective working order by the operator.
In the State of California the above is required by law (Section 4442 of the California Public Resources Code). Other states may have
similar laws. Federal laws apply on federal lands. A spark arrester for the muffler is available through your nearest engine authorized
service dealer or contact the service department, P.O. Box 361131 Cleveland, Ohio 44136-0019.
TROY-BILT LLC P.O. BOX 361131 CLEVELAND, OHIO 44136-0019
PRINTED IN U.S.A.
769-00044.fm
FORM NO.
(12/01)
Advertisement

Related Manuals for Troy-Bilt 25A-592A063


Summary of Contents for Troy-Bilt 25A-592A063
- Page 1 Federal laws apply on federal lands. A spark arrester for the muffler is available through your nearest engine authorized service dealer or contact the service department, P.O. Box 361131 Cleveland, Ohio 44136-0019. TROY-BILT LLC P.O. BOX 361131 CLEVELAND, OHIO 44136-0019 PRINTED IN U.S.A.
-
Page 2: Table Of Contents
TABLE OF CONTENTS Content Page Important Safe Operation Practices ..............3 Assembling The Edger ..................5 Know The Edger....................6 Operating The Edger ..................7 Making Adjustments ...................8 Maintaining and Servicing The Edger..............10 Troubleshooting ....................12 Parts List ......................13 Warranty Information..................Back Cover FINDING MODEL NUMBER This Operator’s Manual is an important part of your new edger. -
Page 3: Important Safe Operation Practices
SECTION 1: IMPORTANT SAFE OPERATION PRACTICES WARNING: THIS SYMBOL POINTS OUT IMPORTANT SAFETY INSTRUCTIONS WHICH, IF NOT FOLLOWED, COULD ENDANGER THE PERSONAL SAFETY AND/OR PROPERTY OF YOURSELF AND OTHERS. READ AND FOLLOW ALL INSTRUCTIONS IN THIS MANUAL BEFORE ATTEMPTING TO OPERATE THIS MACHINE. FAILURE TO COMPLY WITH THESE INSTRUCTIONS MAY RESULT IN PERSONAL INJURY. - Page 4 4. Never operate with damaged safety devices. 18. Only use parts and accessories made for this Failure to do so, can result in personal injury. machine by the manufacturer. Failure to do so, can 5. Never run an engine indoors or in a poorly result in personal injury.
-
Page 5: Assembling The Edger
SECTION 2: ASSEMBLING YOUR EDGER This unit is shipped WITHOUT IMPORTANT: GASOLINE or OIL. After setting up the unit, service Wing Knobs engine with gasoline and oil as instructed in the Briggs Upper Handle & Stratton Owner/Operator Manual packed with your edger. -
Page 6: Know The Edger
• Disconnect the spark plug wire and ground it as Hairpin Clip instructed earlier in this section. Refer to Figure 2. Clutch Rod • With the blade clutch/depth control lever in the disengaged position (the top notch in the depth Flat Washer adjustment bracket), carefully pull the recoil starter rope. -
Page 7: Operating The Edger
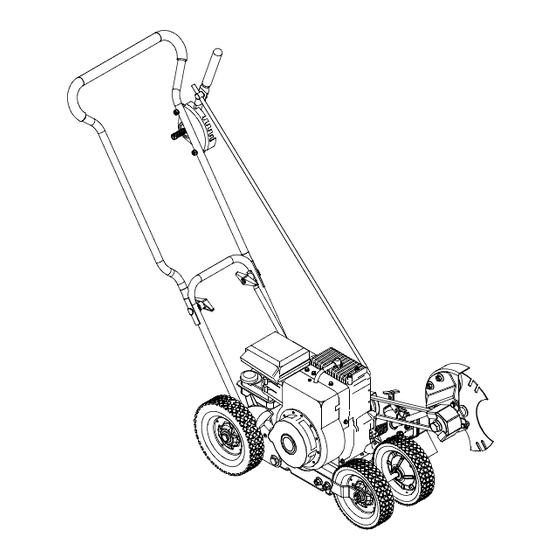
Blade Clutch / Depth Control Lever Throttle Control & Choke Control Blade Angle Adjustment Lever Curb Height Adjustment Lever Pull Rope / Recoil Starter Figure 6 SECTION 4: OPERATING THE EDGER The operation of any edger can result To start the edger’s engine, proceed as follows: WEAR YOUR in foreign objects being thrown into SAFETY GLASSES... -
Page 8: Making Adjustments
• Move the throttle control lever on the engine into To disengage the blade, proceed as follows: the STOP or OFF position. • Move the blade clutch/depth control lever to the left and place it in the top notch in the depth adjustment Make certain that the engine’s spark plug IMPORTANT: bracket. - Page 9 Edger Blade Angle Adjustment Edging Placing the blade angle adjustment lever in the second WARNING: Rotating cutting blade may throw notch from the right will put the spindle assembly at a objects causing personal injury. Keep area 90° angle for vertical edging as illustrated in Figure 11. clear of bystanders and do not operate without guards in place.
-
Page 10: Maintaining And Servicing The Edger
Trimming To adjust the height of the curb wheel, proceed as follows: Placing the blade angle adjustment lever in the notch furthest to the left will put the spindle assembly at a • Perform the Front Wheel Adjustment for curb wheel proper angle for trimming with the edger as illustrated in operation as instructed earlier in this section. - Page 11 • Remove the blade spindle belt guard by removing the hex screws, two lock washers and two hex nuts which secure it to the blade spindle plate. See Figure 17. Blade Spindle Plate Shoulder Spacer Compression Spring Hex Screws Blade Spindle Figure 15 Belt Guard Replacing the Edger Blade...
-
Page 12: Troubleshooting
Off-Season Storage • Coat the edger blade with chassis grease to prevent rusting and corrosion. Observe the following when preparing the edger for • Store the edger in a dry, clean area. Do not store long-term storage: next to any corrosive materials, such as lawn •... -
Page 13: Parts List
Model 592 V-BELTS are specially designed to engage and disengage safely. A substitute (non-OEM) V-Belt can be dangerous by not disengaging completely. Ref. Ref. Part No. Description Part No. Description 712-0413 Hex Jam Nut, 5/8-18 781-0086 Spindle Belt Guard 736-0317 Bell Washer, .64 x 1.25 x .18 714-0122 Square Key, 3/16 x .75... - Page 14 Model 592 (Spindle assembly shown for reference only. See page 13 for parts breakdown)
- Page 15 Model 592 Ref. Ref. Part No. Description Part No. Description 712-0267 Hex Nut, 5/16-18 710-0654A Self-tapping Screw, 3/8-16 x 1.0 736-0119 Lock Washer, 5/16 714-0104 Internal Cotter Pin, .072 x 1.0 712-0287 Hex Nut, 1/4-20 736-0264 Flat Washer, .330 x .630 x .0635 736-0329 Lock Washer, 1/4 736-3050...
- Page 16 MANUFACTURER’S LIMITED WARRANTY FOR: The limited warranty set forth below is given by Troy-Bilt LLC Troy-Bilt LLC does not extend any warranty for with respect to new merchandise purchased and used in the products sold or exported outside of the United States, United States, its possessions and territories.
Need help?
Do you have a question about the 25A-592A063 and is the answer not in the manual?
Questions and answers