Table of Contents
Advertisement
Advertisement
Table of Contents

Subscribe to Our Youtube Channel
Related Manuals for Eumig S 926 GL Stereo Sound


Summary of Contents for Eumig S 926 GL Stereo Sound
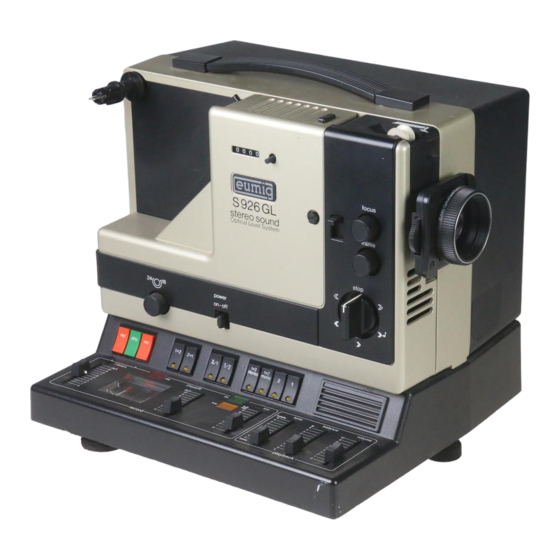
- Page 1 ------· - (..) S 926 GL stereo sound Instructions for use...
- Page 3 This apparatus must be earthed. The equipment should be disconnected from the mains when not in use. Live parts inside - disconnect from mains before removing the cover. Important: When operating the projector, do not obstruc t the air stream emerging from the ventilation slots. V ALID FOR UK ONL Y! IMPORTANT: The wires in the mains lead are coloured in accordance with the following code:...
- Page 4 IMPORTANTSAFEGUARDS When using your projector, basic safety precautions should always be followed, including the following: 1. Read and understand all instructions. 2. Close supervision is necessary when any appliance is used by or near children. Do not leave appliance unattended while in use. 3.
-
Page 5: Table Of Contents
Contents: ......2 , 3 Description of the profector D Stereo ..Recording music in stereo ..• . .. Before swltching on .. - Page 6 45 - - , - - - 20 1� 18 17 44 - - 43 - ---=,, - 4 2- - 39 38 37 36 35 31 30 29 28 27...
-
Page 7: Description Of The Profector
Description of the projector lnching knob Threadlng channel cover Reet shaft Sound head pressure pad Running speed adjustment Sound capstan key Mains switch Rotary selector switch Running counter Front levelling adjustment Front cover fixing screw PIiot light Loop restoring key Sound track selector keys Focusing knob Balance control... -
Page 9: Puttlg On The Show
Puttig on the show Setting the runnlng speed Fltting the reels Connecting to the mains supply To set the runnlng speed - 18 or Open the reel Iock (2) and pull off 24 frames/second or any inter the reel shaft sleeve. Plug the mains lead (13) of the mediate position - turn the knob Push the empty take-up reel fully... -
Page 10: Trimming The Film Leader
• □ � : ')i, J î- � >. Trimming the film leader Threading Projection Adjust the projected image size with the zooming mount (9) on the Check the state of the film leader. Turn the rotary selector switch (27) As soon as the film runs on to the lens and focus the Image wlth the from the "Stop"... -
Page 11: Public Address
Public address Reverse projection Sound projection ln every one of these operating modes the pilot light (29) illumi Turn the rotary selector switch (27) You can make direct announce Turn the selector switch (27) - in > nates the area of the sliding play to sound projection ments through the microphone in either direction - to reverse... -
Page 12: Screen Image Sizes
"Off"_. . ) roller and lnto the core of the 14-30 mm Eumig Optical Level This switches off the projector. empty reel. Turn the rotary selector « . System f/1.3 lens. For instance with Fold down the guide roller arm (23). -
Page 16: Sound Recording Methods
Sound recording methods Malnstrlµe �� -- - t rtgbt Bah1. n oir i g· strlpê Mixing techniques Twin track recording Stereo Speech and music You can mix a commentary into an Twin track recording offers a num Stereo implies hearing with spatial Microphone recordlng - e xisting sound recording on the ber of interesting sound recording... -
Page 17: A Speech And Music
Speech and music !'-- ------ ,,_c;;..) � :.'. r'if. = -=:::r-i=::::-=r-"T.==rl{i �:• {\-,::::=;: q:::,_,=:..---f[�---==:::..-�:::.,,i? �.•\� .,._ - -4.-J-- -��(-R',--- -"'--JI � ����=f!!t.�����r. Y _¾: l' : " � : � i �;;;;:;;;::::=i(:;;;;;;;;;;;;�;;;;;;;;;;;;;;;;:;;;;;;;;;:==;;;.:.J;:: ' "'"d • � e,:J; ,,.. ,..-, ,j -,:---.-,---==�+ :::. -
Page 19: Music Recording
No. 2 is now being and turn. With the preheated past the eut. recorded. lamp a faint projected image remains visible. The Eumig daylight viewer - avail- • able separately - is particularly useful for ail sound recording operations... -
Page 20: B Mlxlng Techniques
Mixing techniques Superimposing a new recording on an existing recording on the same track. Fade out F.adè ln it��r [i)t :,::-:: ❖- : �: ;,._- . i\i�' Mixing in speech via the Here the sequence is shown dia - Adjust the mixing control (34) to preset the degree of attenuation grammatically. -
Page 21: Mixing In Music And Special Affects
.., . . . , r� � � Mixing ln music and speclal - Press the red recording keys Here is the procedure shown dia The sequence is similar during a (43), and grammatical ly: As long as the mix effects fade out which is concluded as - turn the rotary selector switch... -
Page 23: Duoplay Automation
Live sound Track 1 Track 1 Track 1 [Il� Track 2 Commentary � � �1: Track 2 Track 2 Track 2 Mixing of music/sound Multlplay technique Adding to live sound Duoplay automation effects recordlngs With Multiplay you can directly very simple way of controlling ln addition you can - still using record one track on the parallel the interaction of two tracks is to... -
Page 25: Cleaning The Film Channel
- Remove the box spanner. - Pull the pressure pad from its fitting. Eumig sound movie projectors - Push the handle of the box require no maintainence, for all spanner into the pressure pad as moving parts are permanently shown to take up the pressure. -
Page 26: Cleaning The Lens
Cleaning the lens Changlng the projection lamp Changlng the fuse Replace with a new 12 volt 100 watt tungsten-halogen lamp with dia This entaiJs removaJ of the lens as - Dlsconnect the mains plug. - Dlsconnect the mains plug. thermie reflector. When inserting follows: - Unscr-ew the fixing screw - Unscrew the fixing screws... -
Page 27: General Hints
General hints To get the most out of your films Fully edit and splice your films To utilise the full dynamic range of for as long as possible treat them before you have then striped. That the projector, connect two external from time to time with a film way you avoid noises at the splices. - Page 30 · - Ieum1g Subject to design changea wlthout notice. Prlnted at EUMIG ln Auatrla. 769.9205/6 engllsch...
Need help?
Do you have a question about the S 926 GL Stereo Sound and is the answer not in the manual?
Questions and answers