COSORI CRC-R501-KUS - 5.0-Quart Rice Cooker Manual
- User manual (24 pages)
Advertisement
Package Contents
1 x 5.0-Quart Rice Cooker
1 x Nonstick Inner Pot
1 x 3.0-Quart Steam Basket
1 x Standing Rice Paddle
1 x Measuring Cup
1 x Recipe Book
1 x User Manual
1 x Quick Reference Guide
Specifications
| Model | CRC-R501-KUS |
| Power Supply | AC 120V, 60Hz |
| Rated Power | 1000W |
| Capacity | 5 qt / 10 cup* (uncooked rice) |
| Weight | 9.3 lbs / 4.2 kg |
| Dimensions | 12.3D x 10.6W x 9.2H in / 31.2D x 26.9W x 23.4H cm |
*using the included rice measuring cup, which is approximately 6.1 oz / 180 mL.
IMPORTANT SAFEGUARDS
Follow basic safety precautions when using your rice cooker.
Read all instructions.
Key Safety Points
- Do not touch hot surfaces.
- Do not touch the steam vent or the area near the steam vent while cooking or in Keep Warm mode. Do not cover the area with a cloth.
- Always use heat-resistant gloves, pads, or oven mitts when moving the rice cooker, handling hot materials, and when placing items in or removing items from the rice cooker, including the inner pot, steam basket, and accessories.
- Never use the rice cooker without the inner pot in place.
General Safety
- To protect against electric shock, do not immerse the rice cooker, cord, or plug in water or liquid.
- Do not use the rice cooker in water or under running water.
- Unplug when not in use and before cleaning. Allow to cool before putting on or taking off parts, and before cleaning or storage.
- Do not put food, liquid, or foreign objects on the heating plate.
- Ensure the heating plate is clean and the underside of the inner pot is dry before inserting the inner pot.
- Close supervision is necessary when the rice cooker is used by or near children.
- Children should be supervised to ensure that they do not play with the rice cooker.
- Do not allow children to clean or perform maintenance on the rice cooker.
- Do not use your rice cooker if it is damaged, not working, or if the cord or plug is damaged. Contact Customer Support.
- Using accessories or replacement parts not recommended by COSORI may cause injuries.
- Do not use outdoors.
- Do not place the rice cooker or any of its parts on or near hot gas or electric burners, or in a heated oven.
- Do not use the included accessories and inner pot in a microwave, on a stove or grill, or in an oven.
- Be extremely cautious when moving the rice cooker or inner pot if it contains hot oil or other hot liquids.
- The rice cooker is not intended to be operated by means of an external timer or separate remote-control system.
- This rice cooker is not intended for use by persons (including children) with reduced physical, sensory, or mental capabilities, or lack of experience and knowledge, unless they have been given supervision or instruction concerning use of the rice cooker by a person responsible for their safety.
Note: See Care & Maintenance for instructions on how to clean accessories.
While Cooking
![]()
Risk of electric shock. Cook only in the removable inner pot. Do not put any liquid directly into the rice cooker.- Use on a flat, stable, heat-resistant surface away from heat sources or liquids.
- The removable inner pot is extremely hot during use and can be heavy when full of ingredients.
- Be careful when handling the inner pot or steam basket when it contains hot food, hot oil, or other hot liquids.
- Place hot accessories on a heatresistant surface or potholder.
- Do not place anything on top of your rice cooker while it is operating. Do not store anything inside your rice cooker other than recommended accessories.
- Do not touch the metal portion of the lid, hot surfaces, or any accessories during or immediately after cooking because they will be hot.
- Do not place paper, cardboard, or plastic into your rice cooker, or any materials which may catch fire or melt.
- Do not use this rice cooker for deep frying with oil.
- Do not block any ventilation openings. Hot steam is released through openings. Keep your hands and face clear of openings.
- Do not leave the rice cooker unattended while in use.

Power & Cord
- This rice cooker uses a short powersupply cord to reduce the risk resulting from it being grabbed by children, becoming entangled in, or tripping over a longer cord.
- To turn the rice cooker off, tap CANCEL to stop cooking, then unplug. To unplug, grasp the plug and pull from the outlet. Never pull from the power cord.
- Do not use with an extension cord. This rice cooker is intended for countertop use only.
- Do not let the power cord hang over the edge of a table or counter or touch hot surfaces.
![]()
Spilled food can cause serious burns. Keep appliance and cord away from children. Never drape cord over edge of counter, never use outlet below counter, and never use with an extension cord.- Never use an outlet below the counter when plugging in your rice cooker.
- Your rice cooker has a polarized plug (one prong is wider than the other), which fits into a polarized outlet only one way. If the plug does not fit, reverse the plug. If it still does not fit, do not use the plug in that outlet. Do not alter the plug in any way.
- Keep the rice cooker and its cord out of reach of children.
- Your rice cooker should only be used with 120V, 60Hz electrical systems. Do not plug into another type of outlet.
- If the power supply cord is damaged, it must be replaced by Arovast Corporation or similarly qualified persons in order to avoid an electric or fire hazard. Please contact Customer Support.

Electromagnetic Fields (EMF)
This rice cooker complies with all standards regarding electromagnetic fields (EMF). If handled properly and according to the instructions in this user manual, the appliance is safe to use based on scientific evidence available today.
GETTING TO KNOW YOUR RICE COOKER
Rice Cooker Diagram

- Steam Vent
- Open Button
- Lid
- Control Panel
- Power Cord
- Inner Lid
- Steam Cap
- Steam Cap Release Button
- Radiator Plate
- Inner Lid Release Button
- Top Temperature Sensor
- Condensation Collectors
- Heating Plate
- Bottom Temperature Sensor
- 3.0-Quart Steam Basket
- Nonstick Inner Pot
- Standing Rice Paddle
- Measuring Cup
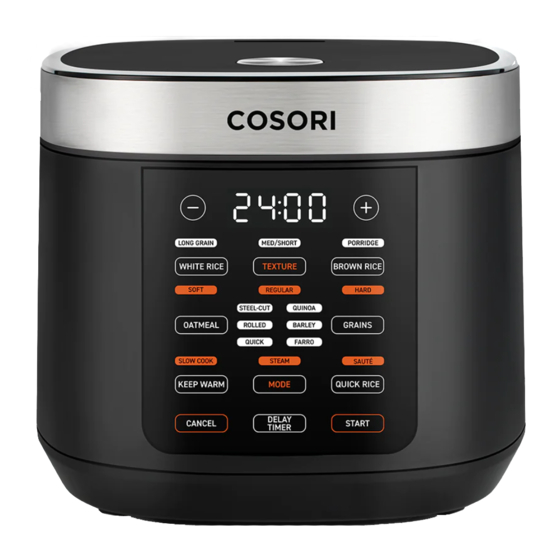
Control Panel

- Display
- Increase/Decrease Time
- Rice Type
- White Rice Button
- Rice Texture Button
- Brown Rice Button
- Rice Texture
- Oatmeal Button
- Oatmeal Type
- Grains Button
- Grain Type
- Cooking Modes
- Keep Warm Button
- Cooking Mode Button
- Quick Rice Button
- Cancel Button
- Delay Timer Button
- Start Button
BEFORE FIRST USE
Setting Up
- Remove all packaging around and inside the rice cooker.
- Place on a stable, level, heat-resistant surface. Keep away from areas that can be damaged by steam (such as walls or cupboards).
- Remove the inner lid. [Figure 1.1]

- Wash the inner lid, steam cap, inner pot, steam basket, rice paddle, and measuring cup with hot, soapy water and a nonabrasive sponge.
- Dry the parts and reinstall the inner lid.
Place the inner pot in the rice cooker.

Test Run
A test run will help you become familiar with your rice cooker, make sure it's working correctly, and clean it of possible residues.
- Make sure there is no food or packaging in the rice cooker and plug it in.
- Add water to the inner pot up to the "STEAM" water level marking. Close the lid.
- Tap MODE twice to select "STEAM".
- Tap START to start the Steam function.
- The rice cooker will beep several times when finished.
- Open the lid, carefully remove the inner pot, and discard the remaining water.
- Let the rice cooker cool for 15 minutes. Wipe the inner lid and outside of the rice cooker with a dry cloth.
COOKING WITH YOUR RICE COOKER
Cooking Functions
Note:
- Cook time is an estimate. Actual cook time may vary depending on factors such as amount of grain and water, room temperature, water temperature, and voltage.
- The inner pot does not have water level markings for 1 cup. If you are cooking 1 cup, use the "Grain: Water Ratio" column to determine the correct amount of water.
Cooking Functions Quick Reference Charts
| Grain Type | Function | Water Level Marking | Grain : Water Ratio | Cups* | Estimated Cook Time (Minutes) |
| Long Grain White Rice | WHITE RICE LONG GRAIN | Long Grain White | 1: 1¼ | 1 | 35–45 |
| 5 | 45–55 | ||||
| 10 | 55–65 | ||||
| Medium/Short Grain White Rice | WHITE RICE MED/SHORT | Med/Short White | 1: 1¼ | 1 | 37–47 |
| 5 | 46–56 | ||||
| 10 | 56–66 | ||||
| White Rice Porridge | WHITE RICE PORRIDGE | Porridge | 1: 5 | ½ | 35–45 |
| 1 | 45–55 | ||||
| 1½ | 50–60 | ||||
| 2 | 55–65 | ||||
| 2½ | 60–70 | ||||
| Quick White Rice** | QUICK RICE | Long Grain White | 1: 1¼ | 1 | 27–37 |
| 5 | 39–49 | ||||
| 10 | 50–60 | ||||
| Jasmine White Rice | WHITE RICE LONG GRAIN | Long Grain White | 1: 1¼ | 1 | 35–45 |
| 5 | 45–55 | ||||
| 10 | 55–65 | ||||
| Sushi Rice | WHITE RICE MED/SHORT | Med/Short White | 1: 1¼ | 1 | 32–42 |
| 5 | 41–51 | ||||
| 10 | 51–61 | ||||
| Long Grain Brown Rice | BROWN RICE LONG GRAIN | Brown | 1: 1½ | 1 | 64–74 |
| 4 | 70–80 | ||||
| 8 | 77–87 | ||||
| Medium/Short Grain Brown Rice | BROWN RICE MED/SHORT GRAIN | Brown | 1: 1¼ | 1 | 65–75 |
| 4 | 71–81 | ||||
| 8 | 78–88 | ||||
| Brown Rice Porridge | BROWN RICE PORRIDGE | | 1: 31⁄3 | ½ | 55–65 |
| 1 | 60–70 | ||||
| 1½ | 65–75 | ||||
| 2 | 70–80 | ||||
| 2½ | 75–85 | ||||
| Steel-Cut Oatmeal | OATMEAL STEEL-CUT | Steel Cut Oatmeal | 1: 3 | 1 | 35–45 |
| 2 | 40–50 | ||||
| 4 | 50–60 | ||||
| Rolled Oatmeal | OATMEAL ROLLED | Rolled Oatmeal | 1: 3 | 1 | 21–31 |
| 2 | 28–38 | ||||
| 4 | 40–50 | ||||
| Quick Oatmeal | OATMEAL QUICK | Rolled Oatmeal | 1: 3 | 1 | 14–24 |
| 2 | 20–30 | ||||
| 4 | 30–40 | ||||
| Quinoa | GRAINS QUINOA | Quinoa | 1: 1¼ | 1 | 37–47 |
| 3 | 42–52 | ||||
| 6 | 46–56 | ||||
| Barley | GRAINS BARLEY | Barley | 1: 1¼ | 1 | 50–60 |
| 3 | 54–64 | ||||
| 6 | 60–70 | ||||
| Farro | GRAINS FARRO | Farro | 1: 1¼ | 1 | 65–75 |
| 3 | 68–78 | ||||
| 6 | 73–83 |
*1 rice measuring cup is approximately 6.1 oz / 180 mL.
**The Quick Rice function cooks white rice faster but may result in slightly harder rice.
| Function | Time Range | Default Time | Default Temperature |
| Slow Cook | 5 min–24 hr | 30 min | 212°F / 100°C |
| Steam | 1 min–1 hr | 10 min | 212°F / 100°C |
| Sauté | 1 min–30 min | 5 min | 320°F / 160°C |
| Keep Warm | 10 min–24 hr | 158°F / 70°C | |
| Delay Timer | Up to 24 hr |
White Rice / Brown Rice
- Use the measuring cup to measure uncooked rice. Overfill the cup, then level it off to get an accurate measurement. [ Figure 2.1 ]

- Place rice in a separate container or fine mesh sieve. Wash rice until the water appears clear.
- Transfer washed rice to the inner pot and add the appropriate amount of water. You can reference the water level markings printed on the inside of the inner pot.
- Place the inner pot in the rice cooker. Close the lid.
- Make sure that the inner lid and steam cap are properly installed.
- Plug in the rice cooker. Tap WHITE RICE or BROWN RICE. "LONG GRAIN" is automatically selected. Continue tapping to select "MED/SHORT GRAIN" or "PORRIDGE". The estimated cook time will show on the display.
- If you're cooking porridge, you can adjust the cook time from 40 min–2 hr.
- "REGULAR" rice texture is automatically selected. Optionally, tap TEXTURE to select "SOFT" or "HARD".
- Optionally, tap DELAY TIMER and use + and – to delay cooking for up to 24 hours. Cooking will automatically start after counting down.
- Tap START to start the cooking function.
- The rice cooker will beep several times when finished and automatically switch to the Keep Warm function. The display will show how much time has passed since cooking finished. Tap CANCEL twice to stop the Keep Warm function.
- Keep Warm can last up to 24 hours, but we recommend that you avoid leaving cooked rice in the rice cooker for more than 5 hours.

Quick Rice
- Use the measuring cup to measure uncooked rice. Overfill the cup, then level it off to get an accurate measurement.
- Place rice in a separate container or fine mesh sieve. Wash rice until the water appears clear.
- Transfer washed rice to the inner pot and add the appropriate amount of water. You can reference the water level markings printed on the inside of the inner pot.
- Place the inner pot in the rice cooker. Close the lid.
- Make sure that the inner lid and steam cap are properly installed.
- Plug in the rice cooker. Tap QUICK RICE. The estimated cook time will show on the display.
- The Quick Rice function cooks rice faster but the texture may be slightly harder.
- Tap START to start the cooking function.
- The rice cooker will beep several times when finished and automatically switch to the Keep Warm function. The display will show how much time has passed since cooking finished. Tap CANCEL twice to stop the Keep Warm function.
- Keep Warm can last up to 24 hours, but we recommend that you avoid leaving cooked rice in the rice cooker for more than 5 hours.
Oatmeal
- Use the measuring cup to measure uncooked oats. Overfill the cup, then level it off to get an accurate measurement.
- Place oats in the inner pot and add the appropriate amount of water. You can reference the water level markings printed on the inside of the inner pot.
- Place the inner pot in the rice cooker. Close the lid.
- Make sure that the inner lid and steam cap are properly installed.
- Plug in the rice cooker. Tap OATMEAL. "STEEL-CUT" is automatically selected. Continue tapping to select "ROLLED" or "QUICK". The estimated cook time will show on the display.
- Optionally, tap DELAY TIMER and use + and – to delay cooking for up to 24 hours. Cooking will automatically start after counting down.
- Tap START to start the cooking function.
- The rice cooker will beep several times when finished and automatically switch to the Keep Warm function. The display will show how much time has passed since cooking finished. Tap CANCEL twice to stop the Keep Warm function.
- Keep Warm can last up to 24 hours, but we recommend that you avoid leaving cooked oatmeal in the rice cooker for more than 3 hours.
Grains
- Use the measuring cup to measure uncooked grains, such as quinoa. Overfill the cup, then level it off to get an accurate measurement.
- Places grains in the inner pot and add the appropriate amount of water. You can reference the water level markings printed on the inside of the inner pot.
- Place the inner pot in the rice cooker. Close the lid.
- Make sure that the inner lid and steam cap are properly installed.
- Plug in the rice cooker. Tap GRAINS. "QUINOA" is automatically selected. Continue tapping to select "BARLEY" or "FARRO". The estimated cook time will show on the display.
- Optionally, tap DELAY TIMER and use + and – to delay cooking for up to 24 hours. Cooking will automatically start after counting down.
- Tap START to start the cooking function.
- The rice cooker will beep several times when finished and automatically switch to the Keep Warm function. The display will show how much time has passed since cooking finished. Tap CANCEL twice to stop the Keep Warm function.
- Keep Warm can last up to 24 hours, but we recommend that you avoid leaving cooked grain in the rice cooker for more than 3 hours.
Slow Cook
- Place food in the inner pot.
- Do not fill past the 10-cup long grain white rice water level marking.
- Place the inner pot in the rice cooker. Close the lid.
- Make sure that the inner lid and steam cap are properly installed.
- Plug in the rice cooker. Tap MODE to select "SLOW COOK".
- Tap + and – to adjust the cook time.
- Optionally, tap DELAY TIMER and use + and – to delay cooking for up to 24 hours. Cooking will automatically start after counting down.
- Tap START to start the cooking function.
- The rice cooker will beep several times when finished and automatically switch to the Keep Warm function. The display will show how much time has passed since cooking finished. Tap CANCEL twice to stop the Keep Warm function.
- Keep Warm can last up to 24 hours, but we recommend that you avoid leaving cooked food in the rice cooker for more than 3 hours.
Steam
- Add water to the inner pot up to the "STEAM" water level marking.
- Place food in the steam basket, then place the steam basket in the inner pot.
- Do not overfill the steam basket.
- Place the inner pot in the rice cooker. Close the lid.
- Make sure that the inner lid and steam cap are properly installed.
- Plug in the rice cooker. Tap MODE twice to select "STEAM".
- Tap + and – to adjust the cook time.
- Optionally, tap DELAY TIMER and use + and – to delay cooking for up to 24 hours. Cooking will automatically start after counting down.
- Tap START to start the cooking function. "PrE" will show on the display and the rice cooker will begin preheating. When preheating is finished, the display will show the timer counting down.
- The rice cooker will beep several times when finished and automatically switch to the Keep Warm function. The display will show how much time has passed since cooking finished. Tap CANCEL twice to stop the Keep Warm function.
- Keep Warm can last up to 24 hours, but we recommend that you avoid leaving cooked food in the rice cooker for more than 3 hours.
Sauté
- Place the inner pot in the rice cooker. You can leave the lid open or close the lid for faster preheating.
- Plug in the rice cooker. Tap MODE three times to select "SAUTE".
- Tap + and – to adjust the cook time.
- Tap START to start the cooking function. "PrE" will show on the display and the rice cooker will begin preheating. When preheating is finished, the display will show the timer counting down.
- You can add oil to the inner pot before or after preheating.
- If food is added to the inner pot before preheating finishes, the countdown may not appear.
- Place food in the inner pot to begin cooking.
- When finished, tap CANCEL to stop the cooking function.
Keep Warm
- Place the inner pot in the rice cooker. Close the lid.
- Make sure that the inner lid and steam cap are properly installed.
- Plug in the rice cooker. Tap KEEP
- Tap + and – to adjust the time.
- Tap START to start the cooking function.
Note: After every cooking function (except "SAUTE"), the rice cooker will automatically switch to the Keep Warm function. The display will show how much time has passed since cooking finished. Tap CANCEL twice to stop the Keep Warm function.
Delay Timer
- Before cooking, tap DELAY TIMER to set a delay timer.
- You cannot set a delay timer in "KEEP WARM", "SAUTE", or "QUICK RICE" functions.
- Tap + and – to delay cooking for up to 24 hours.
Note: This is not a delayed start. Food will finish cooking when the delay timer ends.
- Tap START and cooking will automatically start after counting down.
Auto Off
- If no cooking function is selected, the rice cooker will turn off after 5 minutes of no operation. The display will turn off and START will be illuminated. [ Figure 2.2 ]

- Tap START to use the rice cooker

CARE & MAINTENANCE
Note:
- Always clean the inner pot and accessories after every use.
- The inner pot has a nonstick coating for easy cleaning.
- Do not use abrasive cleaners, metal scouring pads, or metal utensils on any part of the rice cooker, including inner pot and other accessories. These will scratch or damage their surfaces.
- This rice cooker does not contain any userserviceable parts. For any repairs, contact Customer Support.
- Before cleaning, turn off and unplug the rice cooker and allow it to cool completely.
- Wipe the outside and inside of the rice cooker with a moist cloth.
- Press the Inner Lid Release Button, then pull the inner lid to remove it. If necessary, press the Steam Cap Release Button to empty and clean the steam cap.
- Wash the inner lid, steam cap, inner pot, steam basket, rice paddle, and measuring cup with hot, soapy water and a nonabrasive sponge. Soak if necessary.
- Accessories are also dishwasher-safe on the top rack.
- Dry the parts and reinstall the inner lid. Place the inner pot in the rice cooker.
- Let all surfaces dry completely before plugging in or turning on the rice cooker.
Storage
- Clean and dry the rice cooker and all accessories.
- Place the inner pot in the rice cooker. Close the lid.
- Store the rice cooker in an upright position. Do not store anything on top.
Emptying the Steam Cap
- Press the Steam Cap Release Button located on the inner lid.
- Empty the water that is collected in the steam cap.
- Clean the steam cap with hot, soapy water and a non-abrasive sponge.
- If necessary, you can remove the steam cap for easy cleaning and drying.

- If necessary, you can remove the steam cap for easy cleaning and drying.

TROUBLESHOOTING
| Problem | Possible Solution |
| The rice cooker will not turn on. | Make sure the rice cooker is plugged into a powered outlet. |
| The rice cooker has a plastic smell. | Any rice cooker may have a plastic smell from the manufacturing process. This is normal. Follow the instructions for a Test Run to decrease the plastic smell. If the plastic smell does not decrease, contact Customer Support |
| Food is undercooked, too soft, or too hard. | Make sure the food to water ratio is correct. Make sure you select the correct cooking function for the food you are cooking. |
| Food boils over while | Make sure the food to water ratio is correct. |
| cooking. | Make sure the inner lid and steam cap are properly installed. |
| Display shows Error Code "E1\E3". | There is an open circuit in the temperature monitor. Contact Customer Support. |
| Display shows Error Code "E2\E4". | There is a short circuit in the temperature monitor. Contact Customer Support. |
If your problem is not listed, please contact Customer Support.

Documents / ResourcesDownload manual
Here you can download full pdf version of manual, it may contain additional safety instructions, warranty information, FCC rules, etc.
Advertisement


Need help?
Do you have a question about the CRC-R501-KUS and is the answer not in the manual?
Questions and answers