Table of Contents
Advertisement
Available languages
Available languages
Quick Links
Advertisement
Table of Contents

Subscribe to Our Youtube Channel
Related Manuals for Linea 2000 DOMO DO1002KR


Summary of Contents for Linea 2000 DOMO DO1002KR
- Page 1 DO1002KR Handleiding Keukenrobot Mode d’emploi Robot de cuisine Gebrauchsanleitung Küchenmaschine Instruction booklet Stand mixer Manual de instrucciones Robot de cocina Návod k použití Kuchyňský robot – sada Návod na použitie Kuchynský robot - sada PRODUCT OF...
- Page 2 Lees aandachtig alle instructies - bewaar deze handleiding voor latere raadpleging. Lisez attentivement les instructions - gardez le mode d’emploi pour utilisation ultérieur. Lesen Sie genau die Anweisungen - bewahren Sie die Gebrauchsanleitung für spätere heranziehung. Read all instructions carefully - save this instruction manual for future reference. Lea detenidamente todas las instrucciones - Conserve este manual para futura referencia.
-
Page 3: Garantie
GARANTIE Geachte klant, Al onze producten ondergaan steeds een strenge kwaliteitscontrole, alvorens ze aan je worden aangeboden. Mocht je desondanks toch nog problemen hebben met jouw toestel, dan betreuren wij dit ten zeerste. In dat geval verzoeken wij je contact op te nemen met onze klantendienst. Onze medewerkers zullen je met plezier verder helpen. - Page 4 VEILIGHEIDSVOORSCHRIFTEN Wanneer je elektrische toestellen gebruikt, moeten volgende veiligheidsinstructies in acht genomen worden: Lees deze instructies zorgvuldig door. Bewaar deze handleiding om later te raadplegen. · Verwijder voor het eerste gebruik alle verpakkingsmaterialen en eventuele promotionele stickers. Zorg ervoor dat kinderen niet met de verpakkingsmaterialen spelen. ·...
- Page 5 · De voedingskabel moet steeds aangesloten worden op een stopcontact dat geïnstalleerd en geaard is volgens de lokale standaarden en normen. · Gebruik enkel de accessoires die meegeleverd worden bij het toestel. · Gebruik het toestel nooit wanneer de voedingskabel of stekker beschadigd is, na een slechte werking van het toestel of wanneer het toestel beschadigd is.
-
Page 6: Voor Het Eerste Gebruik
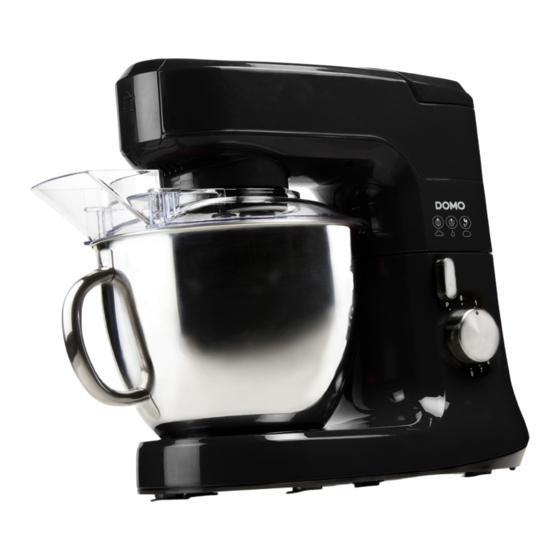
ONDERDELEN Snelheidsregeling Ontgrendelknop voor multifunctionele kop Roestvrijstalen mengkom Deksel mengkom Vulopening Deksel aansluitpunt vleesmolen Multifunctionele kop Deksel aansluitpunt blender Blender 10. Vleesmolen 11. Klopper 12. Deeghaak 13. Ballongarde VOOR HET EERSTE GEBRUIK · Verwijder het toestel en de accessoires uit de verpakking. Verwijder eventuele promotionele stickers. - Page 7 Zorg ervoor dat de stekker uit het stopcontact verwijderd is en dat de snelheidsregeling op ‘0’ staat. Geef een kwartdraai naar links aan de ontgrendelknop, duw de kop helemaal naar boven en draai de ontgrendelknop weer naar rechts zodat hij naar boven wijst om de kop vast te zetten.
- Page 8 Om vlees te vermalen, plaats je achtereenvolgens het wormwiel en het snijmes. Daarna maak je een keuze uit de maalschijven: fijn of grof. Plaats de uitsparing op de schijf ter hoogte van het uitstekende palletje. Sluit het geheel af met de aanschroefring. Plaats eventueel de schaal om het vlees op te leggen op de vleesmolen.
- Page 9 12. Om de vleesmolen te verwijderen, druk je op de ontgrendelknop naast het aansluitpunt. Draai de vleesmolen een kwartslag met de wijzerzin mee. Maak alle onderdelen goed schoon en droog zorgvuldig af voor je ze opnieuw gebruikt. Reinigen: De vleesmolen niet in een vaatwasmachine reinigen. BLENDER Afhankelijk van de aard van de ingrediënten, is de blender in staat om 1,5 l te mixen.
-
Page 10: Reiniging En Onderhoud
REINIGING EN ONDERHOUD · Verwijder steeds de stekker uit het stopcontact alvorens het toestel te reinigen. · Dompel het motorblok nooit onder in water of onder stromend water. Maak het motorblok schoon met een zachte, vochtige doek. · Demonteer alle accessoires volgens de gebruiksaanwijzing in de rubriek ‘demonteren’. ·... - Page 11 GARANTIE Cher client, Tous nos produits sont soumis à des contrôles qualité stricts avant d’être proposés à la vente. Si vous deviez toutefois rencontrer un problème avec votre appareil, nous le déplorons vivement. Dans ce cas, nous vous invitons à prendre contact avec notre service à la clientèle. Nos collaboratrices se feront un plaisir de vous aider ! +32 14 21 71 91 info@linea2000.be...
-
Page 12: Consignes De Sécurité
CONSIGNES DE SÉCURITÉ Les consignes de sécurité suivantes doivent être respectées lors de l’utilisation de tout appareil électrique: Lisez ces consignes très attentivement. Conservez ce mode d’emploi afin de pouvoir le consulter ultérieurement. · Avant la première utilisation, enlevez tous les éléments d’emballage et les éventuels autocollants promotionnels. - Page 13 · Vérifiez avant usage si la tension indiquée sur l’appareil correspond à la tension du réseau électrique de votre domicile. · Le cordon d’alimentation doit toujours être branché dans une prise de courant placée et mise à la terre conformément aux normes et standards locaux. ·...
-
Page 14: Avant La Première Utilisation
PARTIES Bouton de sélection de vitesse Bouton de déverrouillage pour tête multifonction Bol mélangeur en inox Couvercle du bol mélangeur Ouverture de remplissage Point d’introduction du hachoir à viande Tête multifonction Point d’introduction du mixeur Mixeur 10. Hachoir à viande 11. - Page 15 Posez l’appareil sur une surface plane, propre et sèche. Assurez-vous que la fiche est débranchée de la prise de courant et que le sélecteur de vitesse est réglé sur «0». Actionnez le bouton de déverrouillage d’un quart de tour vers la gauche, poussez la tête à...
- Page 16 Pour hacher de la viande, vous placez successivement : la roue-vis et le découpoir. Après, il faut faire un choix entre les disques de hachage : fin ou grossier. Alignez l’encoche sur le disque avec le ressaut saillant. Serrez le tout avec l’anneau de vissage. Placez éventuellement le plateau pour y mettre votre viande.
- Page 17 12. Pour enlever le hachoir à viande, il faut appuyer sur le bouton de déverrouillage à côté du point d’introduction. Tournez le hachoir à viande d’un quart de tour dans le sens des aiguilles d’une montre. Nettoyez bien toutes les pièces et séchez-les à...
-
Page 18: Nettoyage Et Entretien
Faites pivoter le bol mélangeur dans le sens inverse des aiguilles d’une montre afin de le dégager de sa position de verrouillage, puis enlevez le bol mélangeur. Actionnez de nouveau le bouton de déverrouillage d’un quart de tour vers la gauche, poussez la tête à... -
Page 19: Mise Au Rebut
MISE AU REBUT Ce symbole sur le produit ou son emballage indique que ce produit ne peut être traité comme déchet ménager. Il doit plutôt être remis au point de ramassage concerné, se chargeant du recyclage du matériel électrique et électronique. - Page 20 GARANTIE Sehr geehrter Kunde, Sämtliche unserer Produkte unterliegen einer strengen Qualitätskontrolle, bevor Sie Ihnen angeboten werden. Sollten dennoch Probleme mit Ihrem Gerät auftreten, bedauern wir dies zutiefst. Wir möchten Sie in diesem Fall bitten, unseren Kundenservice zu kontaktieren. Unsere Mitarbeiter helfen Ihnen gern weiter! +32 14 21 71 91 info@linea2000.be Montag –...
- Page 21 SICHERHEITSVORKEHRUNGEN Wenn Sie elektrische Geräte verwenden, müssen folgende Sicherheitshinweise beachtet werden: Lesen Sie diese Hinweise sorgfältig durch. Bewahren Sie diese Bedienungsanleitung zum späteren Nachschlagen auf. · Entfernen Sie vor dem ersten Gebrauch alle Verpackungsmaterialien und möglichen Werbeaufkleber. Sorgen Sie dafür, dass Kinder nicht mit den Verpackungsmaterialien spielen.
- Page 22 · Gerät nur für den vorgesehenen Zweck verwenden. · Vor Gebrauch überprüfen, ob die auf dem Gerät angegebene Spannung mit dem des Stromnetzes übereinstimmt. · Das Netzkabel muss stets an eine Steckdose angeschlossen werden, die gemäß den örtlichen Standards und Normen isoliert und geerdet wurde. ·...
-
Page 23: Vor Der Ersten Inbetriebnahme
TEILE Geschwindigkeitsregelung Entriegelungsknopf für den Multifunktionskopf Rührschüssel aus Edelstahl Rührschüsseldeckel Einfüllöffnung Anschlusspunkt Fleischwolf Multifunktionskopf Anschlusspunkt Mixer Mixer 10. Fleischwolf 11. Flachrührer 12. Knethaken 13. Schneebesen VOR DER ERSTEN INBETRIEBNAHME · Nehmen Sie Gerät und Zubehör aus der Verpackung. Entfernen Sie mögliche Werbeaufkleber. - Page 24 Achten Sie darauf, dass der Stecker nicht in der Steckdose steckt und die Geschwindigkeitsregelung auf «0» steht. Drehen Sie zum Festspannen des Kopfes den Entriegelungsknopf um eine Viertelumdrehung nach links, drücken Sie den Kopf vollständig nach oben, und drehen Sie den Entriegelungskopf wieder nach rechts, sodass er nach oben zeigt. Setzen Sie die Rührschüssel auf die Basis und drehen Sie sie im Uhrzeigersinn fest.
- Page 25 Um Fleisch zu zerkleinern montieren Sie nacheinander die Spirale und das Kreuzmesser. Danach wählen Sie eine der Mahlscheiben: fein oder grob. Legen Sie die Aussparung der Scheibe auf die Höhe der Metallnut. Verschließen sie das Ganze mit dem Anschraubring. Nehmen Sie den Teller, auf den Sie Ihr Fleisch legen können. Mit dem Druckstempel können Sie auf sichere Weise Fleisch in den Fleischwolf schieben.
- Page 26 12. Um den Fleischwolf vom Gerät zu entfernen drücken Sie auf den Entsperrungsknopf neben den Anschlusspunkt Fleischwolf. Drehen Sie den Fleischwolf um ein Viertel im Uhrzeigersinn. Reinigen Sie alle Teile gründlich und trocknen Sie diese sorgfältig ab, bevor Sie diese erneut gebrauchen.
-
Page 27: Reinigung Und Wartung
Drücken Sie das Zubehör aus der Verriegelungsposition heraus, und drehen Sie es dann eine Viertelumdrehung im Uhrzeigersinn. Entfernen Sie das Zubehörteil anschließend vom Antrieb und entfernen Sie es. Entfernen Sie das Zubehör vorsichtig, da scharfe Kanten vorhanden sein können. Entfernen Sie die Schüssel, indem Sie sie gegen den Uhrzeigersinn aus der verriegelten Position losdrehen. - Page 28 ENTSORGEN Dieses Symbol auf dem Produkt oder seiner Verpackung weist darauf hin, dass dieses Produkt nicht als normaler Haushaltsabfall zu behandeln ist, sondern an einem Sammelpunkt für das Recyling von elektrischen und elektronischen Geräten abgegeben werden muss. Durch Ihren Beitrag zum korrekten Entsorgen dieses Produkts schützen Sie die Umwelt und die Gesundheit Ihrer Mitmenschen.
-
Page 29: Warranty
WARRANTY Dear client , All of our products are always submitted to a strict quality control before they are sold to you. Should you nevertheless experience problems with your device, we sincerely regret this. In that case, we kindly request you to contact our customer service. Our staff will gladly assist you. -
Page 30: Safety Instructions
SAFETY INSTRUCTIONS When using electrical appliances, basic safety precautions should always be taken, including the following: Read all instructions carefully. Keep this manual for future reference. · Make sure all packaging materials and promotional stickers have been removed before using the appliance for the first time. ·... - Page 31 · Do not operate this appliance with a damaged cord or plug or in the event the appliance malfunctions or has been damaged in any manner. Return the appliance to the DOMO Service Department or its service agent for examination, repair, or electrical or mechanical adjustment.
-
Page 32: Before The First Use
11. Beater 12. Dough hook 13. Balloon whisk BEFORE THE FIRST USE · Remove the appliance and the accessories from the packaging. Remove any promotional stickers. · Wash all removable parts in warm soapy water and dry thoroughly. · Never immerse the motor unit in water to avoid electrocution. ASSEMBLY &... - Page 33 Turn the release button a quarter turn to the left, push the head down entirely and turn the release button a quarter turn to the right again so that it point upwards, to lock the head. Place the lid onto the bowl. Slide the opening on the lid. Put the plug into the socket and select the desired speed by turning the speed control knob.
- Page 34 You can use the pushing rod to press the meat firmly inside. 10. For sausage making, insert the following components: 11. For making stuffed meatballs, insert the following components: 12. To remove the meat grinder, press the release button next to the connection point for meat grinder. Make a quarter turn clockwise on the meat grinder.
-
Page 35: Cleaning And Maintenance
Note: · Never run the blender empty. · Never fill the work bowl with boiling fluids; always allow them to cool to room temperature. · If you want to crush ice, do not use more than 9 ice cubes (4x4x2 cm) at a time. DISASSEMBLY Remove the plug from the socket. -
Page 36: Environmental Guidelines
ENVIRONMENTAL GUIDELINES This symbol on the product or on its packaging indicates that this product may not be treated as household waste. Instead it must be brought to the applicable collection point for recycling of electrical and electronic equipment. By ensuring this product is disposed of correctly, you will help prevent potential negative consequences for the environment and human health, which could otherwise be caused by inappropriate waste handling of this product. - Page 37 GARANTIA Este aparato tiene un periodo de garantía de 2 años a partir de la fecha de compra. Durante el periodo de garantía, el distribuidor será completamente responsable de los defectos directamente asignables a errores del material y fabricación. Cuando se detecten este tipo de errores, y siempre que se estime necesario, el aparato se sustituirá...
-
Page 38: Instrucciones De Seguridad
INSTRUCCIONES DE SEGURIDAD Cuando utilice aparatos eléctricos, se deben seguir las instrucciones de seguridad mencionadas a continuación: Lea detenidamente estas instrucciones. Conserve este manual para consultarlo posteriormente. · Antes del primer uso retire todos los materiales de embalaje y etiquetas promocionales. Asegúrese de que los niños no puedan jugar con el material de embalaje. - Page 39 · El cable de alimentación debe estar conectado a una toma de corriente que debe haber sido instalada y conectada a tierra de acuerdo con las normas y reglamentos locales. · Solo debe utilizar los accesorios que se suministran con el aparato. ·...
-
Page 40: Antes Del Primer Uso
PIEZAS Control de velocidad Botón de desbloqueo del cabezal multiuso Vaso de mezcla de acero inoxidable Tapa del vaso de mezcla Orificio de llenado Punto de conexión del Picadora de carne Cabezal multiuso Punto de conexión de la licuadora Licuadora 10. - Page 41 Asegúrese de sacar el enchufe de la toma de corriente y que el control de velocidad esté en posición “0” (APAGADO). Gire el botón de desbloqueo un cuarto de vuelta a la izquierda, empuje el cabezal totalmente hacia arriba y gire el botón de desbloqueo a la derecha de manera que apunte hacia arriba para fijar el cabezal.
- Page 42 Para picar carne debe colocar seguidamente el tornillo sin fin y la cuchilla. Después debe seleccionar el disco de corte: fino o grueso. Ponga el hueco del disco a la altura del saliente. Termine el conjunto con el anillo roscado. Coloque el recipiente para colocar la carne en la picadora de carne.
- Page 43 12. Para retirar la picadora de carne, pulse el botón de desbloqueo. Gire a la picadora de carne un cuarto de vuelta en sentido horario. Limpie bien todas las piezas y seque todo completamente antes de usarlo de nuevo. LIMPIEZA : ¡No poner en el lavavajillas! LICUADORA Dependiendo de la naturaleza de los ingredientes, la licuadora puede licuar hasta 1,5 L.
-
Page 44: Limpieza Y Mantenimiento
LIMPIEZA Y MANTENIMIENTO · Saque siempre el enchufe de la toma de corriente antes de limpiar el aparato. · No sumerja nunca el bloque motor en un baño de agua o bajo agua corriente. Limpie el bloque motor con un paño suave y húmedo. ·... - Page 45 ZÁRUKA Pro záruku začínající dnem prodeje spotřebiče platí na území ČR tyto podmínky: 1. trvání záruky: 2 roky 2. poskytování záruky: a) záruční opravu provedeme podle našeho zvážení opravou nebo výměnou vadných dílů, jestliže tyto závady vznikly prokazatelně vadou materiálu nebo chybou při výrobě b) záruční...
-
Page 46: Bezpečnostní Pokyny
BEZPEČNOSTNÍ POKYNY Při používání jakéhokoli elektrického přístroje se řiďte všeobecnými bezpečnostními pravidly včetně těch níže popsaných: Pečlivě si přečtěte tyto informace a manuál nechte i pro pozdější nahlédnutí. · Před použitím odlepte veškeré reklamní a ochranné fólie. Děti si s obalovým materiálem nesmí... - Page 47 · Přívodní kabel nesmí ležet pod přístrojem. Nenechávejte ho viset přes hrany nábytku. · Nenechávejte viset přívodní kabel přes ostré hrany ani ho nenechávejte ležet na horkých místech. · Před zapojením do el. sítě se nejdříve ujistěte, že je přístroj dobře a kompletně sestaven. Před vypnutím přístoje nejdříve otočte všechny ovladače na O/OFF a až...
-
Page 48: Před Prvním Použitím
PŘED PRVNÍM POUŽITÍM · Přístroj vybalte, odlepte věškeré reklamní a ochranné fólie. · Všechny jednotlivé části omyjte a důkladně vysušte. · Nikdy přístroj ani přívodní kabel neponořujte pod vodu. SESTAVENÍ A POUŽITÍ HNĚTENÍ / MÍCHÁNÍ / ŠLEHÁNÍ Celonerezová mísa pojme až 2kg surovin (závisí na typu surovin). Přístroj umístěte na rovnou a stabilní... - Page 49 MLÝNEK NA MASO Před rozebíráním nebo čištěním spotřebič nejdříve vypněte a vytáhněte zástrčku ze zásuvky. Odkryjte víko na konci multifunkční hlavy. Víčko lehce zatlačte nahoru a odejměte. Nyní uvidíte hřídel pro připojení příslušenství. Nasaďte mlýnek pod úhlem 25° a pootočte ho po směru hodinových ručiček dokud se nezacvakne.
- Page 50 11. Pro výrobu masových koulí použijte následující části: 12. Chcete-li mlýnek sundat, tak stiskněte uvolňovací tlačítko. Mlýnek pootočte protisměru hodinových ručiček a uvolněte. Před opětovným použitím důkladně vyčistěte všechny části a vše důkladně osušte. Čištění: Mlýnek není určený pro mytí v myčce nádobí. MIXÉR Nádoba mixéru pojme až...
-
Page 51: Čištění A Údržba
Otočte uvolňovací páčku hlavy o čtvrt otáčky doleva, multifunkční hlavu stlačte dolů a uvolňovací tlačítko opět pusťte doprava. Hlava zůstane ve vodorovné pozici. ČIŠTĚNÍ A ÚDRŽBA · Před každým čištěním vypněte a vypojte přístroj z el. sítě. · Motorovou část nikdy neponořujte pod vodu ani neoplachujte proudem vody. Hlavní tělo otírejte pouze jemným vlhkým hadříkem. - Page 52 ZÁRUKA Pre záruku začínajúcich dňom predaja spotrebiča platí na území SR tieto podmienky: 1. trvania záruky: 2 roky 2. poskytovanie záruky: a) záručnú opravu vykonáme podľa nášho zvážení opravou alebo výmenou chybných dielov, ak tieto závady vznikli preukázateľne chybou materiálu alebo chybou pri výrobe b) záručná...
-
Page 53: Bezpečnostné Pokyny
BEZPEČNOSTNÉ POKYNY Pri používaní akéhokoľvek elektrického prístroja sa riaďte všeobecnými bezpečnostnými pravidlami vrátane tých nižšie popísaných: Starostlivo si prečítajte tieto informácie a manuál nechajte aj pre neskoršie nahliadnutie. · Pred použitím odlepte všetky reklamné a ochrannej fólie. Deti si s obalovým materiálom nesmie hrať. - Page 54 · Prívodný kábel nesmie ležať pod prístrojom. Nenechávajte ho visieť cez hrany nábytku. · Nenechávajte visieť prívodný kábel cez ostré hrany ani ho nenechávajte ležať na horúcich miestach. · Pred zapojením do el. siete sa najprv uistite, že je prístroj dobre a kompletne zostavený. Pred vypnutím prístroja najskôr otočte všetky ovládače na O / OFF a až...
-
Page 55: Pred Prvým Použitím
PRED PRVÝM POUŽITÍM · Prístroj vybaľte, odlepte všetky reklamné a ochrannej fólie. · Všetky jednotlivé časti umyte a dôkladne vysušte. · Nikdy prístroj ani prívodný kábel neponárajte pod vodu. ZOSTAVENIE A POUŽITIE HNETENIE / MIEŠANIE / ŠĽAHANIE Celonerezová misa pojme až 2kg surovín (závisí od typu surovín). Prístroj umiestnite na rovnú... - Page 56 MLYNČEK NA MÄSO Pred demontážou alebo čistením spotrebiča najskôr prístroj vypnite a vytiahnite zástrčku zo zásuvky. Odkryte veko na konci multifunkčné hlavy. Viečko zľahka zatlačte nahor a odoberte. Teraz uvidíte doplnkový hriadeľ. Mlynček položte pod uhlom 25 ° a otočte ho v smere hodinových ručičiek, až kým nezacvakne.
- Page 57 11. Na výrobu guľôčkových guľôčok použite nasledujúce časti: 12. Ak chcete mlynček odstrániť, stlačte uvoľňovacie tlačidlo. Mlynček otočte proti smeru hodinových ručičiek a uvoľnite. Pred opätovným použitím dôkladne vyčistite všetky časti a dôkladne osušte. Mlynček nie je určený na umývanie v umývačke riadu. MIXÉR Nádoba mixéra pojme až...
-
Page 58: Čistenie A Údržba
Otočte uvoľňovaciu páčku hlavy o štvrť otáčky doľava, multifunkčné hlavu stlačte dole a uvoľňovacie tlačidlo opäť pustite doprava. Hlava zostane vo vodorovnej polohe. ČISTENIE A ÚDRŽBA · Pred každým čistením vypnite a vypojte prístroj z el. siete. · Motorovú časť nikdy neponárajte pod vodu ani neoplachujte prúdom vody. Hlavné telo utierajte iba jemnou vlhkou handričkou. - Page 59 www.domo-elektro.be DO1002KR...
- Page 60 über: webshop.domo-elektro.be or scan here: oder hier scannen: of scan hier: ou scannez ici: LINEA 2000 bvba - Dompel 9 - 2200 Herentals - Belgium - Tel: +32 14 21 71 91 - Fax: +32 14 21 54 63...
Need help?
Do you have a question about the DOMO DO1002KR and is the answer not in the manual?
Questions and answers