
Subscribe to Our Youtube Channel
Summary of Contents for T.Werk CHRONOS Click
- Page 1 CHRONOS Click - Pitched roof Translation of the assembly instruction into english +49-8283-997904-0 · info@t-werk.eu · www.t-werk.eu...
- Page 2 T.Werk GmbH Zur Schönhalde 10 D - 89352 Ellzee CHRONOS Click - Pitched roof Translation of the assembly instruction English Document number: D195 Version 2 05.11.2021 T.Werk GmbH - CHRONOS Click Pitched roof solution - Assembly instruction Page 2 of 24...
-
Page 3: Table Of Contents
8 Storage ..........................11 9 Unpacking ..........................12 10 Assembly ..........................12 11 Maintenence and servicing ....................23 12 Disassembly ........................23 13 Disposal ..........................23 T.Werk GmbH - CHRONOS Click Pitched roof solution - Assembly instruction Page 3 of 24... -
Page 4: Chronos Click Pitched Roof Solution
The great strength of the mounting system is the Click system. Clicking the 3.15 m and 5.15 m CHRONOS Click profiles into the CHRONOS adapters guarantees simple and quick installation. The modules are mounted crosswise or upright parallel to the roof. -
Page 5: General Safety Instructions
➢ Install fall protection devices in accordance with the applicable standards. ➢ Prevent unauthorized persons from entering the assembly area. ➢ Block off the assembly area. T.Werk GmbH - CHRONOS Click Pitched roof solution - Assembly instruction Page 5 of 24... -
Page 6: Warranty Conditions
We guarantee that, with proper handling and installation and under normal conditions of use, operation and maintenance, for a period of twelve years from the date of sale from T.Werk GmbH, our components will be free from defects in material and workmanship. -
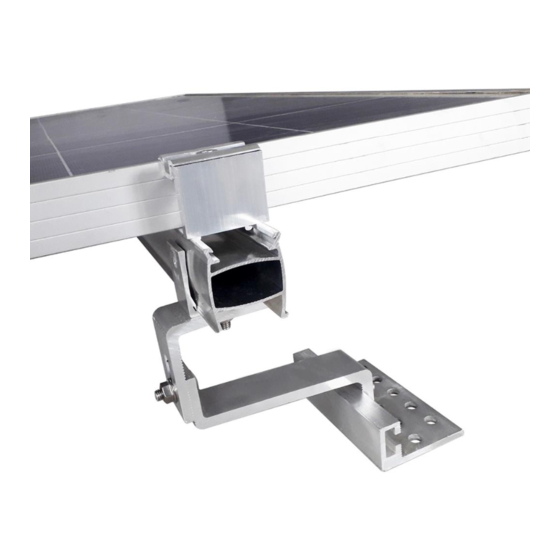
Page 7: Structure Of The Chronos Click Mounting System
(rear side profile to fix rail connector) CHRONOS Click-profile CHRONOS cross connector-set CHRONOS roof hook ALU VAR Plate-head wood screws M8x80 A2 An overview of all components of the CHRONOS Click mounting system is listed in the follow- ing table: article execution article-nr. - Page 8 Clamping range: depending on length Internal hexagon 5 mm incl. sealing washer E19 and calotte Approval by the building authorities Solar fastener (steel-substr.) T.Werk GmbH - CHRONOS Click Pitched roof solution - Assembly instruction Page 8 of 24...
- Page 9 D = 6.5 mm CHRONOS roof adapter Material: A2 stainless steel DIN 603 with square neck SOV00280 0,013 kg Full thread PU: 100 pcs Truss head screw FM8x25 T.Werk GmbH - CHRONOS Click Pitched roof solution - Assembly instruction Page 9 of 24...
- Page 10 Dimensions: 52 mm x 45 mm x 45 mm / 37 mm x 20 mm x 6 mm Pre-assembled Opening at the side D = 6.5 mm CHRONO cross connector set T.Werk GmbH - CHRONOS Click Pitched roof solution - Assembly instruction Page 10 of 24...
-
Page 11: Transport
For the transport of the CHRONOS Click assembly system, the CHRONOS Click profiles are packed into bundles according to the length of the profiles and lashed. The small material of the CHRONOS Click assembly system is picked in cartons and these are then packed together on pallets, wrapped and lashed. -
Page 12: Unpacking
Then cut the straps of the individual boxes. Now remove the assembly mate- rial. Check the assembly material immediately after receipt for completeness and for possible damage during transport. In the event of a defect, contact T.Werk GmbH immediately. 10 Assembly Needed tools: Measuring tools for marking the module field (laser, angle, chalk/string, tape measure, chalk/marker pen). - Page 13 10 mm Recommendation for even loading: roof hooks alter- Position of the profiles nately on the rafters. depends distance between tile /roof panel T.Werk GmbH - CHRONOS Click Pitched roof solution - Assembly instruction Page 13 of 24...
- Page 14 /panel. Fasten the roof hooks to the rafter with at least two pan head wood screws at the exposed point. T.Werk GmbH - CHRONOS Click Pitched roof solution - Assembly instruction Page 14 of 24...
- Page 15 (specification of the module manufacturer), high beading/shafts. Cantilever depending on snow load up to 250 mm Spacing of the modules between the rows: approx. 10 mm T.Werk GmbH - CHRONOS Click Pitched roof solution - Assembly instruction Page 15 of 24...
- Page 16 Align the CHRONOS roof adapter exactly (2). Then tighten the M8 flange nut firmly (3). The roof fastening for a purlin roof is in place. T.Werk GmbH - CHRONOS Click Pitched roof solution - Assembly instruction Page 16 of 24...
- Page 17 Tighten the CHRONOS roof adapters with a flange nut M8 on the clamp (5). 3.4 The roof fastening for a seam roof is in place. T.Werk GmbH - CHRONOS Click Pitched roof solution - Assembly instruction Page 17 of 24...
- Page 18 CHRONOS roof adapter in order to fix the CHRONOS Click profile. Use a hexagonal bit SW8 at a torque of 1 T.Werk GmbH - CHRONOS Click Pitched roof solution - Assembly instruction Page 18 of 24...
- Page 19 (one screw in each end of the profile). Use a hexagon bit SW8 with a torque of 1 Nm. The first layer of CHRONOS Click Profile is attached. T.Werk GmbH - CHRONOS Click Pitched roof solution - Assembly instruction Page 19 of 24...
- Page 20 5 Optional: Mount the second layer of CHRONOS Click Profiles (for cross mounting) Measure and mark the second profile layer. Screw the CHRONOS cross connector sets into the first profile layer at the crossing points just marked (1). Position the CHRONOS cross con- nector sets exactly (2).
- Page 21 SW6 with a torque of approx. 10 Nm (observe the specifica- tions of the module manufacturer) (2). Place the next module in the row against the one already mounted. T.Werk GmbH - CHRONOS Click Pitched roof solution - Assembly instruction Page 21 of 24...
- Page 22 CHRONOS middle clamp set. Repeat assembly steps 6.2 to 6.7 for each row. T.Werk GmbH - CHRONOS Click Pitched roof solution - Assembly instruction Page 22 of 24...
-
Page 23: Maintenence And Servicing
11 Maintenance and servicing Inspect the ZELOS mounting system once a year. In addition, inspect the CHRONOS Click mounting system after extraordinary events (severe storms, earthquakes, ...). Annual maintenance is an important prerequisite for the guarantee. - Page 24 +49 8283 997904 - 299 www.t-werk.eu D - 89352 Ellzee e-mail: info@t-werk.eu T.Werk GmbH - CHRONOS Click Pitched roof solution - Assembly instruction Page 24 of 24 ©T.Werk GmbH · Subject to change without notice · D195 · V2 · 11/2021 · MR_CJ...
Need help?
Do you have a question about the CHRONOS Click and is the answer not in the manual?
Questions and answers