Advertisement
Quick Links
Advertisement

Related Manuals for K-PO DX-5000 PLUS


Summary of Contents for K-PO DX-5000 PLUS
- Page 2 SMT technology to guarantee the best stability, reliability and unprecedented quality, your multi-functional K-PO DX-5000 PLUS Radio is a new step in personal communication and is surely the best choice for professional users. Moreover, with multiple connecting ports in the radio, K-PO DX-5000 PLUS Radio is ready for future upgrading and functions expanding.
-
Page 3: Table Of Contents
CONTENTS FUNCTIONS & FEATURES ................................1 WARNING ......................................1 RESET FUNCTION (Resume Factory Default) ..........................1 INSTALLATION ....................................2 HOW TO USE YOUR RADIO ................................4 FUNCTION MENU SETUP ................................9 SPECIFICATIONS ....................................12... -
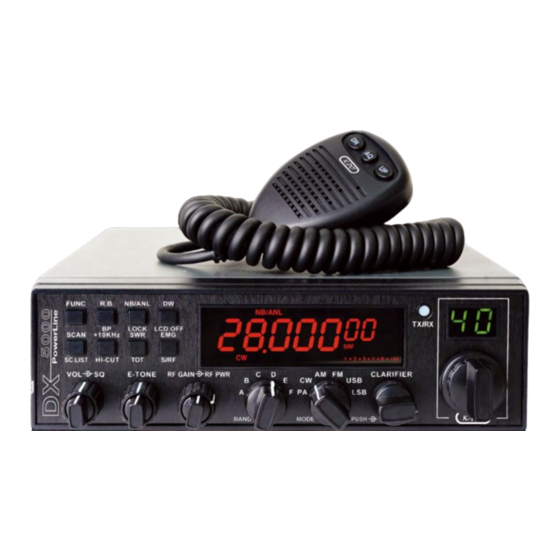
Page 4: Functions & Features
26. VOX function FUNCTIONS & FEATURES 27. CTCSS/DCS code 1. Big LCD which displays frequency and all kinds of information 28. RX compander 2. Dual digital LED channel display 29. Noise gate setting 3. USE EL technology for backlight 30. RX Noise Reduction 4. -
Page 5: Installation
2. ANTENNA INSTALLATION INSTALLATION a) Choosing your antenna: 1. WHERE AND HOW TO MOUNT YOUR RADIO For radios, the longer the antenna, the better its results. Your a) You should choose the most appropriate setting from a simple and dealer will help you with your choice of antenna. practical point of view. - Page 6 3. POWER CONNECTION 4. BASIC OPERATIONS TO BE CARRIED OUT BEFORE USING YOUR SET FOR THE FIRST TIME (without transmitting or using Your RADIO is protected against an inversion of polarities. However, the <<Push-To-Talk>> switch on the microphone) before switching it on, you are advised to check all the connections. Your equipment must be supplied with a continued current of 12 a) Connect the microphone volts (A).
-
Page 7: How To Use Your Radio
6. HOW TO USE INTERNAL SWR METER DW: Appears when DW function is started. - Set to channel 20@D band in FM. 10K: Appears when +10 KHz function is started. - Press <<push-to-talk>> button on the microphone to transmit. EMG: Appears when EMG channel is used. - At the moment, LCD would display SWR value which should be SWR: Appears when SWR is used. - Page 8 it is desired that the control be adjusted only to the point where the open field. receiver background noise or ambient background noise is eliminated. Amplitude Modulation/AM: Communication on a field with relief and Turn fully anticlockwise then slowly clockwise until the receiver noise obstacles in middle distance (the most used).
- Page 9 FUNC key, and then press other keys to realize the second functions enable this function. silk-screened under the button. "FUNC+ Keypad name" is to be used To enable the DW function, firstly turn the SQ control clockwise in the following operating instruction. until the background noise is cut out.
- Page 10 channel. You can receive the calling, and also, can transmit on this (2)FUNC+ SWR channel by pressing PTT key. If there is no transmission or detected When pressing this key, TOT ON or TOT OFF would display on the signal on that channel within 5 seconds (time to resume scanning can LCD for 2 seconds.
- Page 11 24. EXT SP or PA SP 1. PTT EXT SP Transmitting key, Press to speak and release to receive a message. Accept 4 to 8 ohm, 4 watt external speaker to be connected. When 2. UP/DN external speaker is connected to this jack, the built-in speaker is These key allow increasing or decreasing a channel number.
-
Page 12: Function Menu Setup
FUNCTION MENU SETUP (06) NC The initial functions and parameter can be changed via the following This menu refers to RX noise compander settings and operations. Please read the following instruction before setting. making any desired amendments. Default: OFF To enter Function Menu: under ON state, press and hold FUNC key for (07) NG more than 2seconds, and then release the FUNC key to enter into the This menu refers to TX noise gate setting. - Page 13 (13) STP T: When this option is selected, press PUSH and turn CLARIFIER knob to change transmitting frequency. When pressing this key, This menu is to set tuning step when "3" icon will display on the far left of the LCD. Under this condition, adjusting frequency by CLARIFIER knob rotate the CLARIFIER knob to change the transmitting frequency Options: 10 Hz, 100 Hz, 1 KHz, 10 KHz...
- Page 14 (19) TSR TF: When TF is selected,LCD would display transmitting frequency when transmitting. This menu is to choose whether to enable SR: When SR is selected, LCD would display SWR value of antenna Transmitting SWR Protection function or when transmitting, for example: "1.2" on the LCD. not.
-
Page 15: Specifications
SPECIFICATIONS Frequency Response AM and FM: 450 to 2500 Hz General Output Impedance 50 ohms, unbalanced 28.000 MHz-29.700 MHz Frequency Range SSB: 0.25μV for 10dB(S+N)/N at greater 24.715 MHz-30.105 MHz (Programmable) than 1/2-watt of audio output. Frequency Band A/B/C/D/E/F AM: 1.0μV for 10 dB(S+N)/N at greater Channel 60 channels (programmable) in each band Sensitivity... - Page 17 A1.210909...
Need help?
Do you have a question about the DX-5000 PLUS and is the answer not in the manual?
Questions and answers