
Subscribe to Our Youtube Channel
Related Manuals for Kärcher MIC 26

Summary of Contents for Kärcher MIC 26
- Page 1 MIC 26 Deutsch English Français Italiano Nederlands Español Português Ελληνικά Register your product 59677050 01/21 www.kaercher.com/welcome...
-
Page 2: Table Of Contents
Inhaltsverzeichnis Anbausätze Inhaltsverzeichnis Bedienung Angaben zum Fahrzeug Mähdeck 125 cm Bestimmungsgemäße Verwendung Mähdeck 135 cm Schwerpunkt Frontkehrwalze Allgemeine Hinweise Schneeräumschilde Umweltschutz, REACH und Entsorgung Schneefräse des ausgedienten Fahrzeuges Streuer Garantie Aufbaustreuer Zubehöre, Ersatzteile, Anbausätze Ausgleichsgewicht ohne Anhängerkupp- Symbole in der Betriebsanleitung lung Symbole auf dem Gerät 8.10 Ausgleichsgewicht mit Anhängerkupp-... -
Page 3: Angaben Zum Fahrzeug
Angaben zum Fahrzeug Bestimmungsgemäße Verwendung Verwenden Sie dieses Gerät ausschließlich gemäß den – Es dürfen nur die vom Unternehmer oder dessen Be- Angaben in dieser Betriebsanleitung. auftragten für den Maschineneinsatz freigegebenen Diese Maschine (Geräteträger) wurde für den Einsatz auf Flächen befahren werden. Grünflächen, zur Anlagenpflege und zum Winterdienst 2.1.1 Vorhersehbarer Fehlgebrauch... -
Page 4: Garantie
3.1.2 Inhaltsstoffe (REACH) Symbole auf dem Gerät Aktuelle Informationen zu Inhaltsstoffen finden Sie unter: VORSICHT www.kaercher.de/REACH Verbrennungsgefahr durch heiße Oberflä- 3.1.3 Entsorgung des ausgedienten chen! Vor Arbeiten am Gerät, Auspuffanlage Fahrzeuges ausreichend abkühlen lassen. Ausgediente Fahrzeuge enthalten wertvolle recyclingfähi- VORSICHT ge Materialien, die einer Verwertung zugeführt werden Verbrennungsgefahr durch möglicherweise sollten. -
Page 5: Abladehinweise
Abladehinweise Sicherheitshinweise zum Fahrbetrieb GEFAHR – Es müssen grundsätzlich die Vorschriftsmaßnahmen, Verletzungsgefahr, Beschädigungsgefahr! Regeln und Verordnungen beachtet werden, die für Gewicht des Gerätes beim Verladen beachten! Kraftfahrzeuge gelten. – Das Gerät darf nicht von Kindern oder Jugendlichen Leergewicht (ohne Anbausätze) 870 - 944 kg * betrieben werden. -
Page 6: Sicherheitshinweise Zum Verbrennungs- Motor
Sicherheitshinweise zum Sicherheitseinrichtungen Verbrennungsmotor 4.9.1 Sitzkontaktschalter – Vor Inbetriebnahme, Betriebsanleitung des Motoren- Befindet sich kein Bediener auf dem Fahrersitz, sind Funk- herstellers lesen und insbesondere die Sicherheitshin- tionen mit erhöhtem Gefahrenpotential gesperrt. weise beachten. 4.9.2 Startsperre GEFAHR Zum Starten des Motors muss das Bremspedal gedrückt Verletzungsgefahr! werden. -
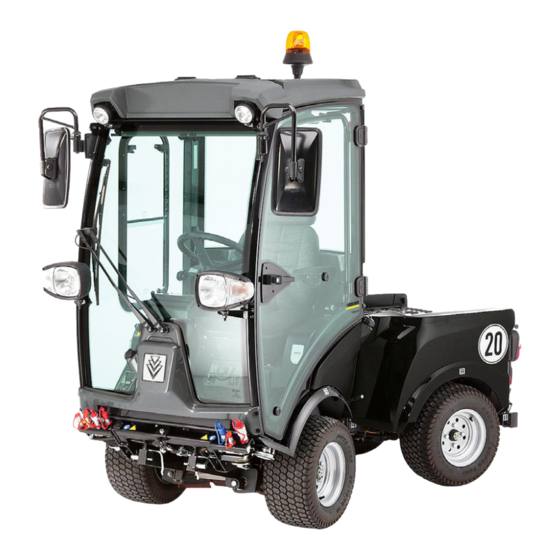
Page 7: Bedienelemente
Bedienelemente Gerät mit Schutzbügel 1 Lenksäule * 2 Konsole * 3 Lenkrad 4 Schutzbügel, klappbar 5 Rundumkennleuchte (Option) 6 Arbeitslicht 7 Fahrlicht/Blinker (Option) 8 Tankverschluss 9 Aufnahme für Anbaugeräte 10 Schauglas Hydrauliköl 11 Tankanzeige 12 Fahrersitz * 13 Pedale * 14 Frontkraftheber * siehe nachfolgende Detailansicht Das Gerät mit Schutzbügel ist aus Sicherheitsgründen... -
Page 8: Lenksäule
5.2.1 Lüftung/Klimaanlage (Option) Lenksäule 1 Schalter Lüftergebläse 1 Lüftung 2 Temperaturregler Heizung 2 Kontrollleuchte Blinker 3 Regler Kühlleistung (Option) 3 Schalter Warnblinkanlage 5.2.2 Deckenkonsole 4 Klemmschraube Lenkrad-Höhenverstellung 5 Betriebsstundenzähler Arbeitshydraulik 6 Kontrollleuchte Feststellbremse 7 Anzeige Schwimmstellung AUX 1 8 Klemmschraube Lenkrad-Neigungsverstellung 9 Anzeige Schwimmstellung Frontkraftheber 10 Multifunktionshebel für Licht, Blinker und Hupe Multifunktionshebel für Licht, Blinker... -
Page 9: Pedale
Pedale Anschlüsse Begriffsdefinition AUX: Auxilliary = Zusatzsteuerventil Begriffsdefinition Hydraulische PTO: Power Take Off = Hydraulische Kraftabgabe Begriffsdefinition Elektrische PTO: Power Take Off = Elektrische Kraftabgabe 5.7.1 Vorne 1 Bremspedal 2 Verriegelung Bremspedal (Feststellbremse) 3 Anschlag Arbeitsgeschwindigkeit 4 Fahrpedal vorwärts 5 Fahrpedal rückwärts 5.5.1 Feststellbremse betätigen ... - Page 10 5.7.3 Am Hinterwagen 1 Hydraulikkupplungen Main PTO 2 Hydraulikkupplungen AUX2 3 Leckagekupplung 1 Wasserkupplung 2 Steckdose E3-Front...
-
Page 11: Konsole (Bei Gerät Mit Fahrerkabine)
Konsole (bei Gerät mit Fahrerkabine) 1 Warnleuchte Ladekontrolle Batterie 2 Warnleuchte Hydrauliköltemperatur 3 Warnleuchte Kühlwassertemperatur 4 Warnleuchte Öldruck 5 Kontrollleuchte Fernlicht 6 Schalter Stellung 1: Wasserkupplung vorne ein Stellung 0: Wasserkupplung vorne aus Stellung 2: Wasserumlaufsystem zuschalten (Option) 7 Taster Stellung 1: Arbeitshydraulik Main PTO ein Stellung 0: Arbeitshydraulik Main PTO aus 8 Zündschloss... -
Page 12: Funktion Joystick (Bei Gerät Mit Fahrerkabine)
Funktion Joystick (bei Gerät mit Fahrerkabine) Anschluss AUX 1 Taste vorne Funktionstaste Joystick (Joystick) Drücken und hal- nach links / rechts bewegen Anschluss AUX elektrisch 12 V Taste vorne Funktionstaste Joystick (Joystick) Funktionstasten blau oder rot (A/B) drücken 5.9.2 Anzeige Schwimmstellung 1 Joystick 2 Taste vorne 3 Funktionstasten... -
Page 13: Konsole (Bei Gerät Mit Schutzbügel)
5.10 Konsole (bei Gerät mit Schutzbügel) A Bedienhebel, rastet ein 2.PTO Anschluss: vorwärts/rückwärts B Bedienhebel Frontkraftheber auf/ab C Bedienhebel AUX 1 Anschluss D Bedienhebel AUX 2 Anschluss Multifunktionshebel in Verbindung mit Frontgeräteträ- ger und Wildkrautbesen erhältlich (optional) E Bei Arbeiten mit Saugmund (optional) Stellung E1 - Saugmund nicht verriegelt Stellung E2 - Saugmund verriegelt 1 Warnleuchte Ladekontrolle Batterie... -
Page 14: Funktion Bedienhebel (Bei Gerät Mit Schutzbügel)
5.11 Funktion Bedienhebel (bei Gerät mit Schutzbügel) 5.11.1 Funktion Bedienhebel A 5.11.3 Funktion Bedienhebel C Ruhestellung Ruhestellung An AUX 1 angeschlossene Anbaugeräte nach vor- Am 2.PTO angeschlossene Anbaugeräte vorwärts, ne, Hebel rastet nicht ein Hebel rastet ein Am AUX 1 angeschlossene Anbaugeräte nach hin- Am 2.PTO angeschlossene Anbaugeräte rück- ten, Hebel rastet nicht ein wärts, Hebel rastet ein... -
Page 15: Vor Inbetriebnahme
Vor Inbetriebnahme Vor Erstinbetriebnahme Fahrersitz einstellen Dokumententasche nach beiliegender Anleitung an der GEFAHR Heckscheibe befestigen. Unfallgefahr! Fahrersitz nicht während der Fahrt einstel- len. Tanken 6.4.1 Standardsitz Gefahr Explosionsgefahr! – Nicht in geschlossenen Räumen tanken. – Rauchen und offenes Feuer unbedingt vermeiden. –... -
Page 16: Lenkradposition Einstellen
Lenkradposition einstellen Vor dem Start/Sicherheitsprüfung GEFAHR GEFAHR Unfallgefahr! Lenkradposition nicht während der Fahrt ein- Unfallgefahr, Verletzungsgefahr! Sobald ein Punkt der Si- stellen. cherheitsüberprüfung nicht erfüllt ist, darf das Gerät nicht in Betrieb genommen werden sondern muss instand ge- setzt werden. Vor jedem Betrieb muss folgende Sicherheitsüberprüfung durchgeführt werden: 6.6.1... -
Page 17: Gerät Abstellen
7.1.1 Feststellbremse lösen 7.1.5 Hindernisse überfahren Bremspedal ganz durchtreten. WARNUNG Verriegelung nach hinten drehen. Beschädigungsgefahr! Seitenbesen und Saugmund vor Bremspedal loslassen. Überfahren von Hindernissen anheben. Hindernisse bis 150 mm Höhe: 7.1.2 Motor starten Hindernis langsam und vorsichtig im Winkel von 45° ... -
Page 18: Anbausätze
Die Bodenbelastung kann durch Verwendung des Anbau- des Anbausatzes lesen. satzes Reifen Rasen (2.851-089.0) vermindert werden. Zum jetzigen Zeitpunkt gibt es folgende Anbausätze für Mit abgenommenem Kehrgutbehälter /Frischwassertank den MIC 26: steigt die Fahrstabilität und die Übersicht. – Mähdeck 125 cm 8.2.4 Nach dem Mähen –... -
Page 19: Frontkehrwalze
8.3.4 Nach dem Mähen 8.5.3 Begrenzungsleuchten (Option) anschließen Arbeitsgerät und Saugmund absenken. Oberseite des Saugmunds mit Druckluft säubern (bei Kehrmaschine). Kühler reinigen. Frontkehrwalze 8.4.1 Hydraulikleitungen anschließen Kabel wie oben gezeigt verlegen. Stecker am Heck der Kehrmaschine einstecken. 8.5.4 Voraussetzungen für den Betrieb –... -
Page 20: Streuer
8.6.3 Begrenzungsleuchten (Option) anschließen Spritzschutz einhängen, damit der Kühler vor dem Streugut geschützt ist. 8.7.2 Walzenstreuer befestigen Kabel wie oben gezeigt verlegen. Stecker am Heck der Kehrmaschine einstecken. 8.6.4 Voraussetzungen für den Betrieb – Wird kein Streuer angebaut, muss bei demontiertem Kehrgutbehälter/Wassertank für die Fahrt auf öffentli- chen Straßen das Ausgleichsgewicht (Option) am Heck des Gerätes angebracht sein. -
Page 21: Aufbaustreuer
8.7.3 Tellerstreuer befestigen 8.7.6 Bedienung Zum Einschaltendes Streuers, PTO einschalten 8.7.7 Voraussetzungen für den Betrieb – Motordrehzahl auf das untere Ende des Bereichs „eco“ einstellen. Aufbaustreuer 1 Haltestift 2 Sicherungsbolzen 3 Klappstecker Anbauen wie Walzenstreuer, aber Führungsschlitze weiter vom Fahrzeug entfernt verwenden. 8.7.4 Hydraulikleitungen anschließen 1 Aufbaustreuer... -
Page 22: Ausgleichsgewicht Ohne Anhängerkupplung
Fahrzeug unter den auf Stützen stehenden Auf- 8.8.2 Bedienung baustreuer positionieren. Zum Einschaltendes Streuers, PTO einschalten Aufbaustreuer in die Führung des Heckaufbaus ablassen. 8.8.3 Arbeitsleuchte anschließen Beim erstmaligen Anbringen des Aufbaustreuers am Stecker der Lampe in Steckdose am Hinterwagen ein- Fahrzeug, muss die linke und rechte vordere Führung stecken. -
Page 23: Anhängerkupplung
8.12.3 Bedienung 8.11 Anhängerkupplung Zum Heben und Senken, Frontkraftheber mit Joystick bedienen. 8.13 Wildkrautbesen nur Gerät mit Fahrerkabine 1 Sicherungsbolzen 2 Anhängerkupplung Sicherungsbolzen durch Drehen entriegeln und seitlich herausziehen. Anhängerkupplung in die Vierkantrohre des Geräterah- mens schieben. 1 Wildkrautbesen ... - Page 24 8.13.5 Bedienung 8.13.6 Funktion Joystick GEFAHR Verletzungsgefahr bei Kontakt mit dem rotierenden Wild- krautbesen. Beim Einstellen und Arbeiten auf ausreichend Sicherheitsabstand zu Personen achten. Verletzungsgefahr durch wegfliegende Steine oder Schmutz. Spritzschutz korrekt einstellen und ausreichend Abstand zu Personen einhalten. GEFAHR Unfallgefahr durch verringerte Lenkwirkung.
-
Page 25: Lagerung
Besenarm aus- / einschwenken Lagerung Taste vorne Funktionstaste Joystick WARNUNG (Joystick) Verletzungs- und Beschädigungsgefahr! Gewicht des Ge- nach links / rechts rätes bei Lagerung beachten. bewegen Wird das Fahrzeug längere Zeit nicht genutzt, bitte folgen- de Punkte beachten: Besenkopf nicken (vorne kippen) ... -
Page 26: Pflege Und Wartung
Pflege und Wartung 10.2.3 Seitliche Motorverkleidung anbringen 10.1 Allgemeine Hinweise Vor dem Reinigen und Warten des Gerätes, dem Aus- wechseln von Teilen oder der Umstellung auf eine an- dere Funktion ist das Gerät auszuschalten und gegebenenfalls der Zündschlüssel abzuziehen. ... -
Page 27: Reinigung
Prüfen, dass der Wasserabscheider kein Wasser ent- 10.3 Reinigung hält. Arbeitsgerät anheben. Kühler reinigen. Gerät auf einer ebenen Fläche abstellen. Prüfen, ob beim Fahren mit Anbaugeräten ein Heckge- Motordrehzahl auf Stellung MIN bringen. wicht erforderlich und montiert ist. ... -
Page 28: Wartungsarbeiten
10.4.8 Alle 1000 Betriebsstunden oder jährlich 10.5.2 Vorbereitung Durchführung aller Arbeiten durch den Kundendienst. Gerät auf einer ebenen Fläche abstellen. Kühlwasser austauschen. Arbeitsgerät absenken. Ventile einstellen. Motordrehzahl auf Stellung MIN bringen. Sichtprüfung Kraftstoffschläuche und Kühlwasser- ... - Page 29 10.5.5 Batterie laden Anzugsdrehmoment Vorderreifen 83 - 85 Nm Gefahr Anzugsdrehmoment Hinterreifen 83 - 85 Nm Verletzungsgefahr! Sicherheitsvorschriften beim Umgang 10.5.7 Motorölstand prüfen und Öl nachfüllen mit Batterien beachten. Gebrauchsanweisung des Lade- gerätherstellers beachten. Gefahr Batterie nur mit geeignetem Ladegerät laden. ...
- Page 30 Der Ölstand muss sich innerhalb des Schauglases befinden. 10.5.8 Motoröl und Motorölfilter wechseln Hydrauliköl nachfüllen. Hinweis: Ein warmer Motor erleichtert das Ablassen. Ölsorte: siehe Kapitel „Technische Daten“. Gefahr Hinweis: Fehlendes Hydrauliköl kann nur durch ein spezi- Verbrennungsgefahr durch heißes Öl und möglicherweise elles Sonderzubehör (Bestell-Nr.) nachgefüllt werden, heiße Schlauchleitungen! oder durch den Kärcher Kundendienst.
- Page 31 Sicherstellen dass der Absperrhahn geöffnet ist. 10.5.14 Kühlwasser nachfüllen Prüfen, ob sich der Schwimmer am Boden des Wasser- – Zum Nachfüllen eine Wasser-Frostschutzmischung abscheiders befindet. verwenden. Ist der Schwimmer nicht am Boden, befindet sich Was- – Keine unterschiedlichen Frostschutzmittel mischen. ser im Wasserabscheider und der Wasserabscheider –...
- Page 32 10.5.19 Luftfilter prüfen 1 Luftfiltereinsatz 2 Vorfilter 1 Luftfilterwechselanzeige 3 Klammer Ist die Luftfilterwechselanzeige rot, muss der Luftfilter- Vorfilter abnehmen. einsatz ausgetauscht werden. Luftfiltereinsatz eingebaut lassen, damit der Staub 10.5.20 Luftfilter reinigen und wechseln beim Reinigen des Vorfilters nicht in den Motor gelangt. ...
- Page 33 10.5.21 Gerät schmieren Abbildung symbolisch 10.5.23 Scheibenwischer warten 1 Keilriemen nur Gerät mit Fahrerkabine VORSICHT Gefahr von Funktionsstörungen. Keilriemen nicht mit Fett in Berührung bringen. Mit Pfeilen markierte Schmiernippel mit der Fettpresse abschmieren. Mit „*“Pfeilen markierte Schmiernippel sind täglich vor Betriebsbeginn abzuschmieren.
-
Page 34: Sicherungen
10.6.2 Sicherungen am Sicherungskasten 10.6 Sicherungen Motorraum auswechseln HINWEIS Nur Sicherungen mit gleichem Sicherungswert verwen- den. Defekte Sicherungen erneuern. 10.6.1 Sicherungen am Sicherungskasten der Fahrerkabine auswechseln nur Gerät mit Fahrerkabine 1 Deckel Deckel abnehmen. 1 Deckel 2 Rändelschraube ... -
Page 35: Störungshilfe
Störungshilfe 11.1 Störungen mit Anzeige Anzeige Ursache Behebung Durch wen Warnleuchte Motor überhitzt Motordrehzahl auf Leerlauf stellen. Bediener Motortemperatur Stand der Kühlflüssigkeit im Motor prüfen. leuchtet Erlischt die Warnleuchte nicht innerhalb von 5 Minuten, Motor abstellen und Kundendienst aufsuchen. Warnleuchte Hyd- Hydrauliköl überhitzt Temperatur zu hoch: Motor im Standgas be- Bediener... -
Page 36: Technische Daten
Technische Daten MIC 26 Fahrgeschwindigkeit, vorwärts km/h Fahrgeschwindigkeit, rückwärts km/h Arbeitsgeschwindigkeit km/h Steigfähigkeit (max.) Angetriebene Achsen Einsatzdauer bei vollem Tank ca. 12 Motor Hersteller Yanmar 3TNV76-DU Hubraum 1116 Motorleistung bei 3000 1/min 18,9 Drehmoment bei 2000 1/min 66,6 Elektrische Anlage... -
Page 37: Bereifung
12.1 Bereifung VORSICHT Nur von Kärcher freigegebene Reifen verwenden. Reifentyp Reifengröße Empfohlener Reifenfülldruck MPa (bar) Strassenreifen 195/55 R10C 0,62 (6,2) Grasreifen 20x10.00-10 0,28 (2,8) Standardreifen, extra 20x12.00-10 0,14 (1,4) breit Traktionsreifen (gro- 20x 8.00-10 0,45 (4,5) bes Profil) Abbildung: Aufkleber in der Fahrerkabine mit empfohlenen Reifenfülldrücken... - Page 38 Contents Mower 135 cm Information about the vehicle Front brush roller Proper use Snow removal shields Centre of Gravity Snow blower General notes Caster Environmental protection, REACH and Chassis mounted spreader disposal of the worn out vehicle Balance weight without attachment hitch Warranty 8.10 Balance weight with attachment hitch Accessories, spare parts, upgrade kits...
-
Page 39: Information About The Vehicle
Information about the vehicle Proper use Use this appliance only as directed in these operating in- – The machine may only be operated on the surfaces ap- structions. proved by the company or its authorised representa- This machine (attachment carrier) was developed for use tives. -
Page 40: Warranty
3.1.2 Ingredients (REACH) Symbols on the machine The latest information on ingredients can be found under: CAUTION www.kaercher.de/REACH Risk of burns on account of hot surfaces! Al- 3.1.3 Disposal of the worn out vehicle low the exhaust to cool down sufficiently be- Worn out vehicles contain valuable recyclable materials fore starting work on the machine. -
Page 41: Unloading Tips
Unloading tips Safety information concerning the driving operation DANGER Risk of injury, risk of damage! – It is important to follow all safety instructions, rules and Observe the weight of the appliance when you load it! regulations applicable for driving motor vehicles. Unladen weight (without attachment sets) 870 - 944 kg * –... -
Page 42: Safety Information Concerning The Combustion Engine
Safety information concerning the combustion engine – Read the operating instructions of the engine manufac- turer before start-up and follow the safety instructions carefully. DANGER Risk of injury! – Do not close the exhaust. – Do not bend over the exhaust or touch it (risk of burns). –... -
Page 43: Control Elements
Control elements Device with protective bar 1 Steering column * 2 Panel * 3 Steering wheel 4 Hoop guard, foldable 5 Beacon light (optional) 6 Work light 7 Driving light/direction indicator (option) 8 Tank lid 9 Retainer for attachments 10 Sight glass hydraulic oil 11 Tank indicator 12 Driver's seat * 13 Pedals *... -
Page 44: Steering Column
5.2.1 Ventilation/air conditioning (option) Steering column 1 Switch ventilator blower 1 Ventilation 2 Temperature regulator of heater 2 Indicator lamp for direction indicator 3 Cooling capacity regulator (option) 3 Switch for warning system 5.2.2 Ceiling panel 4 Clamp screw for steering wheel height adjustment 5 Operating hours counter, working hydraulics 6 Indicator lamp for parking brakes 7 Display, float position AUX 1... -
Page 45: Lowering Speed Control Valve (Option)
5.5.2 Release parking brake 5.7.1 Front Press the brake pedal all the way. Unlock the lock. Release the brake pedal. Lowering speed control valve (option) The rotary knob for the lowering speed is used to adjust the lowering speed of the front implement frame. 1 Rotary knob lowering speed control valve A Direction of rotation "Increase lowering speed"... - Page 46 5.7.3 On the rear cart 1 Hydraulic couplings main PTO 2 Hydraulic couplings AUX2 3 Leakage coupling 1 Water coupling 2 Socket E3 front...
-
Page 47: Console (For Device With Driver Cabin)
Console (for device with driver cabin) 1 Warning lamp for battery charge indicator 2 Warning lamp hydraulic oil pressure 3 Warning light coolant temperature 4 Warning lamp oil pressure 5 Indicator lamp for high beam 6 Switch Position 1: Water coupling front on Position 0: Water coupling front off Position 2: Switch on water circulation system (option) 7 Buttons... -
Page 48: Joystick Function (For Device With Driver Cabin)
Joystick function (for device with driver cabin) AUX 1 connection Button to the Function button Joystick front (joystick) Press and hold move to the left / right AUX connection, electrical 12 V Button to the Function button Joystick front (joystick) Press the blue or red function but- tons (A/B) -
Page 49: Console (For Device With Protective Bar)
5.10 Console (for device with protective bar) A Control lever, snaps in place 2.PTO connection: forward/reverse B Control lever Front power lift up/down C Control lever AUX 1 connection D Control lever AUX 2 connection Multifunction lever available in connection with front ap- pliance carrier and weed broom (optional) E For working with the suction port (optional) Position E1 - suction port not locked... -
Page 50: Operating Lever Function (For Device With Protective Bar)
5.11 Operating lever function (for device with protective bar) 5.11.1 Function control lever A 5.11.3 Function control lever C Resting position Resting position Attachments connected to AUX 1 towards the front, Attachments connected to 2.PTO forward, lever lever does not snap in place snaps in place Attachments connected to AUX 1 towards the rear, Attachments connected to 2.PTO reverse, lever... -
Page 51: Before Startup
Before Startup Prior to initial start-up Adjusting driver's seat Attach the document pouch to the rear window as in- DANGER structed in the enclosed instructions. Danger of accident. Do not adjust the driver's seat while driving. Refuelling 6.4.1 Standard seat Danger Risk of explosion! –... -
Page 52: Set The Steering Wheel Position
Set the steering wheel position Prior to start/safety test DANGER DANGER Danger of accident. Do not adjust the steering wheel posi- Risk of accidents, injuries. If one point of the safety check tion while driving. is not fullfilled, the appliance must not be taken into opera- tion, but must be repaired. -
Page 53: Turn Off Device
7.1.2 Start the engine 7.1.5 Driving over obstacles Remove your foot from the accelerator pedal. WARNING Set engine speed to MIN position. Risk of damage! Raise the side-brushes and the suction Press the brake pedal all the way down. opening before overtaking hurdles. -
Page 54: Attachment Sets
– Set the motor rpm to high. Currently the following attachments are available for the Note: MIC 26: The wear on the ground can be reduced by using the up- – Mower deck 125 cm grade kit for grass tyres (2.851-089.0). -
Page 55: Front Brush Roller
8.3.3 Prerequisites for operation 8.5.2 Operations – The balance weight (option) must be attached to the Operation of the attachment unit is done with the joy- rear of the machine for driving on public roads. stick; for more about this, see the “Joystick function” –... -
Page 56: Caster
8.6.2 Operations Operation of the attachment unit is done with the joy- stick; for more about this, see the “Joystick function” chapter. 8.6.3 Connect the marker lamps (option) Insert the spray guard to protect the radiator from sprayed materials. 8.7.2 Fasten the roller caster ... -
Page 57: Chassis Mounted Spreader
8.7.3 Attach the plate caster 8.7.6 Operations Switch on the PTO to switch on the control 8.7.7 Prerequisites for operation – Set the motor speed to "eco", the lower level of the range. Chassis mounted spreader 1 Holding pin 2 Safety pin 3 Folding plug ... -
Page 58: Balance Weight Without Attachment Hitch
Position the vehicle under the chassis mounted spread- 1 Hydraulic couplings main PTO er that is standing on the supports. 2 Electric connectors Lower the chassis mounted spreader into the guides of Connect the hydraulic hoses and electrical plug with the rear structure. -
Page 59: Coupling Triangle
8.11 Towing hitch 8.13 Weed broom only device with driver cabin 1 Safety pin 2 Towing hitch 1 Weed broom Unlock the safety bolt by turning it and pull it out toward the side. 2 Water-spraying equipment Slide the lorry hitch into the square pipes of the ma- 3 Splash guard chine frame. - Page 60 8.13.5 Operation 8.13.6 Joystick function DANGER Risk of injury if you touch the rotating weed broom. Watch for sufficient safety clearance to people when adjusting and working. Risk of injury on account of projected rocks or dirt. Correct- ly adjust the spray guard and keep sufficient clearance to persons.
-
Page 61: Storage
Swivel in / out the broom arm Button to the Function button Joystick front (joystick) move to the left / right Tilt the broom head (forwards) Function button Function button Joystick Blue Press and hold move to the left / right Roll the broom head (tilt at the side) Function button... -
Page 62: Care And Maintenance
Care and maintenance 10.2.3 Install the engine's side panels 10.1 General notes First switch off the appliance and remove the ignition key before performing any cleaning or maintenance tasks on the appliance, replacing parts or switching over to another function. ... -
Page 63: Cleaning
10.4.2 After each vehicle wash 10.3 Cleaning Grease all bearings that are marked with an "*" under Raise the working machine. "Maintenance tasks/vehicle". Park the machine on an even surface. 10.4.3 Weekly Set engine speed to MIN position. ... -
Page 64: Maintenance Works
10.4.8 After 1000 operating hours or once a year 10.5.2 Preparation All work must be performed by customer service. Park the machine on an even surface. Replace cooling water. Lower the working appliance. Adjust the valves. ... - Page 65 Lower machine using vehicle jack. 10.5.5 Charging battery Torque the wheel nuts/wheel bolts to the required Danger torque. Risk of injury! Comply with safety regulations on the han- Tightening torque for front tyres 83 - 85 Nm dling of batteries. Observe the directions provided by the manufacturer of the charger.
- Page 66 Refill hydraulic oil. 10.5.8 Change the motor oil and the oil filter Oil grade: Refer to chapter "Technical data" Note: A warm motor facilitates the draining process. Note: Low hydraulic oil can only be topped up with a spe- Danger cial optional accessory (order no.) or by the Kärcher after- Risk of burns due to hot oil or possible hot hose lines!
- Page 67 Ensure that the drain-off tap is open. 10.5.14 Refill cooling water Check whether the floater is located on the bottom of – Use a water and antifreeze mixture to refill. the water separator. – Do not mix different antifreeze types. If the floater is not on the bottom, there is water in the –...
- Page 68 10.5.19 Check the air filter 1 Air filter insert 2 Pre-filter 1 Change air filter indicator 3 Clip If the ventilation display is red, the air filter insert must Remove pre-filter. be replaced. Leave the air filter insert in place and thus prevent the 10.5.20 Cleaning and replacing the air filter dust from entering the engine when cleaning the prefil- ter.
- Page 69 10.5.21 Lubricate the machine Illustration is symbolic 10.5.23 Maintaining the wiper 1 V-belt only device with driver cabin CAUTION Risk of functional disturbances. Do not let the V-belts get in contact with the grease. Lubricate the grease nipples marked with an arrow with the grease gun.
-
Page 70: Fuses
10.6.2 Replacing the fuses in the fuse box of the 10.6 Fuses motor compartment NOTICE Only use fuses with identical safety ratings. Replace defective fuses. 10.6.1 Replacing the fuses in the fuse box in the driver cabin only device with driver cabin 1 Cover ... -
Page 71: Troubleshooting
Troubleshooting 11.1 Faults with display Display Cause Remedy By whom Warning lamp for Engine is overheated Set the engine speed to idle. Operator motor tempera- Check the level of cooling liquid in the engine. ture lights up If the warning lamp does not turn off within 5 minutes, shut off the engine and contact Cus- tomer Service. -
Page 72: Technical Specifications
Technical specifications MIC 26 Drive speed, forward km/h Drive speed, reverse km/h Working speed km/h Climbing capability (max.) Driven axles Usage duration when tank is full about 12 Engine Manufacturer Yanmar Type 3TNV76-DU Cylinder capacity 1116 Engine output at 3000 rpm 18.9... -
Page 73: Tyres
12.1 Tyres CAUTION Only use Kärcher-approved tyres. Tyre type Tyre size Recommended tyre pressure MPa (bar) Road tyres 195/55 R10C 0.62 (6.2) Grass tyres 20x10.00-10 0.28 (2.8) Standard tyres, extra 20x12.00-10 0.14 (1.4) wide Traction tyres (coarse 20x 8.00-10 0.45 (4.5) tread) Figure: Label in the driver cabin with recommended tyre pressures... - Page 74 Table des matières Utilisation Indications relatives au véhicule Niveau de fauchage 125 cm Utilisation conforme Niveau de fauchage 135 cm Point de gravité Balai de nettoyage avant Consignes générales Chasse-neige Protection de l'environnement, REACH et Déneigeuse à hélice élimination de l'ancien véhicule Épandeur Garantie Accessoires, pièces de rechange, kits de...
-
Page 75: Indications Relatives Au Véhicule
Indications relatives au véhicule Utilisation conforme L'utilisation de l'appareil doit être faite en conformité avec – Si aucun dispositif de travail n'est fixé à l'arrière de l'ap- les consignes figurant dans les instructions de service. pareil, le contrepoids doit impérativement être placé à Cette machine (support de l'appareil) a été... -
Page 76: Garantie
ATTENTION 3.1.2 Substances (REACH) Remarque relative à une situation éventuellement dange- Les informations actuelles relatives aux substances se reuse pouvant entraîner des dommages matériels. trouvent à l'adresse : www.kaercher.de/REACH Symboles utilisés sur l'appareil 3.1.3 Élimination de l'ancien véhicule PRÉCAUTION Les véhicules usés contiennent des matériaux précieux re- Surfaces brûlantes, risque de brûlure! Avant cyclables qui doivent être amenés à... -
Page 77: Consignes De Déchargement
Consignes de déchargement Consignes de sécurité relatives au mode de déplacement DANGER Risque de blessure, de dommage ! – Doivent être respectées les mesures de règlement, les Respecter le poids de l'appareil lors du transport ! règles et les décrets qui sont valables pour les automobiles. Poids à... -
Page 78: Consignes De Sécurité Relatives Au Mo- Teur À Combustion
Consignes de sécurité relatives au Dispositifs de sécurité moteur à combustion 4.9.1 Contacteur du siège – Avant la mise en service, lire le mode d'emploi du S'il ne se trouve aucun opérateur sur le siège du conduc- constructeur du moteur et en particulier respecter les teur, toutes les fonctions sont verrouillées avec un poten- consignes de sécurité. -
Page 79: Eléments De Commande
Eléments de commande Appareil avec étrier de protection 1 Colonne de direction * 2 Console * 3 Volant 4 Étrier de protection, rabattable 5 Gyrophare (option). 6 Eclairage de travail 7 Feux de route/clignotant (option) 8 Verrouillage du réservoir 9 Logement pour appareils de manutention 10 Regard pour huile hydraulique 11 Jauge à... -
Page 80: Colonne De Direction
5.2.1 Ventilation/climatisation (option) Colonne de direction 1 Commutateur ventilateur 1 Ventilation 2 Régulateur de température chauffage 2 Témoin de contrôle clignotant 3 Régulateur puissance de refroidissement (option) 3 Interrupteur clignotant 5.2.2 Console de toit 4 Vis de serrage réglage en hauteur volant 5 Compteur horaire hydraulique de travail 6 Lampe témoin frein de stationnement 7 Indicateur position flottante AUX 1... -
Page 81: Pédale
Pédale Raccordements Définition de la notion AUX : Auxiliary = soupape de commande supplémentaire Définition de la notion PTO hydraulique : Power Take Off = prise de force hydraulique Définition de la notion PTO électrique : Power Take Off = prise de force électrique 5.7.1 À... - Page 82 5.7.3 À l'arrière du véhicule 1 Coupleurs hydrauliques Main PTO 2 Coupleurs hydrauliques AUX2 3 Couplage de fuite 1 Coupleur d'eau 2 Prise E3 avant...
-
Page 83: Console (Sur L'appareil Avec Cabine Conducteur)
Console (sur l’appareil avec cabine conducteur) 1 Voyant contrôle de charge de la batterie 2 Voyant température d'huile hydraulique 3 Témoin de contrôle de température du liquide de refroi- dissement 4 Voyant pression d'huile 5 Témoin de contrôle des feux de route 6 Interrupteur Position 1 : coupleur d'eau avant activé... -
Page 84: Fonction Joystick (Sur L'appareil Avec Cabine Conducteur)
Fonction joystick (sur l’appareil avec cabine conducteur) Raccordement AUX 2 (sans position flottante) Interrupteur prin- Touche de com- Joystick cipal position mande flottante (console) Désactiver pousser vers la gauche/vers la droite Raccordement AUX 1 Touche avant (le- Touche de com- Joystick vier de com- mande... -
Page 85: Console (Sur L'appareil Avec Étrier De Protection)
5.10 Console (sur l’appareil avec étrier de protection) A Le levier de commande s'enclenche raccord 2.PTO : marche avant/marche arrière B Levier de commande relevage avant haut/bas C Levier de commande AUX 1 raccordement D Levier de commande AUX 2 raccordement Levier multifonction disponible en relation avec le sup- port d'appareil frontal et balai pour mauvaises herbes (en option) -
Page 86: Fonction Levier De Commande (Sur L'appareil Avec Étrier De Protection)
5.11 Fonction levier de commande (sur l’appareil avec étrier de protection) 5.11.1 Fonctionnement du levier de commande 5.11.3 Fonctionnement du levier de commande Position de repos Position de repos Appareils de manutention raccordés à AUX 1 à Appareils de manutention raccordés sur 2.PTO en l'avant ;... -
Page 87: Avant La Mise En Service
Avant la mise en service 6.4.1 Siège standard Avant la première mise en service Fixer le porte-documents sur la lunette arrière, confor- mément aux instructions ci-jointes. Faire le plein Danger Risque d'explosion ! – Ne faites jamais le plein dans des locaux fermés. –... -
Page 88: Régler La Position Du Volant
Régler la position du volant Avant le démarrage / Contrôle de sécurité DANGER Risque d'accident. Ne pas régler la position du volant pen- DANGER dant le déplacement. Risque d'accident, risque de blessure. Dès qu'un point du contrôle de sécurité n'est pas rempli, l'appareil ne doit pas être mis en service mais réparé. -
Page 89: Mettre L'appareil Hors Tension
7.1.2 Lancer le moteur 7.1.5 Franchissement des obstacles Oter le pied de la pédale d'accélérateur. AVERTISSEMENT Amener le régime moteur sur la position MIN. Risque d'endommagement ! Lever les balais latéraux et la Enfoncer la pédale de frein tout en bas. bouche d'aspiration avant passer sur des obstacles. -
Page 90: Jeux De Montage
(2.851-089.0). Il existe actuellement les kits de montage suivants pour le La stabilité de la conduite et la visibilité augmentent MIC 26 : lorsque le collecteur de balayures/réservoir d'eau fraîche – Niveau de fauchage 125 cm est retiré. -
Page 91: Balai De Nettoyage Avant
8.3.3 Conditions pour l'exploitation 8.5.2 Utilisation – Le contrepoids (option) doit être mis en place à l'arrière La commande de l'élément rapporté se fait à l'aide du de l'appareil pour le déplacement sur voies publiques. levier de commande, voir le chapitre « Fonction du le- –... -
Page 92: Épandeur
8.6.2 Utilisation La commande de l'élément rapporté se fait à l'aide du levier de commande, voir le chapitre « Fonction du le- vier de commande ». 8.6.3 Raccord des feux de gabarit (option) Accrocher la protection contre les éclaboussures afin que le radiateur soit protégé... - Page 93 8.7.3 Fixer le plateau d'épandage 8.7.6 Utilisation Pour mettre en marche l'épandeur, enclencher le com- mutateur PTO. 8.7.7 Conditions pour l'exploitation – Régler la vitesse du moteur sur l'extrémité inférieure de la plage « eco ». Épandeur 1 Goupille de retenue 2 Axe de retenue 3 Fiche rabattable ...
-
Page 94: Contrepoids Sans Attelage De Remorque
Positionner le véhicule sous l'épandeur situé sur les Raccorder les flexibles hydrauliques et les fiches élec- supports. triques avec les raccords correspondants. Abaisser l'épandeur dans le guidage de la structure ar- 8.8.2 Utilisation rière. Pour mettre en marche l'épandeur, enclencher le com- ... -
Page 95: Attelage De Remorque
8.10.1 Attelage de remorque 8.12.2 Conditions pour l'exploitation La charge d'appui et la charge de traction autorisées – En fonction du poids de l'appareil de manutention posé, sont indiquées au chapitre « Caractéristiques des contrepoids (option) doivent être posés à l'arrière techniques ». - Page 96 Pour les travaux de nettoyage, démarrer l’hydraulique 8.13.4 Monter le balai à feuilles mortes de travail Main PTO, le balai à mauvaises herbes Installer et fixer le balai à feuilles mortes prémonté sur tourne. le relevage avant. Abaisser le support d'appareil frontal en position flot- Remarque tante.
-
Page 97: Entreposage
Bras du balai à mauvaises herbes (avec position flot- Entreposage tante) AVERTISSEMENT Interrupteur prin- Touche de com- Joystick Risque de blessure et d'endommagement ! Prendre en cipal position mande compte le poids de l'appareil à l'entreposage. flottante Respecter les instructions suivantes si le véhicule doit res- (console) ter inutilisé... -
Page 98: Entretien Et Maintenance
Entretien et maintenance 10.2.3 Apporter le carter moteur latéral 10.1 Consignes générales Avant de nettoyer ou de mantenir l'appareil, de changer des pièces ou le changement à une autre fonction, l'ap- pareil doit être arrêter et en cas écheant reitrer la clé de contact. -
Page 99: Nettoyage
Contrôler si les robinets sur le séparateur d'eau et sur 10.3 Nettoyage le filtre à carburant sont ouverts. Lever l'appareil de travail. Vérifier que le séparateur d'eau ne contient pas d'eau. Garer l'appareil sur une surface plane. ... -
Page 100: Travaux De Maintenance
Risque de blessure par un abaissement involontaire du 10.4.7 Tous les 500 heures ou semestriellement bac à poussières. Exécuter les travaux sur la turbine uni- Confier tous les travaux au service après-vente. quement avec le bac à poussière totalement soulevé (pour ... - Page 101 Risque d'incendie et d'explosion! REMARQUE – Éviter impérativement de fumer ou de faire brûler des Utiliser un cric standard approprié. objets. – Les espaces dans lesquelles sont chargé les batteries doivent être bien aère, puisque au chargement peut ap- paraître du gaz très explosif. Risque de brûlure! –...
- Page 102 Refermer l'orifice de remplissage. Laisser le moteur env. 30 secondes en marche. Vérifier le niveau d'huile. Apporter l'huile usagée à un point de collecte appro- prié. 10.5.9 Contrôler le niveau d'huile hydraulique et remplir huile hydraulique. Important Pour éviter des perturbations du fonctionnement, une ...
- Page 103 10.5.12 Vidanger l'huile des moteurs de moyeux 10.5.14 Remettre le liquide de refroidissement à niveau Seul le service après-vente est autorisé à procéder au remplacement. – Utiliser un mélange de protection antigel-eau pour re- mettre à niveau. – Ne pas mélanger des antigels différents. –...
- Page 104 AVERTISSEMENT 10.5.15 Contrôler le séparateur d'eau Risque de blessure dû à un écoulement de carburant ! Ra- masser et essuyer le carburant qui a coulé. Mettre des gants de protection. Couper le moteur et le laisser refroidir. Fermer le robinet d'arrêt au niveau du séparateur d'eau.
- Page 105 10.5.20 Nettoyage et échange du filtre à air 1 Vis 2 Bride de fixation 3 Corps du filtre à air Dévisser la vis. Pousser le filtre à air vers l'intérieur et l'enlever par le bas. Desserrer les brides de fixation. ...
- Page 106 10.5.21 Graisser l'appareil Figure symbolique 10.5.23 Les essuie-glaces attendent 1 Courroie trapézoïdale appareil avec cabine conducteur uniquement PRÉCAUTION Risque de dysfonctionnements Ne pas laisser la courroie trapézoidale en contact avec la graisse. Lubrifier les graisseurs marqués avec des flèches au moyen d'une presse à...
-
Page 107: Fusibles
10.6.2 Changer les fusibles à la boîte à fusible 10.6 Fusibles Compartiment de moteur REMARQUE N'utiliser que des fusibles du même ampérage. Remplacer les fusibles défectueux. 10.6.1 Changer le fusible à la boîte à fusible dans la cabine de conducteur. ... -
Page 108: Service De Dépannage
Service de dépannage 11.1 Pannes avec affichage Mention Cause Remède Par qui Le voyant d'aver- Moteur surchauffé Mettre le régime moteur sur ralenti. Opérateur tissement tempé- Contrôler le niveau du liquide de refroidisse- rature du moteur ment dans le moteur. est allumé... -
Page 109: Caractéristiques Techniques
Caractéristiques techniques MIC 26 Vitesse d'avancement, en avant km/h Vitesse d'avancement, en arrière km/h Vitesse de travail km/h Pente (max.) Essieux entraînés Durée de fonctionnement avec un réservoir plein env. 12 Moteur Fabricant Yanmar Type 3TNV76-DU Cylindrée 1116 Puissance de moteur max. 3000 1/min 18,9 Couple à... -
Page 110: Pneumatiques
12.1 Pneumatiques PRÉCAUTION Utiliser uniquement des pneumatiques autorisés par Kär- cher. Type de pneus Dimension Pression de des pneuma- gonflage recom- tiques mandée MPa (bars) Pneus de route 195/55 R10C 0,62 (6,2) Pneus herbe 20x10.00-10 0,28 (2,8) Pneus standard, extra 20x12.00-10 0,14 (1,4) larges... - Page 111 Indice Tetto mietitrice 125 cm Dati del veicolo Tetto mietitrice 135 cm Uso conforme a destinazione Rullospazzola frontale Baricentro Scudo spazzaneve Avvertenze generali Fresa da neve Tutela dell'ambiente, REACH e smalti- Dispositivo di spargimento mento del vecchio veicolo fuori uso Spargitore assemblato Garanzia Peso di equilibratura senza gancio di trai-...
-
Page 112: Dati Del Veicolo
Dati del veicolo Uso conforme a destinazione Utilizzate questo apparecchio esclusivamente in conformi- – È consentito percorrere sole quelle superfici adibite tà alle indicazioni fornite da questo manuale d'uso. all'uso della macchina da parte dell'imprenditore o dei Questa macchina (porta-apparecchio) è stata sviluppata suoi incaricati. -
Page 113: Garanzia
3.1.2 Componenti (REACH) Simboli riportati sull'apparecchio Informazioni aggiornate sulle componenti contenute sono PRUDENZA disponibili all'indirizzo: Pericolo di scottature causate da superfici www.kaercher.de/REACH calde! Prima di effettuare qualsiasi intervento 3.1.3 Smaltimento del vecchio veicolo fuori sull'apparecchio lasciare raffreddare suffi- cientemente l'impianto di scarico. I veicoli dismessi contengono preziosi materiali di riciclag- PRUDENZA gio che devono essere consegnati al riciclaggio. -
Page 114: Indicazioni Per Lo Scarico
Indicazioni per lo scarico Avvertenze di sicurezza riguardo alla marcia PERICOLO Pericolo di lesioni e danneggiamento! – Rispettare in linea di principio le norme, i regolamenti e Osservare il peso dell'apparecchio al caricamento! le disposizioni che valgono per gli autoveicoli. Peso a vuoto (senza kit di montaggio) 870 - 944 kg * –... -
Page 115: Avvertenze Di Sicurezza Riguardo Al Moto- Re A Combustione
Avvertenze di sicurezza riguardo al Dispositivi di sicurezza motore a combustione 4.9.1 Interruttore di contatto del sedile – Prima di procedere alla prima messa in funzione, leg- Quando sul sedile non è presente alcun operatore, le funzioni gere il manuale d'uso fornito dalla casa produttrice del con un elevato potenziale di pericolosità... -
Page 116: Dispositivi Di Comando
Dispositivi di comando Apparecchio con archetto di sicurezza 1 Piantone dello sterzo * 2 Console * 3 Volante 4 Staffa di sostegno, inclinabile 5 Avvisatore ottico rotante (opzionale) 6 Luce di lavoro 7 Fari/Indicatore di direzione (in opzione) 8 Tappo del serbatoio 9 Alloggio per apparecchi assemblati 10 Vetro d'ispezione olio idraulico 11 Indicatore del serbatoio... -
Page 117: Piantone Dello Sterzo
5.2.1 Ventilazione/climatizzatore (opzione) Piantone dello sterzo 1 Interruttore ventola 1 Ventilazione 2 Termoregolatore riscaldamento 2 Spia di controllo indicatore di direzione 3 Regolatore capacità refrigerante (opzione) 3 Interruttore lampeggio di emergenza 5.2.2 Console da tetto 4 Vite di serraggio regolazione in altezza del volante 5 Contatore ore d'esercizio idraulica di lavoro 6 Spia di controllo per freno di stazionamento 7 Indicazione posizione flottante AUX 1... -
Page 118: Pedali
Pedali Collegamenti Definizione del termine AUX: Auxilliary = valvola di co- mando addizionale Definizione del termine PTO idraulica: Power Take Off = produzione di forza idraulica Definizione del termine PTO elettrica: Power Take Off = produzione di forza elettrica 5.7.1 Davanti 1 Pedale del freno 2 Blocco pedale del freno (sicurezza bambini) - Page 119 5.7.3 Sul carrello posteriore 1 Giunti idraulici Main PTO 2 Giunti idraulici AUX2 3 Giunto per perdite 1 Giunto dell'acqua 2 Presa E3-frontale...
-
Page 120: Mensola (In Caso Di Apparecchio Con Cabina Conducente)
Mensola (in caso di apparecchio con cabina conducente) 1 Spia di avviso controllo ricarica batteria 2 Spia di avviso temperatura olio idraulico 3 Spia temperatura acqua di raffreddamento 4 Spia di avviso pressione dell'olio 5 Spia di controllo abbaglianti 6 Interruttore Posizione 1: giunto dell'acqua anteriore ON Posizione 0: giunto dell'acqua anteriore OFF Posizione 2: Azionare il sistema di circolazione dell'ac-... -
Page 121: Funzione Joystick (In Caso Di Apparecchio Con Cabina Conducente)
Funzione joystick (in caso di apparecchio con cabina conducente) Collegamento AUX 1 Tasto anteriore Tasto di funzione Joystick (joystick) Premere e tenere --- muovere verso si- nistra / destra Collegamento AUX elettrico 12 V Tasto anteriore Tasto di funzione Joystick (joystick) Premere i tasti di funzione blu e ros-... -
Page 122: Mensola (In Caso Di Apparecchio Con Archetto Di Sicurezza)
5.10 Mensola (in caso di apparecchio con archetto di sicurezza) A Leva di comando, aggancia 2. Attacco PTO: avanti/indietro B Leva di comando Sollevatore frontale su/giù C Leva di comando AUX 1 attacco D Leva di comando AUX 2 attacco Leva multifunzionale disponibile in collegamento con porta-apparecchio frontale e scopa per erbacce (in op- zione) -
Page 123: Funzione Leva Di Comando (In Caso Di Apparecchio Con Archetto Di Sicurezza)
5.11 Funzione leva di comando (in caso di apparecchio con archetto di sicurezza) 5.11.1 Funzione leva di comando A 5.11.3 Funzione leva di comando C Posizione di riposo Posizione di riposo Apparecchi assemblati collegati a AUX 1 in avanti, Apparecchi assemblati collegati al 2° PTO avanti, la la leva non aggancia leva aggancia Apparecchi assemblati collegati a AUX 1 indietro, la... -
Page 124: Prima Della Messa In Funzione
Prima della messa in funzione Prima della messa in funzione Regolazione del sedile di guida Fissare la borsa portadocumenti secondo le istruzioni PERICOLO allegate al lunotto posteriore. Rischio di incidenti. Non regolare il sedile di guida durante la marcia. Rifornimento di carburante 6.4.1 Sedile standard... -
Page 125: Regolare La Posizione Del Volante
Regolare la posizione del volante Prima dell'avvio/Prova di sicurezza PERICOLO PERICOLO Rischio di incidenti. Non regolare la posizione del volante Rischio di incidenti, lesioni. Non appena non è soddisfatto durante la marcia. un punto del controllo di sicurezza, l'apparecchio non può essere messo in funzione, ma deve essere riparato. -
Page 126: Spegnere L'apparecchio
7.1.2 Avviare il motore 7.1.5 Superare ostacoli Togliere il piede dall'acceleratore. AVVERTIMENTO Portare il numero di giri del motore in posizione MIN. Rischio di danneggiamento! Sollevare le spazzole laterali Premere a fondo il pedale del freno. e la bocca di aspirazione prima di superare eventuali osta- La spia di controllo del freno di stazionamento deve ac- coli. -
Page 127: Kit Di Montaggio
– Impostare un numero di giri elevato del motore. Attualmente per MIC 26 sono disponibili i kit di montaggio Avviso: seguenti: La sollecitazione del fondo può essere ridotta con l'utilizzo –... -
Page 128: Rullospazzola Frontale
8.3.3 Presupposti per il funzionamento 8.5.2 – Per la guida su strade pubbliche deve essere applicato L'uso dell'apparecchio avviene tramite il joystick, a tale il peso di equilibratura (opzione) sulla parte posteriore scopo vedere nel capitolo "Funzione joystick". dell'apparecchio. 8.5.3 Collegare le luci di limitazione (opzione) –... -
Page 129: Dispositivo Di Spargimento
8.6.2 L'uso dell'apparecchio avviene tramite il joystick, a tale scopo vedere nel capitolo "Funzione joystick". 8.6.3 Collegare le luci di limitazione (opzione) Agganciare il paraspruzzi, affinché il radiatore sia pro- tetto da prodotti sfusi. 8.7.2 Fissare il dispositivo di spargimento a rullo ... -
Page 130: Spargitore Assemblato
8.7.3 Fissare il dispositivo di spargimento a 8.7.7 Presupposti per il funzionamento disco – Impostare il numero di giri del motore sull'estremità in- feriore del campo „eco“. Spargitore assemblato 1 Perno di sostegno 2 Perno di sicurezza 3 Spina a levetta ... -
Page 131: Peso Di Equilibratura Senza Gancio Di Traino
Alla prima volta che si colloca lo spargitore assemblato 8.8.2 al veicolo occorre regolare la guida anteriore a sinistra Per avviare lo spanditore, attivare PTO e a destra. 8.8.3 Collegamento della luce di lavoro Infilare la spina della lampada nella presa sul carrello posteriore. -
Page 132: Traiangolo A Giunto
8.12.3 Uso 8.11 Giunto di aggancio Per sollevare e abbassare, utilizzare il sollevatore fron- tale mediante il joystick. 8.13 Scopa per erbacce solo apparecchio con cabina conducente 1 Perno di sicurezza 2 Giunto di aggancio Sbloccare ed estrarre lateralmente il perno di sicurezza ruotandolo. - Page 133 8.13.5 Uso 8.13.6 Funzione joystick PERICOLO Pericolo di lesioni in caso di contatto con la scopa per er- bacce in rotazione. Durante l’impostazione e il lavoro man- tenersi a una distanza di sicurezza sufficiente dalle persone. Pericolo di lesioni a causa di pietre che schizzano via o sporco.
-
Page 134: Supporto
Premere / sollevare il braccio della scopa per erbacce Supporto (senza posizione galleggiante) AVVERTIMENTO Interruttore prin- Tasto di funzione Joystick Pericolo di lesioni e di danneggiamento! Rispettare il peso cipale posizione dell'apparecchio durante la conservazione. flottante (menso- Se il veicolo non viene utilizzato per un lungo periodo, si prega di osservare i punti seguenti: Disattivare Premere e tenere muovere verso si-... -
Page 135: Cura E Manutenzione
Cura e manutenzione 10.2.3 Applicare il rivestimento laterale del 10.1 Avvertenze generali motore Prima di pulire, manutenzionare l'apparecchio, sostitu- ire componenti o passare ad un'altra modalità di funzio- namento, spegnere l'apparecchio e, se necessario, togliere la chiave di accensione. ... -
Page 136: Pulizia
Verificare che il separatore di acqua non contenga ac- 10.3 Pulizia qua. Sollevare l'attrezzo di lavoro. Pulire il radiatore. Depositare la spazzatrice su una superficie piana. Verificare se durante la marcia con apparecchi assem- Portare il numero di giri del motore in posizione MIN. blati è... -
Page 137: Interventi Di Manutenzione
Pericolo di lesioni causato dall'abbassamento accidentale 10.4.7 Ogni 500 ore o ogni sei mesi del vano raccolta. Gli interventi sulla turbina devono esse- Fare eseguire tutti i lavori dal servizio di assistenza re eseguiti solo con il vano raccolta completamente solle- clienti. - Page 138 Pericolo di ustioni chimiche! – Sciacquare con abbondante acqua pulita eventuali schizzi di acido negli occhi o sulla cute. – Quindi, contattare immediatamente un medico. – Lavare i vestiti sporchi con acqua. – Cambiare i vestiti. 10.5.4 Montaggio e collegamento della batteria ...
- Page 139 Riempire con olio motore. Tipo di olio: vedi capitolo „Dati tecnici". Chiudere Il foro di rabbocco dell'olio. Fare funzionare il motore per circa 30 secondi. Controllare il livello dell'olio motore. Far smaltire l'olio usato dagli appositi centri di raccolta. 10.5.9 Controllare il livello dell'olio idraulico e aggiungere olio idraulico Importante:...
- Page 140 10.5.12 Sostituire l'olio nei motori delle ruote Fare eseguire la sostituzione solo dal servizio assi- stenza clienti. 1 Coperchio del radiatore 2 Vite di scarico Svitare il coperchio del radiatore. Riempire completamente il radiatore fino alla parte su- 1 Tappo di riempimento dell'olio periore senza la presenza di bolle d'aria.
- Page 141 10.5.16 Pulire il separatore dell'acqua 10.5.19 Controllare il filtro dell'aria Pericolo Rischio di esplosione! – Non eseguire la manutenzione in ambienti chiusi. – Evitare assolutamente di fumare e usare fiamme libere. Chiudere il rubinetto di chiusura. Posizionare il contenitore di raccolta sotto il separatore d'acqua.
- Page 142 1 Inserto per filtro dell’aria 2 Pre-filtro 3 Molletta Rimuovere il pre-filtro. Lasciare montato l'inserto del filtro dell'aria affinché la polvere durante la pulizia del pre-filtro non si infiltri nel motore. Soffiare dall'interno verso l'esterno con aria compressa (0,3...0,5 MPa) il pre-filtro.
- Page 143 10.5.21 Lubrificazione dell'apparecchio Figura simbolica 10.5.23 Eseguire la manutenzione del 1 Cinghie trapezoidali tergicristallo PRUDENZA solo apparecchio con cabina conducente Pericolo di guasti funzionali. Evitare che la cinghia trape- zoidale entri in contatto con il grasso. Lubrificare i nippli di lubrificazione contrassegnati con le frecce con una pressa di ingrassaggio.
-
Page 144: Fusibili
10.6.2 Sostituire i fusibili della scatola fusibili 10.6 Fusibili del vano motore NOTA Utilizzare solo fusibili con lo stesso valore di amperaggio. Sostituire i fusibili difettosi. 10.6.1 Sostituire i fusibili della scatola fusibili del vano motore solo apparecchio con cabina conducente 1 Coperchio ... -
Page 145: Risoluzione Guasti
Risoluzione guasti 11.1 Guasti visualizzati Messaggio Causa Rimedio Persona incarica- Spia di avviso tem- Motore surriscaldato Impostare il numero di giri del motore su mini- Utente peratura motore accesa Controllare il livello di riempimento di refrige- rante nel motore. Se la spia non si spegne entro 5 minuti, spe- gnere il motore e contattare il servizio clienti. -
Page 146: Dati Tecnici
Dati tecnici MIC 26 Velocità di marcia, avanti km/h Velocità di marcia, indietro km/h Velocità di lavoro km/h Pendenza massima superabile Assi alimentate Durata di utilizzo con serbatoio pieno ca. 12 Motore Produttore Yanmar Modello 3TNV76-DU Cilindrata 1116 Potenza motore a 3000 1/min... -
Page 147: Pneumatici
12.1 Pneumatici PRUDENZA Utilizzare solo pneumatici omologati e autorizzati da Kär- cher. Tipo di ruote Dimensione Pressione dei dei pneuma- pneumatici rac- tici comandata MPa (bar) Pneumatici da strada 195/55 R10C 0,62 (6,2) Pneumatici da erba 20x10.00-10 0,28 (2,8) Pneumatici standard, 20x12.00-10 0,14 (1,4) extra larghi... - Page 148 Inhoud Maaidek 125 cm Informatie over het voertuig Maaidek 135 cm Reglementair gebruik Keerrol vooraan Zwaartepunt Sneeuwruimschild Algemene aanwijzingen Sneeuwfrees Milieubescherming, REACH en afdan- Strooier king van het oude voertuig Opbouwstrooier Garantie Toebehoren, reserveonderdelen, aan- Compenserend gewicht zonder trekhaak bouwsets 8.10 Compenserend gewicht met trekhaak Symbolen in de gebruiksaanwijzing 8.11 Trekhaak...
-
Page 149: Informatie Over Het Voertuig
Informatie over het voertuig Reglementair gebruik Gebruik dit apparaat uitsluitend volgens de gegevens in – Er mag alleen gereden worden op de door de onderne- deze gebruiksaanwijzing. mer of diens gemachtigde voor het machinegebruik Deze machine (apparatuurdrager) is voor de inzet op op- vrijgegeven oppervlakken. -
Page 150: Garantie
3.1.2 Stoffen (REACH) Symbolen op het apparaat Actuele informatie over stoffen vindt u onder: VOORZICHTIG www.kaercher.de/REACH Verbrandingsgevaar door hete oppervlakken! 3.1.3 Afdanking van het oude voertuig Laat de uitlaatinstallatie voldoende afkoelen Oude voertuigen bevatten waardevolle recyclebare mate- voordat u aan het apparaat begint te werken. rialen die moeten worden hergebruikt. -
Page 151: Instructies Inzake Uitladen
GEVAAR Instructies inzake uitladen Verwondingsgevaar! GEVAAR Voor elk gebruik moet de veiligheidscontrole in het hoofd- Verwondingsgevaar, beschadigingsgevaar! stuk „Inbedrijfstelling“ uitgevoerd worden. Gewicht van het apparaat bij het verladen in acht nemen! – Alle bedieningshendels en schakelaars moeten voor het starten van de motor in de neutrale stand staan. De Leeggewicht (zonder aanbouwsets) 870 - 944 kg * bestuurder moet bij het starten op de bestuurdersstoel... -
Page 152: Veiligheidsinstructies Voor De Verbran
Veiligheidsinstructies voor de Veiligheidsinrichtingen verbrandingsmotor 4.9.1 Zitcontactschakelaar – Voor de inbedrijfstelling de gebruiksaanwijzing van de Wanneer zich geen bediener op de chauffeursstoel be- motorfabrikant lezen en in het bijzonder de veiligheids- vindt, zijn functies met een verhoogd, potentieel gevaar instructies in acht nemen. geblokkeerd. -
Page 153: Bedieningselementen
Bedieningselementen Apparaat met beschermbeugel 1 Stuurkolom * 2 Console * 3 Stuurwiel 4 Rolbeugel, opklapbaar 5 Zwaailicht (optie) 6 Werklicht 7 Rijverlichting/richtingaanwijzer (optie) 8 Tanksluiting 9 Bevestigingspunt voor aanbouwapparaten 10 Kijkglas hydraulische olie 11 Tankweergave 12 Bestuurdersstoel * 13 Pedalen * 14 Hydraulische hefinrichting voren * zie onderstaand gedetailleerd aanzicht Het apparaat met beschermbeugel mag om veiligheidsre-... -
Page 154: Stuurkolom
5.2.1 Ventilatie / airconditioning (optie) Stuurkolom 1 Schakelaar ventilator 1 Ventilatie 2 Temperatuurregelaar verwarming 2 Controlelampje knipperlicht 3 Regelaar koelvermogen (optie) 3 Schakelaar noodknipperlichtinstallatie 5.2.2 Plafondconsole 4 Klemschroef hoogteregeling stuurwiel 5 Bedrijfsurenteller werkhydraulica 6 Controlelampje parkeerrem 7 Weergave lossende stand AUX 1 8 Klemschroef stuurwielstand 9 Weergave lossende stand lift aan voorzijde 10 Multifunctionele hendel voor verlichting, knipperlichten... -
Page 155: Pedalen
Pedalen Aansluitingen Begripsdefinitie AUX: auxilliary = extra bedieningsklep Begripsdefinitie hydraulische PTO: Power Take Off = hydraulische krachtafgifte Begripsdefinitie elektrische PTO: Power Take Off = elektrische krachtafgifte 5.7.1 Voren 1 Rempedaal 2 Vergrendeling rempedaal (parkeerrem) 3 Aanslag werksnelheid 4 Rijpedaal vooruit 5 Rijpedaal achteruit 5.5.1 Parkeerrem hanteren... - Page 156 5.7.3 Aan de volgwagen 1 Hydraulische verbindingen PTO 2 Hydraulische verbindingen AUX2 3 Lekkagekoppeling 1 Wateraansluiting 2 Contactdoos E3-vooraan...
-
Page 157: Bedieningspaneel (Bij Apparaat Met Bestuurderscabine)
Bedieningspaneel (bij apparaat met bestuurderscabine) 1 Waarschuwingslampje laadcontrole batterij 2 Waarschuwingslampje temperatuur hydraulische olie 3 Waarschuwingslampje koelwatertemperatuur 4 Waarschuwingslampje oliedruk 5 Controlelampje groot licht 6 Schakelaar Stand 1: Waterkoppeling voren aan Stand 0: Waterkoppeling voren uit Stand 2: Watercirculatiesysteem uitschakelen (optie) 7 Knop Stand 1: Hydraulica Main PTO aan Stand 0: Hydraulica Main PTO uit... -
Page 158: Werking Joystick (Bij Apparaat Met Bestuurderscabine)
Werking joystick (bij apparaat met bestuurderscabine) Aansluiting AUX 1 Toets voor (joy- Functietoets Joystick stick) Indrukken en in- naar links/rechts gedrukt houden bewegen Aansluiting AUX elektrisch 12 V Toets voor (joy- Functietoets Joystick stick) Functietoetsen blauw of rood (A/ B) indrukken 5.9.2 Weergave lossende stand 1 Joystick... -
Page 159: Bedieningspaneel (Bij Apparaat Met Beschermbeugel)
5.10 Bedieningspaneel (bij apparaat met beschermbeugel) A Bedieningshendel, klikt in Tweede PTO aansluiting: voorwaarts/achterwaarts B Bedieningshendel Hydraulische hefinrichting voren omhoog/omlaag C Bedieningshendel AUX 1 aansluiting D Bedieningshendel AUX 2 aansluiting Multifunctionele hendel in verbinding met werktuigdra- ger voren en onkruidbezem verkrijgbaar (optioneel). E Bij werken met zuigmond (optioneel) Stand E1 - Zuigmond niet vergrendeld Stand E2 - Zuigmond vergrendeld... -
Page 160: Werking Bedieningshendel (Bij Apparaat Met Bestuurderscabine)
5.11 Werking bedieningshendel (bij apparaat met bestuurderscabine) 5.11.1 Functie bedieningshendel A 5.11.3 Functie bedieningshendel C Ruststand Ruststand Aan AUX 1 aangesloten aanbouwapparaten naar Aan de tweede PTO aangesloten aanbouwappara- voren, hendel klikt niet in ten voorwaarts, hendel klikt in Aan de AUX 1 aangesloten aanbouwapparaten Aan de tweede PTO aangesloten aanbouwappara- naar achteren, hendel klikt niet in ten achterwaarts, hendel klikt in... -
Page 161: Voor De Inbedrijfstelling
Voor de inbedrijfstelling Vóór eerste inbedrijfstelling Chauffeursstoel instellen Documententas volgens de bijgevoegde handleiding GEVAAR bevestigen aan de achterruit. Ongevalgevaar. Bestuurdersstoel niet instellen tijdens de rit. Tanken 6.4.1 Standaardstoel Gevaar Explosiegevaar! – Niet in gesloten ruimtes tanken. – Roken en open vuur is verboden. –... -
Page 162: Stuurwielstand Instellen
Stuurwielstand instellen Vóór de start/veiligheidscontrole GEVAAR GEVAAR Ongevalgevaar. Stuurwielstand niet instellen tijdens de rit. Ongevalgevaar, verwondingsgevaar. Zodra een punt van de veiligheidscontrole niet vervuld wordt, mag het appa- raat niet in bedrijf genomen en moet het gerepareerd wor- den. Voor ieder gebruik moet de volgende veiligheidscontrole uitgevoerd worden: 6.6.1 Veiligheidscontrole... -
Page 163: Apparaat Uitzetten
VOORZICHTIG Apparaat uitzetten Beschadigingsgevaar door oververhitting van de kracht- Werkapparaat optillen. overbrenging en de rem. Apparaat niet verrijden met een Apparaat stopzetten. geactiveerde rem. Schakel de PTO uit. Na een koude start het apparaat met motortoerental op ... -
Page 164: Opbouwsets
Opbouwsets In dit hoofdstuk wordt een selectie van de meest gangbare 8.2.2 Bediening aanbouwsets vermeld en de montage aan het apparaat Het aanbouwapparaat wordt bediend via de joystick, weergegeven. zie hiervoor het hoofdstuk "Werking joystick". Neem voor vragen (waaronder over andere aanbouwsets) 8.2.3 Voorwaarden voor het bedrijf contact op met Kärcher. -
Page 165: Keerrol Vooraan
8.3.3 Voorwaarden voor het bedrijf 8.5.2 Bediening – Het compenserend gewicht (optie) moet bij het rijden Het aanbouwapparaat wordt bediend via de joystick, op de openbare weg achteraan het apparaat aange- zie hiervoor het hoofdstuk "Werking joystick". bracht zijn. 8.5.3 Begrenzingslampen (optie) aansluiten –... -
Page 166: Strooier
8.6.2 Bediening Het aanbouwapparaat wordt bediend via de joystick, zie hiervoor het hoofdstuk "Werking joystick". 8.6.3 Begrenzingslampen (optie) aansluiten Spatbescherming aanbrengen zodat de koeler be- schermd is tegen het strooigoed. 8.7.2 Strooiwals bevestigen Kabels leggen zoals hierboven weergegeven. ... -
Page 167: Opbouwstrooier
8.7.3 Schotelstrooier bevestigen 8.7.6 Bediening Voor het inschakelen van de strooier, PTO inschakelen 8.7.7 Voorwaarden voor het bedrijf – Motortoerental instellen op het onderste uiteinde van het bereik „eco“. Opbouwstrooier 1 Stift 2 Borgpen 3 Klapstekker Aanbouwen zoals de strooiwals maar geleidegleuven verder van het voertuig gebruiken. -
Page 168: Compenserend Gewicht Zonder Trekhaak
Voeruig positioneren onder de op de steunen staande Hydraulische slangen en elektrische stekkers met de opbouwstrooier. overeenkomstige koppelingen verbinden. Opbouwstrooier in de geleiding van de achteropbouw 8.8.2 Bediening laten zakken. Voor het inschakelen van de strooier, PTO inschakelen ... - Page 169 8.12.3 Bediening 8.11 Trekhaak Lift aan voorzijde met joystick bedienen om op te tillen en laten zakken. 8.13 Onkruidborstel Alleen apparaat met bestuurderscabine 1 Borgpen 2 Trekhaak Borgpen door draaien ontgrendelen en zijdelings eruit trekken. Trekhaak in de vierkante buizen van het frame schui- ven.
- Page 170 8.13.5 Bediening 8.13.6 Werking joystick GEVAAR Verwondingsgevaar bij contact met de roterende onkruid- borstel. Bij instellingen en werkzaamheden erop letten dat er voldoende veiligheidsafstand t.o.v. personen wordt ge- houden. Verwondingsgevaar door wegvliegende stenen of vuil. Spuitbescherming correct instellen en voldoende afstand tot personen houden.
- Page 171 Bezemarm uitzwenken/intrekken Opslag Toets voor (joy- Functietoets Joystick WAARSCHUWING stick) Gevaar voor letsel en beschadiging! Het gewicht van het naar links/rechts apparaat bij opbergen in acht nemen. bewegen Als het voertuig lange tijd niet worden gebruikt, neem dan volgende punten in acht: Bezemkop knikken (naar voren kantelen) ...
- Page 172 Onderhoud 10.2.3 Zijdelingse motorbekleding aanbrengen 10.1 Algemene aanwijzingen Voor reinigings- en onderhoudswerkzaamheden van het apparaat, het vervangen van onderdelen of het om- bouwen voor een andere functie dient het apparaat te worden uitgeschakeld en eventueel de contactsleutel te worden verwijderd. ...
- Page 173 Radiateur reinigen. 10.3 Reiniging Controleren of bij het rijden met aanbouwapparatuur Apparatuur optillen. achteraan een gewicht vereist en gemonteerd is. Apparaat op een egaal oppervlak neerzetten. Volledige apparaat op beschadigingen controleren. Motortoerental op stand MIN zetten. 10.4.2 Na elke wasbeurt van het voertuig ...
- Page 174 VOORZICHTIG 10.4.8 Alle 1000 bedrijfsuren of jaarlijks Motorolie, stookolie, diesel en benzine niet in het milieu te- Uitvoering van alle werkzaamheden door de klanten- recht laten komen. Gelieve bodem te beschermen en oude service. olie op een milieuvriendelijke manier tot afval verwerken. ...
- Page 175 OPMERKING Wielmoeren/wielbouten losschroeven en eruit nemen. Bij de uitbouw van de batterij moet erop gelet worden dat Wiel wegnemen. eerst de leiding van de negatieve pool afgeklemd wordt. Defect wiel in een vakgarage laten repareren. Controleer de batterijpolen en de poolklemmen op vol- ...
- Page 176 Het oliepeil moet zich binnen het kijkglas bevinden. 10.5.8 Motorolie en motoroliefilter wisselen Hydraulische olie bijvullen. Instructie: Een warme motor vergemakkelijkt het aftappen. Oliesoort: zie hoofdstuk "technische gegevens". Gevaar Tip: Tekort aan hydraulische olie kan alleen door een spe- Verbrandingsgevaar door hete olie en eventueel hete ciaal apart toebehoren (bestelnr.) bijgevuld worden, of slangleidingen!
- Page 177 Garanderen dat de afsluitkraan open is. 10.5.14 Koelwater navullen Controleren of de vlotter zich op de bodem van de wa- – Om na te vullen, moet een mengsel van water en anti- terafscheider bevindt. vriesmiddel gebruikt worden. Indien de vlotter niet op de bodem ligt, bevindt er zich –...
- Page 178 10.5.19 Luchtfilter controleren 1 Luchtfilterinzet 2 Voorfilter 1 Indicatie luchtfiltervervanging 3 Klem Indien de indicatie van de luchtfiltervervanging rood is, Voorfilter wegnemen. moet het luchtfilterelement vervangen worden. Luchtfilterelement ingebouwd laten zodat het stof bij de 10.5.20 Luchtfilter reinigen en vervangen reiniging van de voorfilter niet in de motor terechtkomt.
- Page 179 10.5.21 Apparaat smeren Afbeelding symbolisch 10.5.23 Ruitensproeiers onderhouden 1 V-snaar Alleen apparaat met bestuurderscabine VOORZICHTIG Gevaar voor functionele storingen. V-riem niet met vet in contact laten komen. Met pijlen gemarkeerde smeernippels met de vetpers smeren. Met „*“ pijlen gemarkeerde smeernippels moeten dage- lijks voor het bedrijfsbegin gesmeerd worden.
- Page 180 10.6.2 Zekeringen en zekeringkast motorruimte 10.6 Zekeringen vervangen OPMERKING Gebruik enkel zekeringen met eenzelfde zekeringwaarde. Defecte zekeringen vervangen. 10.6.1 Zekeringen en zekeringkast van de chauffeurscabine vervangen Alleen apparaat met bestuurderscabine 1 Deksel Deksel verwijderen. 1 Deksel 2 Kartelschroef ...
- Page 181 Hulp bij storingen 11.1 Storingen met weergave Weergave Oorzaak Oplossing Door wie Waarschu- Motor oververhit Motortoerental op nullast zetten. Bediener wingslampje mo- Peil van de koelvloeistof in de motor controle- tortemperatuur ren. brandt Indien het waarschuwingslampje niet binnen 5 minuten dooft, de motor uitzetten en de klan- tendienst raadplegen.
- Page 182 Technische gegevens MIC 26 Rijsnelheid, vooruit km/h Rijsnelheid, achteruit km/h Werksnelheid km/h Klimvermogen (max.) Aangedreven assen Duur inzetten bij volle tank ca. 12 Motor Fabrikant Yanmar Type 3TNV76-DU Slagvolume 1116 Motorvermogen bij 3000 1/min 18,9 Koppel bij 2000 1/min 66,6...
- Page 183 12.1 Bandenuitrusting VOORZICHTIG Alleen door Kärcher goedgekeurde banden gebruiken. Bandentype Grootte van Aanbevolen de band bandendruk MPa (bar) Band voor normaal ge- 195/55 R10C 0,62 (6,2) bruik op de openbare Band voor gebruik op 20x10.00-10 0,28 (2,8) gras Standaard band, extra 20x12.00-10 0,14 (1,4) breed...
- Page 184 Índice de contenidos Equipos accesorios Indicaciones sobre el vehículo Manejo Uso previsto Ancho de la segadora 125 cm Centro de gravedad Ancho de la segadora 135 cm Indicaciones generales Cepillo rotativo delantero Protección del medio ambiente, REACH y eliminación del vehículo usado Quitanieves Garantía Quitanieves giratorio...
-
Page 185: Indicaciones Sobre El Vehículo
Indicaciones sobre el vehículo Uso previsto Utilice el aparato únicamente de conformidad con las indi- 2.1.1 Uso erróneo previsible caciones del presente manual de instrucciones. Esta máquina (máquina portadora) fue diseñada para usar Todo uso contrario que no sea el descrito más arriba como en zonas verdes, cuidado de exteriores y cuidados en in- correcto, es inadmisible. -
Page 186: Garantía
3.1.2 Sustancias (REACH) Símbolos en el aparato Encontrará información actual sobre las sustancias en: PRECAUCIÓN www.kaercher.de/REACH ¡Peligro de quemaduras por las superficies 3.1.3 Eliminación del vehículo usado calientes! Antes de realizar algún trabajo en Los vehículos usados contienen materiales valiosos reci- el aparato, deje que la instalación de escape clables que deberán ser entregados para su aprovecha- se enfríe lo suficiente. -
Page 187: Indicaciones De Descarga
Indicaciones de descarga Indicaciones de seguridad para el modo de desplazamiento PELIGRO Peligro de lesiones, peligro de daños. – Deben tenerse en cuenta básicamente las especificacio- Respetar el peso del aparato para la carga. nes y los reglamentos que rigen para los automóviles. Peso en vacío (sin equipos accesorios) 870 - 944 kg * –... -
Page 188: Indicaciones De Seguridad Para El Motor De Combustión
Indicaciones de seguridad para el Dispositivos de seguridad motor de combustión 4.9.1 Interruptor de contacto de asiento – Antes de la puesta en marcha, leer el manual de ins- Si no hay ningún operario en el asiento, las funciones con trucción del fabricante del motor, especialmente las in- alto riesgo están bloqueadas. -
Page 189: Elementos De Mando
Elementos de mando Equipo con asa de protección 1 Columna de dirección * 2 Consola * 3 Volante 4 Estribo de protección, abatible 5 Lámpara omnidireccional (opcional) 6 Luz de trabajo 7 Luz de marcha/Intermitente (opcional) 8 Cierre del depósito 9 Alojamiento para equipos accesorios 10 Mirilla aceite hidráulico 11 Indicador del depósito... -
Page 190: Columna De Dirección
5.2.1 Ventilación/aire acondicionado (opcional) Columna de dirección 1 Interruptor de la ventilación 1 Ventilación 2 Regulador de temperatura de la calefacción 2 Piloto de control del intermitente 3 Regulador de refrigeración (opcional) 3 Interruptor del dispositivo de los intermitentes 5.2.2 Consola de pared 4 Tornillo de sujeción del ajuste de altura del volante 5 Contador de las horas de servicio del sistema hidráuli-... -
Page 191: Estrangulador De Descenso (Opción)
5.5.1 Activar freno de estacionamiento 5.7.1 Delante Pulsar totalmente el pedal de freno. Encajar el bloqueo. Soltar el pedal de freno. 5.5.2 Suelte el freno de estacionamiento Pulsar totalmente el pedal de freno. Soltar el bloqueo. ... - Page 192 5.7.3 En el vehículo trasero 1 Acoplamientos hidráulicos Main PTO 2 Acoplamientos hidráulicos AUX2 3 Acoplamiento fugas 1 Acoplamiento de agua 2 Clavija E3- delantera...
-
Page 193: Consola (En Equipos Con Cabina De Conductor)
Consola (en equipos con cabina de conductor) 1 Piloto de advertencia del control de carga de la batería 2 Piloto de advertencia de la temperatura del aceite hi- dráulico 3 Piloto de advertencia de la temperatura de agua refri- gerante 4 Piloto de advertencia de la presión del aceite 5 Piloto de control de la luz larga 6 Interruptor... -
Page 194: Funcionamiento Joystick (En Equipos Con Cabina De Conductor)
Funcionamiento joystick (en equipos con cabina de conductor) Conexión AUX 1 Tecla delantera Tecla de función Joystick (joystick) Pulsar y mantener --- mover hacia la iz- quierda/derecha Conexión AUX eléctrica 12 V Tecla delantera Tecla de función Joystick (joystick) Pulsar las teclas de función azul o roja (A/B) 5.9.2... -
Page 195: Consola (En Equipos Con Asa De Conductor)
5.10 Consola (en equipos con asa de conductor) A Palanca de mando, encaja 2. Toma PTO: hacia delante/hacia atrás B Palanca de mando Elevador de fuerza frontal arriba/arriba C Palanca de mando toma AUX 1 D Palanca de mando toma AUX 2 Se puede adquirir una palanca multifunción en combi- nación con un módulo de soporte de aparato frontal y una escobilla de malas hierbas. -
Page 196: Funcionamiento Palanca De Mando (En Equipos Con Asa De Protección)
5.11 Funcionamiento palanca de mando (en equipos con asa de protección) 5.11.1 Funcionamiento palanca de mando A 5.11.3 Funcionamiento palanca de mando C Posición de descanso Posición de descanso En equipos accesorios conectados al AUX 1 hacia En equipos accesorios conectados al 2º PTO delan- delante, la palanca no encaja te, la palanca encaja En equipos accesorios conectados al AUX 1 hacia... -
Page 197: Antes De La Puesta En Marcha
Antes de la puesta en marcha Antes de la primera puesta en marcha Ajuste del asiento del conductor Fijar el bolso de documentos de acuerdo con las ins- PELIGRO trucciones de la luna trasera. Peligro de accidentes. No ajustar el asiento del conductor durante la marcha. -
Page 198: Ajustar La Posición Del Volante
Ajustar la posición del volante Antes del inicio/comprobación de seguridad PELIGRO Peligro de accidentes. No ajustar la posición del volante PELIGRO durante la marcha. Peligro de accidentes, peligro de lesiones. Si no se cumple un punto de la comprobación de seguridad, no se puede poner en marcha el aparato, se debe reparar. -
Page 199: Parar El Aparato
7.1.2 Arrancar el motor 7.1.5 Pasaje por encima de obstáculos Quitar el pie ddel pedal de desplazamiento. ADVERTENCIA Poner la velocidad del motor en posición MIN. ¡Peligro de daños! Elevar la escoba lateral y la boca de as- ... -
Page 200: Equipos Accesorios
Actualmente, existen los siguientes equipos accesorios – Ajustar una velocidad alta en el motor. para el MIC 26: Nota: – Ancho de la segadora 125 cm La carga sobre la base se puede reducir mediante el uso –... -
Page 201: Cepillo Rotativo Delantero
8.3.3 Requisitos para el funcionamiento Quitanieves – El peso de compensación (opcional) tiene que estar 8.5.1 Conectar los conductos hidráulicos colocado en la parte posterior del aparato para la circu- lación por la vía pública. – Ajustar una velocidad alta en el motor. Nota: La carga sobre la base se puede reducir mediante el uso del módulo Ruedas hierba (2.851-089.0). -
Page 202: Quitanieves Giratorio
8.6.4 Requisitos para el funcionamiento Quitanieves giratorio – Si no se monta un dispersor, se debe colocar el peso 8.6.1 Conectar los conductos hidráulicos compensatorio (opcional) en la parte trasera del apara- to con el recipiente de suciedad/depósito de agua des- montado para la circulación por la vía pública. - Page 203 8.7.2 Fijar el dispersor de cepillo 8.7.4 Conectar los conductos hidráulicos Quitar las tapas protectoras de los acoplamientos hi- dráulicos y conectar las mangueras hidráulicas con los acoplamientos correspondientes. Unir las tapas protectoras para protegerlas de las su- ciedad.
- Page 204 Dispersor 1 Tornillo (uno visible, dos ocultos) 2 conducción Ajustar la guía. Soltar los 3 tornillos en el frente aprox. 1 vuelta (izquierda y derecha). Desplazar hacia delante del todo el dispersor hasta que el perno de seguridad trasero se pueda bloquear. ...
-
Page 205: Peso Compensatorio Sin Acoplamiento De Remolque
8.8.3 Conectar la luz de trabajo 8.11 Acoplamiento de remolque Introducir el conector de la lámpara en el enchufe del remolque. Conectar la iluminación de trabajo con el interruptor. Peso compensatorio sin acoplamiento de remolque 1 Pernos de seguridad 2 Acoplamiento de remolque ... -
Page 206: Cepillo Para Hierba
8.12.3 Manejo 8.13.5 Manejo Para elevar y bajar, manejar el elevador de fuerza fron- PELIGRO tal con el joystick. Riesgo de lesiones por contacto con la escoba de hierbas rotativa. Al realizar ajustes y trabajos, mantener suficiente 8.13 Cepillo para hierba distancia de seguridad con las personas. -
Page 207: Almacenamiento
8.13.6 Función joystick Presionar/elevar el brazo de cepillo para hierba (sin posición flotante) Interruptor prin- Tecla de función Joystick cipal de la posi- ción flotante (consola) Desactivar Pulsar y mantener mover hacia la iz- quierda/derecha Desplegar/replegar el brazo del cepillo Tecla delantera Tecla de función Joystick (joystick) -
Page 208: Cuidados Y Mantenimiento
Cuidados y mantenimiento 10.2.3 Colocar el revestimiento lateral del motor 10.1 Indicaciones generales Antes de realizar las tareas de limpieza y mantenimien- to, de reemplazar alguna pieza o reajustar otra función, desconecte el aparato y, en caso necesario, saque la llave de encendido. -
Page 209: Limpieza
Comprobar que el separador de agua no contenga 10.3 Limpieza agua. Levantar el aparato de trabajo. Limpiar el refrigerador. Coloque el dispositivo sobre una superficie plana. Comprobar si al desplazar dispositivos accesorios es Poner la velocidad del motor en posición MIN. necesario un peso trasero y si está... -
Page 210: Trabajos De Mantenimiento
Pelligro de lesiones si el recipiente de basura baja involun- 10.4.7 Cada 500 horas o semi anualmente tariamente. Realizar trabajos en la turbina únicamente Realización de todos los trabajos por parte del servi- cuando el recipiente de basura está totalmente levantado cio técnico. - Page 211 ¡Peligro de causticación! AVISO – Enjuagar con agua las salpicaduras de ácido en los Utilice un gato adecuado de los habituales en el mercado. ojos o en la piel. – A continuación llamar inmediatamente al médico. – Lavar la ropa sucia con agua. –...
- Page 212 Rellenar con aceite de motor. Tipo de aceite: consulte el capítulo "Datos técnicos". Cierre la abertura de llenado de aceite. Dejar funcionar el motor aprox. durante aprox. 30 minu- tos. Verifique el nivel de aceite del motor. ...
- Page 213 10.5.12 Cambiar el aceite de los motores de la rueda. El cambio lo debe realizar solamente el servicio técni- co autorizado. 1 Tapa del radiador 2 Tornillo de purga Desatornillar la tapa del radiador. Llenar el radiador lentamente hasta arriba sin burbujas. ...
- Page 214 10.5.16 Limpiar el separador de agua 10.5.18 Ventilar el sistema de combustible Peligro Si se ha vaciado el depósito o se ha cambiado el filtro de Peligro de explosiones combustible, se tiene que ventilar el sistema de combusti- – No llevar a cabo el mantenimiento en lugares cerrados. ble.
- Page 215 1 Módulo de filtro de aire 2 Filtro previo 3 Grapa Retirar el filtro previo. Dejar montado el filtro de aire para que el polvo no en- tre en el motor al limpiar el filtro previo. Limpiar con cuidado el filtro previo con aire comprimido desde dentro hacia fuera (0,3...0,5 MPa).
- Page 216 10.5.21 Lubricar el aparato Figura simbólica 10.5.23 Inspeccionar el limpiaparabrisas 1 Correa trapezoidal solo en equipos con cabina de conductor PRECAUCIÓN Peligro de que se produzcan fallos en el funcionamiento. Evitar que las correas trapezoidales entren en contacto con grasa. ...
-
Page 217: Fusibles
10.6.2 Cambiar los fusibles de la caja de 10.6 Fusibles fusibles del compartimento del motor AVISO Utilice úncamente fusibles del mismo tipo. Sustituya los fusibles defectuosos. 10.6.1 Cambiar los fusibles de la caja de fusibles de la cabina del conductor ... -
Page 218: Subsanación De Averías
Subsanación de averías 11.1 Averías con indicación Anuncio Causa Modo de subsanarla Responsable Piloto de adverten- Motor sobrecalentado Poner la velocidad del motor en punto muerto. Operario cia de la tempera- Comprobar el nivel de líquido del radiador del tura del motor motor. -
Page 219: Datos Técnicos
Datos técnicos MIC 26 Velocidad de avance, hacia delante km/h Velocidad de avance, hacia atrás km/h Velocidad de trabajo km/h Capacidad ascensional (máx.) Eje accionados Tiempo de aplicación con el depósito lleno aprox. 12 Motor Fabricante Yanmar Modelo 3TNV76_DU Cilindrada... -
Page 220: Equipo De Neumáticos
12.1 Equipo de neumáticos PRECAUCIÓN Utilizar solo los neumáticos autorizados por Kärcher. Tipo de neumáticos Tamaño de Presión reco- los neumáti- mendada de los neumáticos MPa (bar) Neumático de carretera 195/55 R10C 0,62 (6,2) Neumático de césped 20x10.00-10 0,28 (2,8) Neumático estándar, 20x12.00-10 0,14 (1,4) - Page 221 Índice Conjuntos de montagem Indicações relativas ao veículo Utilização conforme o fim a que se desti- Manuseamento na a máquina Unidade de ceifa 125 cm Centro de gravidade Unidade de ceifa 135 cm Instruções gerais Rolo varredor dianteiro Protecção do meio ambiente, regulamen- Pás deflectoras de neve to REACH e eliminação do veículo usado Fresadora de neve...
-
Page 222: Indicações Relativas Ao Veículo
Indicações relativas ao veículo Utilização conforme o fim a que se destina a máquina Utilize este aparelho exclusivamente em conformidade – O aparelho só pode passar por superfícies que o pro- com as indicações destas Instruções de Serviço. prietário ou responsável pela utilização do aparelho Esta máquina (suporte de aparelhos) foi desenvolvida aprovou para este fim. -
Page 223: Garantia
3.1.2 Ingredientes (REACH) Símbolos no aparelho Informações actuais sobre os ingredientes podem ser en- CUIDADO contradas em: Risco de queimadura devido a superfícies www.kaercher.de/REACH quentes! Antes de começar a trabalhar no 3.1.3 Eliminação do veículo usado aparelho, diexar arefecer a tubulação de es- Os veículos usados contêm materiais recicláveis precio- cape. -
Page 224: Instruções De Descarga
PERIGO Instruções de descarga Perigo de lesões! PERIGO Antes de cada utilização tem que ser efectuado o controlo Perigo de ferimentos, perigo de danos! de segurança no capítulo "Colocação em funcionamento". Ter atenção ao peso do aparelho durante os trabalhos de –... -
Page 225: Avisos De Segurança Sobre O Motor De
Avisos de segurança sobre o motor de Equipamento de segurança combustão 4.9.1 Interruptor de contacto do assento – Antes de colocar o aparelho em funcionamento, ler o Se nenhum operador estiver sentado no banco do condu- manual de instruções do fabricante do motor e dar es- tor, as funções com elevado potencial de risco são bloque- pecial atenção aos avisos de segurança. -
Page 226: Elementos De Manuseamento
Elementos de manuseamento Aparelho com alavanca de avanço 1 Coluna de direcção * 2 Consola * 3 Volante 4 Estribo de protecção, rebatível 5 Foco rotativo (opção) 6 Luz de trabalho 7 Luz de marcha/Piscas (opção) 8 Tampa do depósito 9 Encaixe para os aparelhos de montagem 10 Óculo de inspecção do óleo hidráulico 11 Indicador do nível do depósito... -
Page 227: Coluna De Direcção
5.2.1 Sofagem/ar condicionado (opção) Coluna de direcção 1 Interruptor do ventilador da sofagem 1 Ventilação 2 Regulador da temperatura do aquecimento 2 Lâmpada de controlo dos piscas 3 Regulador da potência de refrigeração (opção) 3 Interruptor de piscas de emergência 5.2.2 Consola de tecto 4 Parafuso de aperto do ajuste em altura do volante... -
Page 228: Pedais
Pedais Ligações Definição do conceito "AUX": Auxilliary = válvula de co- mando adicional Definição do conceito "PTO hidráulica": Power Take Off = Energia hidráulica debitada Definição do conceito "PTO eléctrica": Power Take Off = Energia eléctrica debitada 5.7.1 Frente 1 Pedal do travão 2 Bloqueio do pedal do travão (travão de imobilização) 3 Batente da velocidade de trabalho 4 Pedal de marcha para a frente... - Page 229 5.7.3 Na parte traseira do carro 1 Acoplamentos hidráulicos Main PTO 2 Acoplamentos hidráulicos AUX2 3 Acoplamento de fuga 1 Acoplamento da água 2 Tomada frontal E3...
-
Page 230: Consola (No Aparelho Com Cabina Do Condutor)
Consola (no aparelho com cabina do condutor) 1 Lâmpada de advertência do controlo da carga da bate- 2 Lâmpada de advertência da temperatura do óleo hi- dráulico 3 Luz de advertência da temperatura da água de refrige- ração 4 Lâmpada de advertência da pressão do óleo 5 Luz de controlo dos máximos 6 Interruptor Posição 1: Acoplamento da água frontal ligado... -
Page 231: Funcionamento Do Joystick (No Aparelho Com Cabina Do Condutor)
Funcionamento do joystick (no aparelho com cabina do condutor) Ligação AUX 2 (sem posição flutuante) Interruptor prin- Tecla de funcio- Joystick cipal da posição namento flutuante (conso- Desactivar deslocar para a esquerda/direita Ligação AUX 1 Tecla para a fren- Tecla de funcio- Joystick te (Joystick) namento... -
Page 232: Consola (No Aparelho Com Alavanca De Avanço)
5.10 Consola (no aparelho com alavanca de avanço) A Alavanca de comando, engata 2.PTO conexão: para a frente/para trás B Alavanca de comando Elevador da força frontal subir/descer C Alavanca de comando conexão AUX 1 D Alavanca de comando conexão AUX 2 Alavanca multifuncional disponível em combinação com suporte para aparelhos frontal e vassoura para er- vas daninhas (opcional) -
Page 233: Funcionamento Da Alavanca De Comando (No Aparelho Com Alavanca De Avanço)
5.11 Funcionamento da alavanca de comando (no aparelho com alavanca de avanço) 5.11.1 Funcionamento alavanca de comando A 5.11.3 Funcionamento da alavanca de comando Posição de repouso Posição de repouso Aparelhos conectados no 2.PTO, frente, alavanca Aparelhos de montagem conectados em AUX 1, engata para a frente, alavanca não engata Aparelhos conectados no 2.PTO, marcha-atrás,... -
Page 234: Antes De Colocar Em Funcionamento
Antes de colocar em funcionamento Antes da primeira colocação em Ajustar o assento do condutor funcionamento PERIGO Perigo de acidente. Não ajustar o banco do condutor du- Fixar a mala dos documentos no vidro traseiro, segun- rante a marcha. do as instruções fornecidas. -
Page 235: Ajustar A Posição Do Volante
6.4.2 Assento confortável (opção) Antes do arranque/controlo de segurança PERIGO Perigo de acidente, perigo de ferimentos. Assim que um ponto do controlo de segurança não for cumprido, não é permitido colocar o aparelho em funcionamento e este tem que ser reparado. Antes do funcionamento tem que ser realizado o seguinte controlo de segurança: 6.6.1... -
Page 236: Funcionamento
Funcionamento PERIGO 7.1.1 Afrouxar o travão de mão Perigo de esmagamento. Ter atenção para que durante o Premir ao máximo o pedal do travão. funcionamento ninguém se encontre ou circule junto da ar- Rodar o bloqueio para trás. ticulação. -
Page 237: Desligar O Aparelho
7.1.5 Passar por cima de obstáculos ATENÇÃO Perigo de danos! Levantar a vassoura lateral e o bocal de aspiração antes de passar por cima de obstáculos. Obstáculos até 150 mm de altura: Passar lenta e cuidadosamente por cima dos obstácu- los num ângulo de 45°. -
Page 238: Conjuntos De Montagem
Actualmente existem os seguintes kits de montagem para via pública. o MIC 26: – Ajustar alta velocidade de rotação do motor. – Unidade de ceifa 125 cm Aviso: –... -
Page 239: Rolo Varredor Dianteiro
8.3.3 Pré-requisitos para o funcionamento Pás deflectoras de neve – O peso de compensação (opção) tem que estar mon- 8.5.1 Conectar as tubagens hidráulicas tado na parte traseira do aparelho, para a circulação na via pública. – Ajustar alta velocidade de rotação do motor. Aviso: A carga sobre o solo pode ser reduzida através da utiliza- ção do conjunto de montagem de pneus de relva (2.851-... -
Page 240: Fresadora De Neve
Fresadora de neve Distribuidor 8.6.1 Conectar as tubagens hidráulicas 8.7.1 Fixar o cavalete de montagem Desligar o motor e retirar a chave da ignição. 1 Pino de segurança 2 Cavalete de montagem Rodar o pino de segurança e retirar. ... - Page 241 8.7.2 Montar o distribuidor de rolo 8.7.4 Conectar as tubagens hidráulicas Retirar as capas de protecção dos acoplamentos hi- dráulicos e ligar as mangueiras hidráulicas com os res- pectivos acoplamentos. Unir as capas de protecção, de modo a criar uma pro- tecção contra sujidade.
-
Page 242: Distribuidor De Montagem
Distribuidor de montagem 1 Parafuso (um visível, dois cobertos) 2 Guia Ajustar a guia: soltar os 3 parafusos na parte dianteira em aprox. 1 rotação (esquerda e direita). Deslocar o distribuidor de montagem completamente para a frente até ser possível bloquear os pinos de se- gurança atrás. -
Page 243: Peso De Compensação Sem Acoplamento De Reboque
8.8.3 Conectar a luz de trabalho 8.11 Acoplamento de reboque Inserir o conector da lâmpada na tomada na parte tra- seira do veículo. Ligar a iluminação de trabalho com interruptor. Peso de compensação sem acoplamento de reboque 1 Pino de segurança 2 Acoplamento de reboque ... -
Page 244: Vassoura Para Remoção De Ervas
8.12.3 Manuseamento 8.13.5 Manuseamento Operar o levantamento hidráulico com o Joystick para PERIGO levantar ou baixar. Perigo de ferimentos no contacto com a vassoura rotativa para remoção de ervas. Ter atenção à presença de pes- 8.13 Vassoura para remoção de ervas soas durante os trabalhos de ajuste e trabalhos com sufi- ... -
Page 245: Armazenamento
8.13.6 Funcionamento com Joystick Premir / levantar fixador da vassoura para remoção de ervas (sem posição flutuante) Interruptor prin- Tecla de funcio- Joystick cipal da posição namento flutuante (conso- Desactivar Premir sem soltar deslocar para a esquerda/direita Oscilar para dentro e para fora o fixador da vassoura Tecla para a fren- Tecla de funcio- Joystick... -
Page 246: Conservação E Manutenção
Conservação e manutenção 10.2.3 Montar o revestimento lateral do motor 10.1 Instruções gerais Antes da limpeza e manutenção do aparelho, da subs- tituição de peças ou na modificação para uma outra função, o aparelho deve ser desligado e, caso neces- sário, retirada a chave de ignição. -
Page 247: Limpeza
Lubrificar todos os rolamentos que estão assinalados 10.3 Limpeza nos "Trabalhos de manutenção/Lubrificar o aparelho" Levantar o aparelho de trabalho. com "*". Estacionar o aparelho sobre uma superfície plana. Verificar se as válvulas no separador da água e no filtro ... -
Page 248: Trabalhos De Manutenção
por baixo do colector do lixo varrido, deve-se girar o colec- 10.4.7 Cada 500 horas ou semestralmente tor completamente para a posição "Esvaziar" (na máquina Realização de todos os trabalhos pela assistência téc- de varrer). nica. Perigo de ferimentos devido à descida inadvertida do co- ... - Page 249 Perigo de queimaduras! AVISO – Lavar ou enxugar respingos de ácido nos olhos ou na Utilizar um macaco normal e adequado. pele com muita água limpa. – De seguida, consultar imediatamente um médico. – As roupas sujas com ácido devem ser lavadas com água.
- Page 250 Fechar a abertura de enchimento de óleo. Deixar o motor trabalhar durante aprox. 30 seg. Verificar o nível de óleo do motor. Entregar o óleo velho nos respectivos locais de reco- lha. 10.5.9 Verificar o nível de óleo hidráulico e complementar o óleo hidráulico Importante De modo a evitar falhas de funcionamento é...
- Page 251 10.5.12 Mudar o óleo nos motores de rodas A substituição só pode ser efectuada pelo serviço de assistência técnica. 1 Tampa do radiador 2 Parafuso de purga Desenroscar a tampa do radiador. Encher lentamente o radiador até ao topo, sem bolhas 1 Parafuso de enchimento do óleo de ar.
- Page 252 10.5.16 Limpar o separador da água 10.5.19 Verifique o filtro do ar Perigo Perigo de explosão! – Não efectuar trabalhos de manutenção em recintos fe- chados. – Evitar a todo o custo fumar e fogo aberto. Fechar a torneira de paragem. ...
- Page 253 1 Elemento do filtro de ar 2 Pré-filtro 3 Grampo Retirar o pré-filtro. Deixar o elemento filtrante do ar montado, para evitar que o pó entre no motor, durante a limpeza do pré-filtro. Limpar o pré-filtro cuidadosamente com ar comprimido (0,3...0,5 MPa), de dentro para fora.
- Page 254 10.5.21 Lubrificar o aparelho Figura simbólica 10.5.23 Manutenção dos limpa pára-brisas 1 Correia trapezoidal Apenas aparelho com cabina do condutor CUIDADO Perigo de falhas de funcionamento. Evitar o contacto da correia trapezoidal com massa lubrificante. Lubrificar os bocais de lubrificação, assinalados com setas, com uma pistola de lubrificação.
-
Page 255: Fusíveis
10.6.2 Substituir os fusíveis na caixa de fusíveis 10.6 Fusíveis do compartimento do motor AVISO Usar apenas fusíveis com amperagem igual. Substituir os fusíveis defeituosos. 10.6.1 Substituir os fusíveis na caixa de fusíveis da cabina do condutor Apenas aparelho com cabina do condutor 1 Tampa ... -
Page 256: Localização De Avarias
Localização de avarias 11.1 Avarias com indicação Indicação Causa Eliminação da avaria Por quem Lâmpada de ad- Motor sobreaquecido Ajustar a rotação do motor em marcha em va- Operador vertência da tem- zio (ao ralenti). peratura do motor Controlar o nível do líquido de refrigeração no brilha motor. - Page 257 Dados técnicos MIC 26 Velocidade de marcha, em frente km/h Velocidade de marcha-atrás km/h Velocidade de trabalho km/h Capacidade de subida (máx.) Eixos accionados Tempo de trabalho com depósito cheio aprox. 12 Motor Fabricante Yanmar Tipo 3TNV76-DU Cilindrada 1116 Potência do motor a 3000 1/min 18,9 Binário a 2000 1/min...
- Page 258 12.1 Pneus CUIDADO Utilizar somente pneus autorizados pela Kärcher. Tipo de pneumático Tamanho Pressão reco- dos pneus mendada para os pneus MPa (bar) Pneus de estrada 195/55 R10C 0,62 (6,2) Pneus de relva 20x10.00-10 0,28 (2,8) Pneus standard, extra- 20x12.00-10 0,14 (1,4) largos Pneus de tracção (per-...
- Page 259 Πίνακας περιεχομένων Χειρισμός Στοιχεία για το όχημα Γέφυρα κουρέματος 125 cm Χρήση σύμφωνα με τους κανονισμούς Γέφυρα κουρέματος 135 cm Κέντρο βάρους Πρόσθιος κύλινδρος σάρωσης Γενικές υποδείξεις Λεπίδες αποχιονισμού Προστασία του περιβάλλοντος, Φρέζα χιονιού κανονισμός REACH και απόρριψη του αποσυρθέντος οχήματος Διανομέας...
-
Page 260: Στοιχεία Για Το Όχημα
Στοιχεία για το όχημα Χρήση σύμφωνα με τους κανονισμούς Χρησιμοποιείτε αυτή τη συσκευή αποκλειστικά και μόνο – Όταν δεν είναι στερεωμένη στο πίσω μέρος της σύμφωνα με τα στοιχεία σ' αυτές τις οδηγίες χειρισμού. συσκευής κάποια διάταξη εργασίας, θα πρέπει να Το... -
Page 261: Προστασία Του Περιβάλλοντος
ΠΡΟΣΟΧΗ Προστασία του περιβάλλοντος, Υπόδειξη για μια ενδεχομένως επικίνδυνη κατάσταση, η κανονισμός REACH και απόρριψη του οποία μπορεί να οδηγήσει σε ελαφρό τραυματισμό ή υλικές αποσυρθέντος οχήματος βλάβες. ΠΡΟΣΟΧΗ 3.1.1 Προστασία του περιβάλλοντος Υπόδειξη για μια δυνητικά επικίνδυνη κατάσταση, η οποία Τα... -
Page 262: Υποδείξεις Ασφαλείας
Υποδείξεις ασφαλείας – Τα παιδιά θα πρέπει να επιτηρούνται προκειμένου να Γενικές υποδείξεις ασφαλείας διασφαλιστεί ότι δεν παίζουν με τη συσκευή. – Προτού την χρησιμοποιήσετε, ελέγχετε την κατάσταση – Μην ανοίγετε το καπό, όταν ο κινητήρας είναι σε και την ασφάλεια λειτουργίας της μηχανής και των λειτουργία. -
Page 263: Υποδείξεις Ασφαλείας Για Τον Κινητήρα Εσωτερικής Καύσης
4.5.1 Ελαστικά και πίεση ελαστικών Υποδείξεις ασφαλείας για φροντίδα – Πριν διορθώσετε την πίεση των ελαστικών, ελέγξτε τη και συντήρηση ρύθμιση του μειωτήρα πίεσης στο συμπιεστή. – Πριν από το καθάρισμα και τη συντήρηση της μηχανής, – Μην υπερβαίνετε τη μέγιστη πίεση ελαστικών. Η την... -
Page 264: Στοιχεία Χειρισμού
Στοιχεία χειρισμού Συσκευή με προστατευτική μπάρα 1 Κολόνα τιμονιού * 2 Κονσόλα * 3 Τιμόνι 4 Προστατευτικός αναβολέας, ανοιγόμενος 5 Περιστρεφόμενο φως σηματοδοσίας (προαιρετικό) 6 Φως εργασίας 7 Φως οδήγησης/Φλας (προαιρετικό) 8 Σφράγιστρο ρεζερβουάρ 9 Υποδοχή για πρόσθετες συσκευές 10 Υαλοδείκτης υδραυλικού λαδιού 11 Ένδειξη... -
Page 265: Κολόνα Τιμονιού
5.2.1 Αερισμός/κλιματιστικό (προαιρετικό) Κολόνα τιμονιού 1 Διακόπτη ανεμιστήρας αερισμού 1 Εξαερισμός 2 Ρυθμιστής θερμοκρασίας θέρμανσης 2 Ενδεικτική λυχνία φλας 3 Ελεγκτής απόδοσης ψύξης (προαιρετικό) 3 Διακόπτης συστήματος φώτων κινδύνου 5.2.2 Κονσόλα οροφής 4 Κοχλίας σύσφιξης ρύθμισης ύψους τιμονιού 5 Μετρητής ωρών λειτουργίας υδραυλικού συστήματος εργασίας... -
Page 266: Στραγγαλιστική Βαλβίδα Βύθισης (Προαιρετικό)
5.5.1 Ενεργοποίηση του φρένου Συνδέσεις ακινητοποίησης Ορισμός AUX: Auxilliary = Πρόσθετη βαλβίδα ελέγχου Πατήστε τέρμα το πεντάλ φρένου. Ορισμός Υδραυλικό PTO: Power Take Off = Υδραυλικά Κουμπώστε την ασφάλεια. παρεχόμενη ενέργεια Αφήστε το πεντάλ φρένου. Ορισμός Ηλεκτρικό PTO: Power Take Off = Ηλεκτρικά 5.5.2 Απασφαλίστε... - Page 267 5.7.3 Στο πίσω φορείο 1 Υδραυλικοί σύνδεσμοι Main PTO 2 Υδραυλικοί σύνδεσμοι AUX2 3 Σύνδεσμος διαρροής 1 Σύνδεσμος νερού 2 Πρίζα Ε3-Εμπρός...
- Page 268 Κονσόλα (σε συσκευή με καμπίνα οδηγού) 1 Προειδοποιητική λυχνία ελέγχου φόρτισης μπαταρίας 2 Προειδοποιητική λυχνία θερμοκρασίας υδραυλικού λαδιού 3 Προειδοποιητική λυχνία θερμοκρασίας νερού ψύξης 4 Προειδοποιητική λυχνία πίεσης λαδιού 5 Λυχνία ελέγχου φώτων πορείας 6 Διακόπτης Θέση 1: Σύνδεσμος νερού εμπρός ενεργός Θέση...
-
Page 269: Κονσόλα
Μοχλός χειρισμού (σε συσκευή με καμπίνα οδηγού) Σύνδεση AUX 2 (χωρίς θέση πλεύσης) Γενικός Πλήκτρο Joystick διακόπτης θέσης λειτουργιών πλεύσης (κονσόλα) Απενεργοποίηση --- Μετακινήστε προς τα αριστερά / δεξιά Σύνδεση AUX 1 Πλήκτρο εμπρός Πλήκτρο Joystick (λεβιές) λειτουργιών Πάτημα και Μετακινήστε... - Page 270 5.10 Κονσόλα (σε συσκευή με προστατευτική μπάρα) A Μοχλός χειρισμού, ασφαλισμένος 2.PTO Σύνδεση: κίνηση εμπρός/πίσω B Μοχλός χειρισμού Πρόσθιο αναβατόριο επάνω/κάτω C Σύνδεση μοχλού χειρισμού AUX 1 D Σύνδεση μοχλού χειρισμού AUX 2 Μοχλός πολλαπλών λειτουργιών σε συνδυασμό με πρόσθια βάση συσκευών και σάρωθρο ζιζανίων (προαιρετικό) E Για...
-
Page 271: Μοχλός Χειρισμού
5.11 Μοχλός χειρισμού (σε συσκευή με προστατευτική μπάρα) 5.11.1 Λειτουργία μοχλού χειρισμού Α 5.11.3 Λειτουργία μοχλού χειρισμού C Θέση αδράνειας Θέση αδράνειας Συνδεδεμένες στο AUX 1 πρόσθετες συσκευές Συνδεδεμένες πρόσθετες συσκευές στο 2ο PTO προς τα εμπρός, ο μοχλός δεν ασφαλίζει προς... -
Page 272: Πριν Τη Θέση Σε Λειτουργία
Πριν τη θέση σε λειτουργία Πριν την πρώτη ενεργοποίηση Ρύθμιση καθίσματος οδηγού Στερεώστε τη θήκη των εγγράφων στο πίσω τζάμι ΚΙΝΔΥΝΟΣ σύμφωνα με τις συνοδευτικές οδηγίες. Κίνδυνος ατυχήματος. Μη ρυθμίζετε το κάθισμα οδηγού κατά την οδήγηση. Ανεφοδιασμός 6.4.1 Τυπικό κάθισμα Κίνδυνος... -
Page 273: Ρύθμιση Θέσης Τιμονιού
6.4.2 Άνετο κάθισμα (προαιρετικό) Πριν την εκκίνηση/τον έλεγχο ασφαλείας ΚΙΝΔΥΝΟΣ Κίνδυνος ατυχήματος, κίνδυνος τραυματισμού. Μόλις δεν πληρείται ένα σημείο του ελέγχου ασφαλείας, η συσκευή δεν επιτρέπεται να τίθεται σε λειτουργία, αλλά πρέπει να επισκευάζεται. Πριν από κάθε λειτουργία πρέπει να εκτελεστούν οι ακόλουθοι... -
Page 274: Λειτουργία
Λειτουργία ΚΙΝΔΥΝΟΣ 7.1.1 Απασφαλίστε το φρένο ακινητοποίησης Κίνδυνος σύνθλιψης. Προσέχετε ώστε κατά τη λειτουργία Πατήστε τέρμα το πεντάλ φρένου. να μη βρίσκονται άτομα πλησίον της άρθρωσης κάμψης. Στρέψτε την ασφάλεια προς τα πίσω. Κίνδυνος εγκαυμάτων, κίνδυνος σύνθλιψης. Αφήστε το πεντάλ φρένου. Χρησιμομποιείται... -
Page 275: Διακοπή Λειτουργίας Της Συσκευής
7.1.4 Ακινητοποίηση Μεταφορά Αφήστε το πεντάλ οδήγησης ή ενεργοποιήστε το ΠΡΟΕΙΔΟΠΟΙΗΣΗ σύντομα προς τα πίσω και η συσκευή φρενάρει Κίνδυνος τραυματισμού και βλάβης! Κατά τη μεταφορά αυτόματα και ακινητοποιείται. λάβετε υπόψη το βάρος της συσκευής. Πατάτε ο πεντάλ φρένου μόνο όταν η συσκευή δεν Κίνδυνος... -
Page 276: Πρόσθετα Εξαρτήματα
εγχειρίδιο καθώς και τις αντίστοιχες υποδείξεις ασφαλείας. τοποθετημένο στο καπό της συσκευής. Επί του παρόντος υπάρχουν οι ακόλουθες πρόσθετες – Ρυθμίστε τον αριθμό στροφών του κινητήρα. συσκευές για το MIC 26: Υπόδειξη: – Γέφυρα κουρέματος 125 cm Η επιβάρυνση του εδάφους μπορεί να μειωθεί με χρήση... -
Page 277: Πρόσθιος Κύλινδρος Σάρωσης
8.3.2 Χειρισμός Λεπίδες αποχιονισμού Ο χειρισμός της πρόσθετης συσκευής γίνεται με τον 8.5.1 Σύνδεση υδραυλικών αγωγών ειδικό λεβιέ, βλ. σχετικά στο κεφάλαιο «Λειτουργία λεβιέ». 8.3.3 Προϋποθέσεις λειτουργίας – Για τη μετακίνηση σε δημόσιες οδούς το αντισταθμιστικό βάρος (προαιρετικό) πρέπει να είναι τοποθετημένο... -
Page 278: Φρέζα Χιονιού
8.6.4 Προϋποθέσεις λειτουργίας Φρέζα χιονιού – Εάν δεν υπάρχει διανομέας, για τη μετακίνηση σε 8.6.1 Σύνδεση υδραυλικών αγωγών δημόσιες οδούς χωρίς δοχείο απορριμμάτων/δεξαμενή νερού το αντισταθμιστικό βάρος (προαιρετικό) πρέπει να είναι τοποθετημένο στο καπό της συσκευής. Υπόδειξη: Η ευστάθεια οδήγησης και η επίβλεψη βελτιώνονται εάν αφαιρεθεί... - Page 279 8.7.2 Στερέωση του κυλινδρικού διανομέα 8.7.4 Σύνδεση υδραυλικών αγωγών Αφαιρέστε τα προστατευτικά πώματα των υδραυλικών συνδέσμων και συνδέστε τους υδραυλικούς ελαστικούς σωλήνες στους αντίστοιχους συνδέσμους. Συνδέστε μεταξύ τους τα προστατευτικά πώματα κατά των ρύπων. 8.7.5 Σύνδεση οπίσθιων φανών 1 Πείρος...
-
Page 280: Διάταξη Διασκορπιστή
Διάταξη διασκορπιστή 1 Κοχλίας (ένας ορατός, δύο καλυμμένοι) 2 Οδηγός Ρύθμιση οδηγού: Χαλαρώστε 3 κοχλίες στο μπροστινό τμήμα κατά περ. 1 περιστροφή (αριστερά και δεξιά). Σπρώξτε τη διάταξη διασκορπιστή προς τα εμπρός ως το τέρμα, έως ότου ασφαλίσουν οι ασφαλιστικές περόνες... -
Page 281: Αντισταθμιστικό Βάρος Χωρίς Σύνδεσμο Ρυμουλκούμενου
8.8.3 Σύνδεση φωτισμού εργασίας 8.11 Σύνδεσμος ρυμουλκούμενου Συνδέστε το φις της λάμπας στην πρίζα που βρίσκεται στο πίσω μέρος του οχήματος. Ανάψτε τα φώτα εργασίας με τον διακόπτη. Αντισταθμιστικό βάρος χωρίς σύνδεσμο ρυμουλκούμενου 1 Ασφαλιστική περόνη 2 Σύνδεσμος ρυμουλκούμενου ... -
Page 282: Σκούπα Ζιζανίων
8.12.3 Χειρισμός 8.13.5 Χειρισμός Η ανύψωση και το χαμήλωμα του πρόσθιου ΚΙΝΔΥΝΟΣ αναβατόριου γίνεται με τον ειδικό λεβιέ. Κίνδυνος τραυματισμού κατά την επαφή με το περιστρεφόμενο σάρωθρο ζιζανίων. Κατά τη ρύθμιση και 8.13 Σκούπα ζιζανίων την εργασία, φροντίστε να κρατάτε επαρκή απόσταση ... -
Page 283: Αποθήκευση
8.13.6 Ειδικός λεβιές λειτουργιών Στρέψη βραχίονα σκούπας έξω / μέσα Πλήκτρο εμπρός Πλήκτρο Joystick (λεβιές) λειτουργιών Μετακινήστε προς τα αριστερά / δεξιά Στρέψη κεφαλής σκούπας (κλίση προς τα εμπρός) Πλήκτρο Πλήκτρο Joystick λειτουργιών λειτουργιών Μπλε Κόκκινο Πάτημα και Μετακινήστε προς κράτημα... -
Page 284: Φροντίδα Και Συντήρηση
Φροντίδα και συντήρηση 10.2.3 Τοποθέτηση πλευρικής επένδυσης 10.1 Γενικές υποδείξεις κινητήρα Πριν από το καθάρισμα και τη συντήρηση της μηχανής, την αντικατάσταση εξαρτημάτων ή την αλλαγή σε άλλο τρόπο λειτουργίας, πρέπει να απενεργοποιείται η μηχανή και εν ανάγκη να αφαιρείται το κλειδί μίζας. ... -
Page 285: Καθαρισμός
Λιπάνετε όλα τα έδρανα που σημαίνονται με "*" στην 10.3 Καθαρισμός ενότητα "Εργασίες συντήρησης/λίπανση συσκευής". Σηκώστε τη συσκευή εργασίας. Ελέγξτε εάν είναι ανοικτοί οι κρουνοί του διαχωριστή Αποθέστε το μηχάνημα σε επίπεδη επιφάνεια. νερού και του φίλτρου καυσίμων. ... -
Page 286: Εργασίες Συντήρησης
ΚΙΝΔΥΝΟΣ 10.4.7 Ανά 500 ώρες ή ανά εξάμηνο Κίνδυνος τραυματισμού! Εκτέλεση όλων των εργασιών από την υπηρεσία Σε όλες τις εργασίες συντήρησης χαμηλώνετε την εξυπηρέτησης πελατών. πρόσθετη συσκευή, προκειμένου να εκτονώσετε την πίεση Αντικατάσταση φίλτρου καυσίμου. του υδραυλικού συστήματος. ... - Page 287 ΚΙΝΔΥΝΟΣ 10.5.6 Αντικατάσταση τροχού Λάβετε πυόψη τους κανονισμούς πρόληψης ατυχημάτων, Κίνδυνος καθώς και τα πρότυπα DIN VDE 0510, VDE 0105 T.1. Σε περίπτωση εργασιών επιδιόρθωσης σε δημόσιες οδούς Κίνδυνος έκρηξης! Μην τοποθετείτε εργαλεία ή παρόμοια με διέλευση οχημάτων, φοράτε προειδοποιητικό ρουχισμό. αντικείμενα...
- Page 288 10.5.7 Ελέγξτε τη στάθμου του λαδιού του 10.5.8 Αντικατάσταση λαδιού και φίλτρου κινητήρα και συμπληρώστε λαδιού κινητήρα Υπόδειξη: Η εκροή είναι ευκολότερη όταν ο κινητήρας είναι ζεστός. Κίνδυνος Κίνδυνος εγκαυμάτων από το καυτό λάδι και πιθανών καυτούς εύκαμπτους σωλήνες! Έχετε διαθέσιμο ένα δοχείο συλλογής για τουλάχιστον 6 λίτρα...
- Page 289 10.5.9 Ελέγξτε τη στάθμη λαδιού του 10.5.12 Αλλαγή λαδιού των κινητήρων τροχών υδραυλικού συστήματος και Αλλαγή μόνο από την εξουσιοδοτημένη υπηρεσία συμπληρώστε λάδι εξυπηρέτησης πελατών. Σημαντικό Για να αποφύγετε λειτουργικές βλάβες, είναι σημαντικό να φροντίζετε ιδιαίτερα για την καθαριότητα σε όλες τις εργασίες...
- Page 290 10.5.16 Καθαρισμός διαχωριστή νερού Κίνδυνος Κίνδυνος έκρηξης! – Μην εκτελείται τις εργασίες συντήρησης σε κλειστό χώρο. – Αποφεύγετε οπωσδήποτε το κάπνισμα και τη γυμνή φλόγα. Κλείστε τη στρόφιγγα διακοπής. Τοποθετήστε το δοχείο συλλογής κάτω από το διαχωριστή νερού. ...
- Page 291 10.5.19 Έλεγχος φίλτρου αέρα 1 Φίλτρο αέρα 2 Προφίλτρο 1 Ένδειξη για την αντικατάσταση του φίλτρου λαδιού 3 Σφιγκτήρας Εάν η ένδειξη αντικατάστασης φίλτρου αέρα είναι Αφαιρέστε το προφίλτρο. κόκκινη, το στοιχείο φίλτρου αέρα πρέπει να Αφήστε το στοιχείο φίλτρου αέρα τοποθετημένο, για να αντικατασταθεί.
- Page 292 10.5.21 Λίπανση της συσκευής Εικόνα συμβολικά 10.5.23 Συντήρηση υαλοκαθαριστήρων 1 Τραπεζοειδής ιμάντας Μόνο συσκευές με καμπίνα οδηγού ΠΡΟΣΟΧΗ Κίνδυνος λειτουργικών βλαβών. Μην φέρνετε τον τραπεζοειδή ιμάντα σε επαφή με λίπος. Λιπάνετε τα γρασσαδοράκια που φέρουν σήμανση βέλους με έναν γρασσαδόρο. ...
-
Page 293: Ασφάλειες
10.6.2 Αντικατάσταση ασφαλειών στο κιβώτιο 10.6 Ασφάλειες ασφαλειών του κινητήρα ΥΠΟΔΕΙΞΗ Χρησιμοποιείτε μόνο ασφάλειες με την ίδια τιμή ρεύματος. Αντικαταστήστε τις ελαττωματικές ασφάλειες. 10.6.1 Αντικατάσταση των ασφαλειών στο κιβώτιο ασφαλειών της καμπίνας οδηγού Μόνο συσκευές με καμπίνα οδηγού 1 Κάλυμμα... -
Page 294: Βοήθεια Για Την Αντιμετώπιση Βλαβών
Βοήθεια για την αντιμετώπιση βλαβών 11.1 Βλάβες με ένδειξη Ένδειξη Αιτία Αντιμετώπιση από Προειδοποιητική Υπερθέρμανση κινητήρα Ρυθμίστε τον αριθμό στροφών του κινητήρα Χειριστής λυχνία στο ρελαντί. θερμοκρασίας Ελέγξτε τη στάθμη του υγρού ψύξης στον κινητήρα φωτίζει κινητήρα. Εάν η προειδοποιητική λυχνία δε σβήσει εντός 5 λεπτών, σβήστε... -
Page 295: Τεχνικά Χαρακτηριστικά
Τεχνικά χαρακτηριστικά MIC 26 Ταχύτητα κίνησης, εμπρός km/h Ταχύτητα κίνησης, όπισθεν km/h Ταχύτητα εργασίας km/h Επιτρεπόμενη κλίση εδάφους (μέγ.) Κινούμενοι άξονες Διάρκεια χρήσης με γεμάτη δεξαμενή καυσίμων περίπου 12 Κινητήρας Κατασκευαστής Yanmar Tύπος 3TNV76-DU Κυβισμός 1116 Ισχύς κινητήρα στα 3000 1/min 18,9 Ροπή... -
Page 296: Ελαστικά
12.1 Ελαστικά ΠΡΟΣΟΧΗ Χρησιμοποιείτε μόνον ελαστικά εγκεκριμένα από την Kärcher. Τύπος ελαστικών Μέγεθος Προτεινόμενη ελαστικών πίεση ελαστικών MPa (bar) Ελαστικά δρόμων 195/55 R10C 0,62 (6,2) Ελαστικά χόρτου 20x10.00-10 0,28 (2,8) Βασικά ελαστικά, πολύ 20x12.00-10 0,14 (1,4) φαρδιά Ελαστικά πρόσφυσης 20x 8.00-10 0,45 (4,5) (μεγάλο... - Page 298 THANK YOU! MERCI! DANKE! GRACIAS! Registrieren Sie Ihr Produkt und pro tieren Sie von vielen Vorteilen. Register your product and bene t from many advantages. Enregistrez votre produit et béné cier de nombreux avantages. Registre su producto y aproveche de muchas ventajas. www.kaercher.com/welcome Bewerten Sie Ihr Produkt und sagen Sie uns Ihre Meinung.
Need help?
Do you have a question about the MIC 26 and is the answer not in the manual?
Questions and answers