Advertisement
Advertisement
Table of Contents

Related Manuals for Aspen Vista CTO4


Summary of Contents for Aspen Vista CTO4
- Page 1 Aspen Vista CTO4 ™ Patient Handbook...
-
Page 2: Table Of Contents
Patient Information Table of Contents Please bring all teaching sheets and discharge information with you if you return to the hospital or physician’s office/clinic for follow-up care. If you have any questions, please contact your physician or fitting professional. Introduction PATIENT NAME Brace Application Adding/Removing the Anterior Strut... -
Page 3: Introduction
Introduction Your physician has determined that wearing the Aspen Vista CTO4 will help your condition. These instructions identify the steps you need to take and what you need to be aware of in order to properly apply and care for your brace at home. -
Page 4: Brace Application
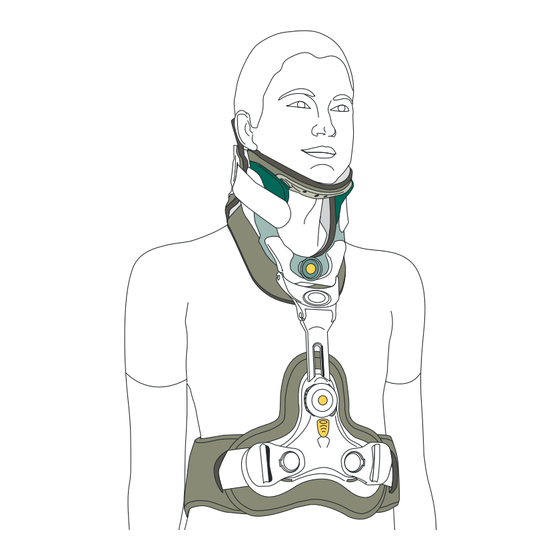
Brace Application The various components of your brace may have been modified to create a customized fit designed to meet your specific needs. To ensure optimal results, do not alter the brace. Consult your clinician or your fitting professional if you have any questions or concerns about the placement of the brace or proper fit. - Page 5 Position the Vista MultiPost Collar as instructed by your physician to obtain Tighten both collar straps. the best fit. Attach the back panel clips to the sides of the vest. Pull the straps evenly Check to see that the back of the chin piece is not pressing inward on until the back panel is tightened.
-
Page 6: Adding/Removing The Anterior Strut
Adding/Removing the Anterior Strut NOTE: Your healthcare provider may instruct you to remove the anterior strut depending on your progression of care. Check again to ensure the lumbar pad straps are comfortable and secure. Using your index fingers, align the tabs of the anterior clip located on the Vista CTO Anterior strut with the slots of the front of the Vista Collar and ensure that they snap into place. -
Page 7: Adding/Removing Of Posterior Strut
Adding/Removing of Posterior Strut NOTE: Your healthcare provider may instruct you to remove the posterior strut while supine in bed. Slide the posterior strut into slot on lumbar belt posterior panel until it Align the three connection posts with the three openings in the Vista snaps into place. -
Page 8: Washing Instructions - Pad Removal
Washing Instructions - Pad Removal Pad Washing To remove the pads, simply peel the pads away from the hook dots that Hand wash the pads with mild soap and warm water. Do not machine wash attach them to the plastic. or use bleach. -
Page 9: Pad Replacement
Pad Replacement All pads are intended to have the green side facing the plastic and the white side facing the patient. To reattach the pads to the brace, properly align the green side of the pads with the corresponding hook dots. For the upper pad on the collar, ensure that the top piece covers the front To replace the back pad, begin by attaching the green side of the pad and rear edges of the plastic components. -
Page 10: Patient Notes
The sole FOLLOW YOUR PHYSICIAN’S INSTRUCTIONS. obligation of Aspen Medical Products, LLC in the event of breach of warranty shall be to repair or replace the defective product or part(s). - Page 11 Aspen Medical Products, LLC 6481 Oak Canyon, Irvine, CA 92618-5202, USA ∙ 800-295-2776 ∙ 949-681-0200 ∙ aspenmp.com © 2020 Aspen Medical Products, LLC ∙ All rights reserved ∙ Pat. aspenmp.com/patents LIT5135A_EN 06/20...
Need help?
Do you have a question about the Vista CTO4 and is the answer not in the manual?
Questions and answers