Advertisement
Quick Links
WC45i-GW-485 Modbus Gateway Quick Start
Guide
Thank you for purchasing the WC45i-GW-485 Modbus Gateway.
This Quick Start Guide provides brief procedures for the hardware installation
and configuration of the WC45i-GW-485.
Important!: It is assumed that the reader and installer have completed the
FreeWave WC45i-GW-485 installation and setup training to follow the
procedures in this document.
Note: For more detailed installation, connection, and configuration
procedures, download the WC45i-GW-485 User Manual from the
http://support.freewave.com/
website.
Registration is required to use this website.
The basic steps are:
A.
Power and Gateway Connections (on page 1)
B.
WC Toolkit Installation (on page 1)
C.
WC Toolkit Update (on page 2)
D.
Configuration (on page 3)
Included Equipment
The WC45i-GW-485 package contains these items:
Included Equipment - WC45i-GW-485
Qty
Description
1
WC45i-GW - Gateway with Modbus Interface and 25ft cable
1
WC45i-BB - Smart Breakout Board
1
WC45i-GW-485 Quick Start Guide
User-supplied Equipment
Small, flathead screwdriver
l
Mounting equipment for the WC45i-GW-485.
l
USB to Serial DB9 programming cable (FreeWave Part #: WC-USB-DB9)
l
DC Adapter Power Supply (+6 to +30VDC)
l
Barrel connector with Ground and Power flying leads
l
Computer for WAVECONTACT device configuration.
l
Power and Gateway Connections
Important!: Verify the items listed in Included and User-supplied
Equipment section are available before starting this procedure.
1. All wiring should be neat and orderly.
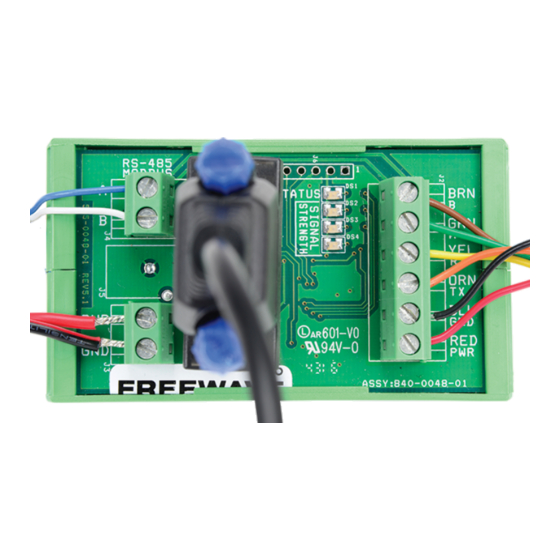
2. On the WC45i-BB Smart Breakout Board:
a. Connect the configuration wires of the Gateway to their respective color-
designated screw terminal connections.
b. Connect the Serial end of the WC-USB-DB9 cable to the RS232 Config
/ Debug connector port and the USB connection to the computer.
c. Use the PWR screw terminal connection to connect the Power Source
from an external power supply of +6 to +30VDC.
d. Use the GND screw terminal connection to connect the External power
ground.
e. Connect the Modbus master to the RS485 Modbus Block.
QSG0035AA Rev Mar-2018
The WC45i-BB connections are similar to
3. If this is the first time the WC45i-GW-485 is installed, wait for the drivers to
install.
Important!: Depending on the computer and connection, the driver
installation can take 3-6 minutes.
4. Continue with
WC Toolkit Installation (on page
WC Toolkit Installation
Note: The images in this procedure are for Windows® 7 and/or Firefox®.
The dialog boxes and windows may appear differently on each computer.
1. Click http://support.freewave.com/.
The FreeWave Support site opens.
Important!: Registration is required to use this website.
2. Enter the User Name and Password.
3. Click
A successful Login message briefly appears.
The Help Topics window opens.
4. Click the Software link.
The Software window opens.
5. Click the WAVECONTACT Toolkit link.
The available software appears in the window.
6. Select and click the attachment.
The Opening dialog box opens.
Page 1 of 4
Figure
Figure 1: WC45i-BB Connections
1).
.
Figure 2: Help Topics window
Figure 3: WAVECONTACT Toolkit window
Copyright © 2018 FreeWave
1:
Advertisement

Subscribe to Our Youtube Channel
Summary of Contents for FreeWave WC45i-GW-485
- Page 1 Figure 1: WC45i-BB Connections Note: For more detailed installation, connection, and configuration procedures, download the WC45i-GW-485 User Manual from the 3. If this is the first time the WC45i-GW-485 is installed, wait for the drivers to http://support.freewave.com/ website. install.
- Page 2 The update procedure is the same for the device and WC Toolkit. 15. Click Next to continue. The Ready to Install window opens. 1. Open the WC Toolkit software. The Update Available message appears in the window. (Figure QSG0035AA Rev Mar-2018 Page 2 of 4 Copyright © 2018 FreeWave...
- Page 3 Figure 14: Select Device window Figure 10: WC Toolkit - Update Available message 5. Continue with Configuration of the WC45i-GW-485. 2. Click the Update Available message link. Configuration Note: The terms node and Endpoint are used interchangeably in this document.
- Page 4 FreeWave Technologies, Inc. reserves the right to make changes to this document or the product described within it without notice. FreeWave assumes no responsibility or liability for the use of this document or the Important!: A Key CANNOT contain spaces or angle brackets.

Need help?
Do you have a question about the WC45i-GW-485 and is the answer not in the manual?
Questions and answers