Table of Contents
Advertisement
Quick Links
Advertisement
Table of Contents
Troubleshooting

Summary of Contents for Deta eVolo EVC7005
- Page 1 INSTALLATION AND OPERATION MANUAL THE INSTALLER MUST BE EVOLO TRAINED AND REGISTERED TO ENABLE THIS PRODUCT TO BE COMMISSIONED, OTHERWISE THE WARRANTY IS INVALID THIS MANUAL MUST BE LEFT WITH THE PROPERTY Item Code Description EVC7005 eVoomXT 7.4/22kW EV Charge Point...
-
Page 2: Table Of Contents
Contents INSTALLATION MANUAL Overview Safety Instructions Product Overview Packaging Contents List Installation Design Installation Commissioning the EV Charge Point Trouble Shooting Product Specification OPERATOR MANUAL Overview Safety Instructions Charge Point Manager Setup Using the charge point LED Indicators Trouble Shooting Statement of Compliance Warranty Disclaimer... -
Page 3: Installation Manual
INSTALLATION MANUAL Site: ________________________________________ Location: ________________________________________ Postcode: ________________________________________... -
Page 4: Overview
1. Overview IMPORTANT Please read this manual fully before starting the installation, maintaining or operating this unit Description The eVolo AC charge point is designed to charge electric vehicles (hereinafter referred to as EVs). This product can be controlled via an APP and requires an internet connection for general use, software updates etc. -
Page 5: Safety Instructions
2. Safety Instructions Safety Instructions The images and illustrations depicted in this manual may differ slightly from the actual product. • Read and follow all warnings and instructions before installing and operating the charge point. • Isolate the electrical supply before commencing the installation. •... -
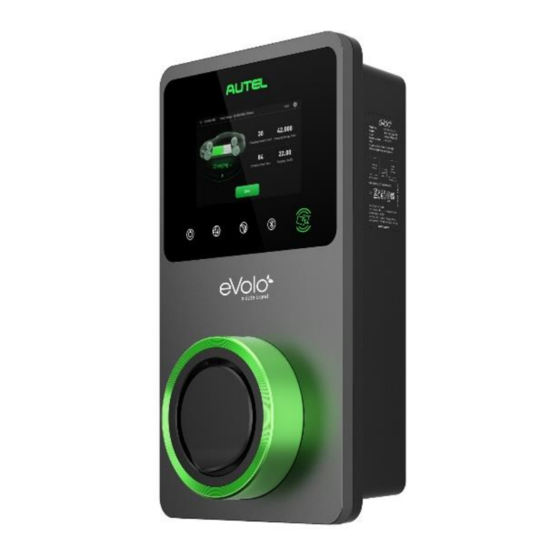
Page 6: Product Overview
3. Product Overview Features LED Indicators (from left to Front View right): • Power LED • Internet Connection • Charging LED • Bluetooth Connection RFID LED icon Power Cable RJ45 Ethernet Port Bottom View Mounting Lugs Data Cable entry Power Cable entry Product Label –... -
Page 7: Packaging Contents List
4. Packing List Parts Included Before you begin, ensure all the parts below can be found within the packaging box: Charge Wall Point Mounting Bracket 6 x 50mm Wall Plugs Screws (x2) (x2) M5 x 10mm Waterproof Screw (x1) Ethernet Cable Gland M16 Closed M25 Closed... -
Page 8: Installation Design
5. Installation Design Design Considerations The eVoomXT is designed for use in communal areas where the the user may be billed for the electricity being used to charge their EV. No diversity to be allowed. Dedicated Distribution Board If multiple charge points are fed from a dedicated landlords 3-phase distribution board (with no other loads connected), the maximum current that an EV can draw automatically adjusts depending upon the number of EV’s being charged. -
Page 9: Installation
6. Installation Location of EV Charge Point • Install your charge point on a flat and vertical surface capable of supporting its weight (the charge point has a weight of approximately 4.2kg) • Position the charge point in a location where it is not vulnerable to being damaged •... - Page 10 Remove the facial cover • Remove the two screws (A) at the bottom of the cover with the screwdriver type T10 • Unclip the cover (B) from the bottom Remove the terminal cover • Unscrew the five screws (C) to remove the inner terminal cover (D).
- Page 11 Terminate Mains Cable • Connect the below wires: • Earth (PE): green/yellow striped • Neutral (N): blue • Live (L1): brown • Live (L2): black (3-phase) • Live (L3): grey (3-phase) • The cable has RS485 conductors combined – terminate these if required, otherwise terminate in separate terminal block or wrap with insulation tape Internet Connection...
-
Page 12: Commissioning The Ev Charge Point
7. Commissioning the EV Charge Point Commissioning The eVolo EV Charge Point must be set up and commissioned by an approved installer. The charge point should be disconnected from the installation during insulation resistance testing. • When power is initally applied to the charge point: •... - Page 13 Ensure Bluetooth on the mobile device is enabled Add and scan the Product ID QR code which is on the rating label on the side of the product If prompted, enter the unique PIN number • The PIN can be found on page 3 of this Installation and Operation Manual •...
- Page 14 • Local DLB Select: Set as ‘Primary Charger’ • If more than one eVolo charge point is connected to a network, only one can be set as ‘Primary Charger’ • If external load management hardware has not been installed, e.g. smart meter, CT clamp, the Smart Meter switch must be set to Off •...
-
Page 15: Trouble Shooting
Trouble Shooting – Commissioning Item Problems Solutions • Check the incoming supply to the charger • No power Check the charge point is connecting the mounting base correctly • Check the RJ45 connector is fully inserted • No network Check the network cable continuity •... -
Page 16: Product Specification
9. Product Specification Specification AC Charging Output Maximum 7.4kW/22kW Input Supply 230V/410V AC 50 Hz 32Amax. single or three phase 1.5m flexible combined 3-phase 6mm power & RS485 data Input cable Earthing Systems TNC-S or TT Connector Type Untethered Type 2 Socket Indications 4 LEDs multicolored Touch Screen LCD Display... -
Page 17: Operator Manual
OPERATOR USER MANUAL 1. Overview Description The eVolo AC charge point is designed to charge electric vehicles (hereinafter called EVs) at your premises. Your eVolo EV charge point is a connected product (as required by the Regulations) and requires an internet connection. The charge point needs to operate via a smart phone APP where an account needs to be registered. -
Page 18: Charge Point Manager Setup
3. Charge Point Manager Setup Management Software The charge point is set by default to Autel’s cloud management software. If using the Autel cloud management software, the user must download the Autel Charge APP. If the charge point has been set to an alternative cloud management software, this should have been set up during commissioning and their APP must be downloaded by the user. -
Page 19: Using The Charge Point
4. Using the EV Charge Point Operation From the home/standby screen, the Cost Details can be viewed and the language can be changed. Button Tap to confirm the information on the screen Cost Details Tap to view the charging cost Language Tap to choose your language for the charger Stop... - Page 20 Screens Preparing to Charge Screen Charging Screen Transaction Details Screen Display subject to change due to firmware updates...
-
Page 21: Led Indicators
5. LED Indicators Description Description • Not Illuminated: The charge point is powered off • Solid Green: The charge point is powered on • Flashing Yellow: Data is being transmitted and/or firmware is Power LED upgrading • Solid Yellow: Firmware upgrade has failed •... -
Page 22: Trouble Shooting
6. Trouble Shooting Issue Resolution • Do not insert the connector into your EV charging The charge session port before setting up a charging schedule for the does not start as first time. Insert the EV charging cable after the scheduled schedule is set up. -
Page 23: Statement Of Compliance
All information, specifications and illustrations in this manual are based on the latest information available at the time of printing. eVolo is a brand of Deta Electrical Co. Ltd. Deta Electrical Company Limited reserves the right to make changes at any time without notice.
Need help?
Do you have a question about the eVolo EVC7005 and is the answer not in the manual?
Questions and answers