
Subscribe to Our Youtube Channel
Summary of Contents for OPTICLIMATE REVOMAX PRO3
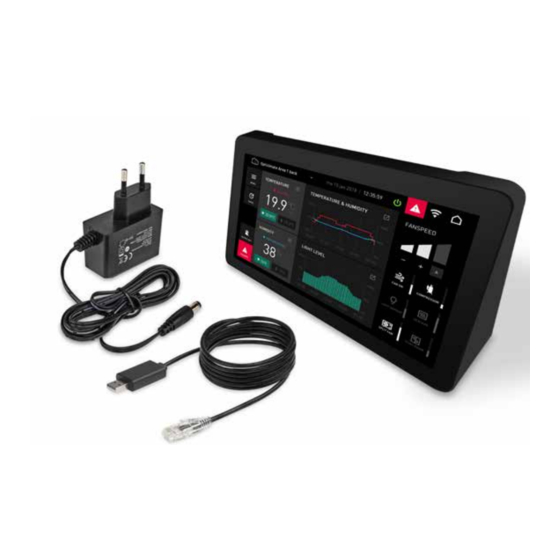
- Page 1 SMART REMOTE CONTROLLER PRO3/PRO4 MANUAL INSTALLATION & USER GUIDE Engineered & Designed in Holland THE FUTURE OF COOLING JUST GOT COOLER. www.opticlimate.com...
-
Page 2: Installation
INSTALLATION The Smart Remote Controller ensures that you can operate your OptiClimate(s) remotely (from anywhere in the world). This means that your climate system can be controlled at all times. The Smart Remote Controller is placed near the OptiClimate(s) and connected to the OptiClimate(s) with a cable. A computer or smartphone (remotely) communicates via the internet with the Smart Remote Controller, which controls the OptiClimate(s). - Page 3 INSTALLATION Control 1 Opticlimate remotely: An Opticlimate Pro3 or Pro4 needs installation of an Interlink Adapter (Art. 1-597 ) on the communication-port in the Opticlimate Pro3 or Pro 4. Installation of the Interlink Adapter Pro 3/4: OPTICLIMATE PCB OPTICLIMATE PCB...
- Page 4 • 2-367 Interlink Coupler standard (not waterproof) • 2-368 Interlink Coupler waterproof If an OptiClimate PRO3 or PRO4 is connected, there must be an interlink adapter on each OC must be mounted in order to connect the interlink cable to the OC.
- Page 5 • Article 1-597 Interlink Adapter Pro3/4 , number equal to number OC Pro3/4 • Interlink cable per OC connection Correct length for distance between Repeater Box and each individual OptiClimate • 2-363 Interlink Cable Black 5mt • 2-364 Interlink Cable Black 10mt •...
- Page 6 USING PRO3/PRO4 APPLICATION Controlling PRO3/PRO4 Aircos The Smart Remote Controller has also a application installed to control PRO3/PRO4 aircos. To start the PRO3/PRO4 application you have to do the following steps. If you start the Smart Remote Controller, you will see the main screen of Revomax application. main screen Press the ‘menu’...
- Page 7 USING PRO3/PRO4 APPLICATION Press the button ‘switch app’ to switch to the PRO3/PRO4 application about screen with switch-app button Confirm the warning message to accept switching to the PRO3/PRO4 application warning dialog if you really want to switch to the other application Some error messages may be displayed.
- Page 8 USING PRO3/PRO4 APPLICATION PRO3/PRO4 application PRO3/PRO4 aircos are connected by a network called modbus. At start of the application, the application will scan the modbus to detect connected aircos. The scanning dialog When no aircos are found, an error will be displayed An error dialog, no aircos found If no aircos are found, check the cabling, and also if the aircos are turned on.
- Page 9 USING PRO3/PRO4 APPLICATION By selecting a tile, the mappings dialog will appear. airco map dialog At this dialog you can selection the modbus-port and set the airco name. Use the 'help' button to show the possible dip-switch setting of the airco. You can set the modbus-port-address with the dipswitch of the airco. Help window with dipswitch settings When the mapping went OK, a small remotecontrol representation will appear in the selected tile.
- Page 10 USING PRO3/PRO4 APPLICATION PRO3/PRO4 application When the application is started with airco’s connected, the mainscreen tiles will be filled with a small representation of a airco remote control. You can see the status of each airco at a glance. Mainscreen with 14 titles When pressing a title with an airco, a dialog will appear to control the selected airco.
- Page 11 USING PRO3/PRO4 APPLICATION Switch to the Revomax application At this dialog, you will see actual airco information and buttons to control the airco. If you want to switch to the Revomax application, you have to change to Revomax mode. You can switch to this mode in the settings dialog.
- Page 12 USING PRO3/PRO4 APPLICATION A warning dialog will appear. To accept press the Revomax mode button. dialog with to accept to change to the Revomax application The Remomax Remote Controller will reboot. Remote control via AnyDesk The Revomax can be remotely controlled using any device connected to the internet. The remote controller uses the Anydesk application by default and you can access the unit using MIFI (modum using a sim card), Hotspot on a mobile cellphone, WIFI and LAN.
- Page 13 USING PRO3/PRO4 APPLICATION Tap "Set password" Click "Unlock Security Settings ..." Tap the password field to open the on-screen keyboard. Unfortunately this obscures the password field, but that does not matter. Enter the password, which is either Maxi Controller for the smart remote controller with the golden startup logo or Revomax for the smart remote controller with the silver startup logo (the first letter must be upper- case).
- Page 14 USING PRO3/PRO4 APPLICATION Enter the password you want to use to remotely access this controller in both fields and close the keyboard. Then tap on the "Permission Profile" box and change it to "Unattended Access" (This is important!) Close both the settings panels by tapping the cross in the top right, then tap "Show ID"...
-
Page 15: Available Accessories
9-digit ID from now on. Available Accessories 1-597 Interlink Adapter Pro 3/4 An Opticlimate PRO3 or PRO4 needs installation of an Interlink Adapter on the communication-port in the Opticlimate PRO3 or PRO4. (required per connected Opticlimate Pro3 or Pro4) 1-598 USB Interlink Adapter Use to Connect with the USB-port at the Smart Remote Controller (or Computer). - Page 16 SMART REMOTE CONTROLLER PRO3/PRO4 MANUAL ® Opticlimate is a registered trademark of airSupplies INSTALLATION & USER GUIDE Engineered & Designed in Holland Manual version 06 20 2023 THE FUTURE OF COOLING JUST GOT COOLER. www.opticlimate.com...
Need help?
Do you have a question about the REVOMAX PRO3 and is the answer not in the manual?
Questions and answers