
Related Manuals for SAKI Artisan

Summary of Contents for SAKI Artisan
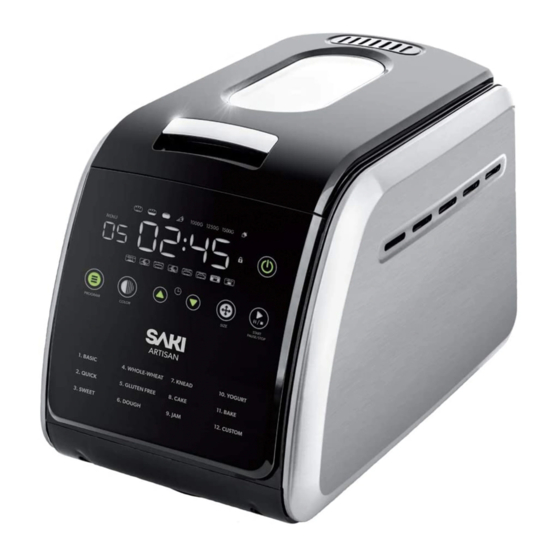
- Page 1 Bread Maker User Manual Questions or Concerns? Email us at support@saki.us Scan QR code using mobile device...
-
Page 3: Table Of Contents
CONTENT BEFORE USE Important Safety Instructions Getting To Know Your Bread Machine Specifications Product Features Parts Control Panel Buttons Display Timer Accessories USING YOUR BREAD MACHINE Tips On Making Bread Ingredients 13-14 Program Cycle Times 16-18 Menu 1: Basic Program Menu 2: Quick Program 19-20 Menu 3: Sweet Program... -
Page 4: Important Safety Instructions
IMPORTANT SAFETY INSTRUCTIONS Follow safety precautions when using electrical appliances to reduce the risks of fire, damage, shock, and injury. General Precautions • Read all instructions: Before using your bread maker, read all the instructions provided in this manual. • Avoid hot surfaces: ◦... - Page 5 Usage Precautions • Proper cord management: Do not let the cord hang over the edge of the table, counter, or touch hot surfaces • Proper placement of appliance: Do not place the appliance on or near a hot gas or electric burner, or in a heated oven. •...
- Page 6 ◦ In case of serious damage, burning smell, electric shock, or power fluctuation, stop using the product and contact Saki Services immediately. ◦ Maintain a minimum 10-inch clearance from the radiator. ◦ Do not touch the device or power cord with wet hands.
- Page 7 • Intended use: Use the bread maker only for its designated purposes • For safe and efficient use of your bread maker, follow these safety guidelines along with those provided in the user manual. In case of any issues or queries, please contact our customer service team at support@saki.us.
-
Page 8: Getting To Know Your Bread Machine
GETTING TO KNOW YOUR BREAD MACHINE Specifications Model Name: SAKI Artisan Bread Machine Power: 850W Voltage & Frequency: AC 110-120V / 50-60 Hz Dimensions: 10.5"(L) x 17" (W) x 14" (H) Capacity: 3lb (1500g) Weight: 14.7 lb (6.7 kg) PRODUCT FEATURES •... -
Page 9: Parts
PARTS Transparent Window Baking Pan Handle Top Lid Baking Pan Steam Vent Baking Pan Receptacle Main Body Main Heater Control Panel Kneading Paddles Heat System... -
Page 10: Control Panel
CONTROL PANEL LOAF EXTRA LIGHT MEDIUM DARK SIZE INGREDIENTS WORKING TIME POWER MENU ON/OFF STAGES SIZE START / STOP MENU COLOR TIME + TIME – LOAF START/STOP SIZE PAUSE Basic Whole-Wheat Knead Yogurt PROGRAMS Quick Gluten Free Cake Bake Sweet Dough Custom Stages of Bread-Making*... -
Page 11: Buttons
BUTTONS Start/ Stop/ Pause Button The Start/stop/pause button has multiple functions: • Pressing it starts the program with a flashing colon. • A quick press pauses the program with a flashing time and colon. • Holding the button for about 3 seconds stops the program. •... -
Page 12: Display Timer
Enhancing Flavors And Adding Ingredients: There are three ways to achieve this: • Add extra ingredients to the bread pan. • When you hear 10 beeps and see a notification ( ), open the lid to add more ingredients. • For the DOUGH program, knead in extra ingredients by hand before shaping and baking. -
Page 13: Accessories
The guides and tips offer instructions and suggestions for making delicious bread with your machine. They cover ingredient ratios, program settings, and provide additional recipe ideas. For more tips, refer to the "Hints & Tips on Making Bread" section in the user manual. Find recipes at www.saki.us... -
Page 14: Tips On Making Bread
◦ Measure your ingredients accurately: For accurate measurements, use a kitchen scale if possible. When using Saki's measuring cups or spoons, fill them to the brim and level off without tapping or packing tightly. ◦ Be cautious when adjusting the water temperature for your bread: Consider the season or room temperature. -
Page 15: Ingredients
INGREDIENTS Here are some common ingredients used in bread making and their effects on the bread: • Flour: The main ingredient in bread, flour provides structure and texture. Different types of flour have different properties, which will affect the taste and texture of the bread. ◦... - Page 16 • Sugar: Sugar adds sweetness and helps brown the crust of the bread. The amount used affects the bread's sweetness. Avoid substituting with powdered sugar, brown sugar, or artificial sweeteners, unless specified. If the recipe doesn't specify, you can use honey, brown sugar, golden or similar alternatives.
-
Page 17: Program Cycle Times
PROGRAM CYCLE TIMES Crust Color Time to Time to Program Loaf Rapid Delay Timings Name Size Time Ingredients Light Medium Dark Timer Ingredients 2 Ib 2.40 2.05 1.45 3.05 1. Basic 2.5 Ib 2.45 2.10 1.50 3.10 2.50 3 Ib 2.15 1.55 3.15... -
Page 18: Menu 1: Basic Program
MAKING BASIC BREAD The basic bread program on your bread maker is specifically designed for baking a simple loaf of bread. It features a longer rise time and a moderate baking temperature. This is because basic breads, without any special ingredients, require more time to rise and develop their flavor. - Page 19 Add ingredients listed into the • Add ingredients in this order baking pan. and measure precisely: ◦ Liquids (water, milk,eggs*), ◦ Oil or butter, Bread flour, ◦ Sugar, powdered milk, salt. ◦ Make a hole in the flour for the yeast, ensuring it doesn't touch any liquid.
- Page 20 Press the start/stop button to start cycle. • To start the baking program, press the start/stop button. • If the cycle doesn't start after a short press, ensure that the lid is completely closed. MENU COLOR TIME + TIME - SIZE START / STOP Press the start/stop button after...
-
Page 21: Menu 2: Quick Program
QUICK PROGRAM The quick bread program on your bread maker is a specialized setting for The quick bread program on your bread maker is a specialized setting for baking quick breads such as white, wheat and rye bread. Quick breads are baking quick breads such as white, wheat and rye bread. - Page 22 Press the stop button after • Start the bread machine and let it the cycle ends. complete the quick bread program cycle. The machine will handle the mixing, kneading, and baking process. • When the bread is finished baking, the bread maker will beep.
-
Page 23: Menu 3: Sweet Program
SWEET PROGRAM The sweet bread program on a bread maker is designed for baking sweet The sweet bread program on a bread maker is designed for baking sweet bread. It has a longer rise time, higher baking temperature, and shorter bread. - Page 24 Remove the bread from the • When baking is done, use oven mitts baking pan. or hot pads to remove the hot pan from the machine. • Let the sweet bread cool in the pan for a few minutes, then transfer it to a wire rack for complete cooling before slicing.
-
Page 25: Menu 4: Whole Wheat Program
WHOLE-WHEAT PROGRAM The whole wheat bread program on a bread maker is a specific setting The whole wheat bread program on a bread maker is a specific setting designed to help you bake whole wheat bread. This setting typically designed to help you bake whole wheat bread. This setting typically includes a longer rise time and a higher baking temperature because includes a longer rise time and a higher baking temperature because whole wheat flour absorbs more liquid and produces a denser dough... - Page 26 Remove the bread from the baking pan. • Once the bread is done, carefully remove it from the bread maker and let it cool on a wire rack before slicing. • Unplug the power cord. Note: The use of sourdough starter in combination with whole wheat flour might require some adjustments and experimentation, as the behavior of sourdough can vary based on many factors, including the maturity of your starter and the temperature and humidity of your environment.
-
Page 27: Menu 5: Gluten-Free Program
5. GLUTEN-FREE PROGRAM The gluten-free setting on your bread maker changes the mix, rise, and The gluten-free setting on your bread maker changes the mix, rise, and bake times for gluten-free flours. Pick a gluten-free flour blend you like, bake times for gluten-free flours. Pick a gluten-free flour blend you like, add more liquid than usual, and tweak as needed. -
Page 28: Menu 6: Dough Program
DOUGH PROGRAM The bread maker's dough program mixes, kneads, and rises dough. The bread maker's dough program mixes, kneads, and rises dough. It combines ingredients, develops structure, and allows the dough to rise It combines ingredients, develops structure, and allows the dough to rise and become elastic. - Page 29 Baking the dough. • Preheat the oven to 450 degrees Fahrenheit. III. • Roll out the pizza dough to desired shape and thickness. • Place it on a baking sheet or pizza stone. Pinch the edges and spread the tomato sauce •...
-
Page 30: Menu 7: Knead Program
KNEAD PROGRAM The knead program in a bread maker is designed to combine and knead dough. It involves mixing, kneading, and resting steps. Mixing blends the ingredients, kneading develops gluten for structure, and resting allows the dough to become more elastic as the gluten relaxes. Pasta Dough Recipe Here's a sample recipe for making pizza dough using the dough program: Prep Time: 10 minutes... - Page 31 Stop the cycle when the dough is ready. • The program beeps 10 times when the dough is ready. • Press the start/stop button to end the cycle. • Remove the dough from the bread maker and transfer it to a floured surface.
-
Page 32: Menu 8: Cake Program
8. CAKE PROGRAM The bread maker's cake setting, taking about 1 hour 50 minutes, mixes, kneads, rises, and bakes a cake. This process prepares ingredients, forms structure, allows rising, and bakes the cake. The result is a moist cake you can enjoy as-is or with frosting Tea Loaf Cake Recipe Here's a sample recipe for making tea loaf using the cake program: Ingredients:... -
Page 33: Menu 9: Jam Program
9. JAM PROGRAM The bread maker's jam program makes jam from fruit and sugar in 1 hour 20 minutes. • Use fresh, unbruised fruit, chopping large ones into smaller pieces. • Use preserving sugar from grocery stores, which has added pectin for a better set. - Page 34 • Carefully remove the hot bread pan Remove the pan and transfer and pour the jam into a sterilized, the jam into a jar. pre-warmed jar. • Seal and let it cool. • If the jam isn't set enough, use the BAKE setting as described earlier.
-
Page 35: Menu 10: Yogurt Program
YOGURT PROGRAM The yogurt program on a bread machine allows you to make homemade yogurt. It heats the milk and plain yogurt to a specific temperature for culturing. The yogurt program takes 1 hour 20 minutes. It can be delayed up to 12 hours by setting the time delay on your bread machine before starting. - Page 36 WARNING: Do not store yogurt in the refrigerator for more than 4 days after making it. Ensure you use fresh ingredients and avoid using expired milk in the appliance. Here are tips for using the yogurt program: • Use whole milk for best results. •...
- Page 37 YOGURT SERVING SUGGESTIONS • Flavorings should be added to the yogurt after it is made, not beforehand. • For the freshest taste, add fruit or flavorings just before consuming the yogurt. • Flavored yogurt can be stored in the refrigerator for up to 4 days. •...
-
Page 38: Menu 11: Bake Program
BAKE PROGRAM The bread machine's bake program offers an effortless way to bake homemade bread without hand-kneading or a stand mixer. It's suitable for a variety of bread recipes like white bread, whole wheat bread, sourdough bread, sweet breads, quick breads, rolls, and pizza dough. Sun-Dried Tomato, Cheese, and Olive Bread Recipe Here's a sample recipe for Sun-Dried Tomato, Cheese, and Olive Bread to use with the dough and bake program on your bread machine. - Page 39 Select program 6 (dough) • Start by preparing the dough using the and begin the cycle. bread machine's dough program (6). • This typically takes around 1 hour and 50 minutes. • Once the dough program is complete, remove the dough from the machine and place it on a lightly floured surface.
-
Page 40: Menu 12: Custom Program
CUSTOM PROGRAM This program allows customization of the bread maker to suit your preferences. Adjust times, settings, and even create your own recipes. You can modify or skip any bread making steps as desired. Here's how to do it: ◦ Adjust Time and Settings: Using the 'Program' button, select the stage you want to modify kneading, rising, baking, or keeping warm. - Page 41 Select the Program 12 (Custom). • Choose Program 12 (Custom). MENU COLOR TIME + TIME - SIZE START / STOP • Use the COLOR button to set crust darkness at the beginning or end of your settings. • Set the baking cycle time by using Customize the baking the TIME buttons when the time stages...
-
Page 42: Cleaning & Maintenance
CLEANING & MAINTENANCE Here's a step-by-step guide on how to clean your bread maker: Safety Precautions Before starting any cleaning or maintenance, ensure that the following safety precautions are taken and check for any damage after every use. 1. Disconnect the bread maker from the power source. 2. - Page 43 • Check the non-stick coating: Over time, the non-stick coating may discolor or peel off. This is not harmful and will not affect the performance. To replace these parts, visit SAKI's website or email Customer Service at support@saki.us. Cleaning the Accessories (Measuring Cup, Hook, Measuring Spoon): •...
- Page 44 • Clean the bread pan and kneading Pour warm or room-temperature paddles with hot, soapy water. Rinse water into baking pan. thoroughly and ensure they are completely dry. • Place the bread maker on a flat, dry, heat-resistant surface. III. •...
-
Page 45: Troubleshooting
TROUBLESHOOTING Here are common bread maker problems and troubleshooting tips. For further inquiries, email us at support@saki.us. BAKING RESULTS Loaf Size & Shapes • Avoid adding too much water or using If there is a collapse in the insufficient flour. - Page 46 • Check that yeast is added and no If the loaf is short and heavy: power failures occurred during operation. • Use water at the correct temperature, sufficient salt, and keep yeast and salt separate before kneading. • Avoid excessive water temperature and yeast moisture before kneading If the sides of the loaf are sunken:...
- Page 47 Troubleshooting tips for bread texture problems: • Use the correct amount of flour and liquid, considering the flour type used. • Knead the dough for the recommended duration to develop gluten. • Avoid overmixing the dough to prevent toughness. • Allow sufficient rising time to develop air bubbles. •...
-
Page 48: Product & Parts
PRODUCT & PARTS Product Troubleshooting: Power Issues: ◦ The bread maker does not turn on: Ensure that the bread maker is plugged in and switched to the "On" position. ◦ The bread maker stops during the baking cycle: Check if the bread maker is overheating. - Page 49 Parts Troubleshooting: Kneading Paddle: ◦ The kneading paddle is damaged: If the kneading paddle is damaged, it may not properly knead the dough. Replace the kneading paddle with a new one to ensure proper functionality. Bread Pan: ◦ The bread pan is damaged: If the bread pan is damaged, it may not hold the dough properly during the baking process.
-
Page 50: Questions & Answers
• Consult the user manual for your bread maker for troubleshooting steps and specific guidance to address common problems. • If the issue persists or you need further assistance, contact us at support@saki.us... - Page 51 Q: What are some tips for making a good loaf of bread in a bread maker? A: Here are some tips to ensure a good loaf of bread when using a bread maker: • Use fresh and high-quality ingredients for the best flavor and texture. •...
- Page 52 It's a simple and quick process. Here's how: Click the warranty registration tab under the support page or visit www.saki.us/pages/warranty. 2. Complete the required fields in the registration form, making sure to provide accurate information.
- Page 53 Scan to access warranty registration...
- Page 56 CUSTOMER SUPPORT If you have any questions or concerns about your product, please contact our helpful Customer Support Team. *Please have your order number ready before contacting our team 100 Bayview Cir Suite 100, Newport Beach, CA 92660 Email: support@saki.us...
Need help?
Do you have a question about the Artisan and is the answer not in the manual?
Questions and answers