Advertisement
Quick Links
BEFORE YOU GET
We're confident you' ll love your gorgeous new Next
furniture. However, it's worth making absolutely certain
So, let's quickly run through these three steps:
No need to unpack everything, just check the first component.
If you're happy, then it's time to get opening!
on the protective packaging – this will prevent anything getting scratched.
Finally, double check you have all the pieces by referencing
Not completely happy with the product? No problem.
We just need everything back in the original packaging, so follow the steps below
and this will ensure a super-smooth returns process and no delay to your refund.
DO
• Check everything is there (the 'parts page'
is a handy checklist).
• Pop all the loose fittings and fixtures into
the packaging provided or tie them up in a
plastic bag.
• Wrap all the big components back
up in the original protective packaging.
• Close up the box and seal it securely
(don't be afraid to use plenty of tape).
Then just give us a call on 0333 777 8999 and we'll sort out a pick up time for you.
STARTED...
before you put it all together.
1. COLOUR
Make sure you're happy with the colour
2. PROTECTIVE PACKAGING
3. PARTS PAGE
the parts page of the instructions.
TIPS FOR RETURNS
Start by laying everything out
DON'T
• Leave anything assembled -
all components should be dismantled
and separately packed.
• Put loose fixtures and fittings straight
into the box.
• Throw it back in the box carelessly –
as it may get damaged.
Advertisement

Subscribe to Our Youtube Channel
Related Manuals for Next JAUG BRONX M76551


Summary of Contents for Next JAUG BRONX M76551
- Page 1 BEFORE YOU GET STARTED... We’re confident you’ ll love your gorgeous new Next furniture. However, it’s worth making absolutely certain before you put it all together. So, let’s quickly run through these three steps: 1. COLOUR Make sure you’re happy with the colour No need to unpack everything, just check the first component.
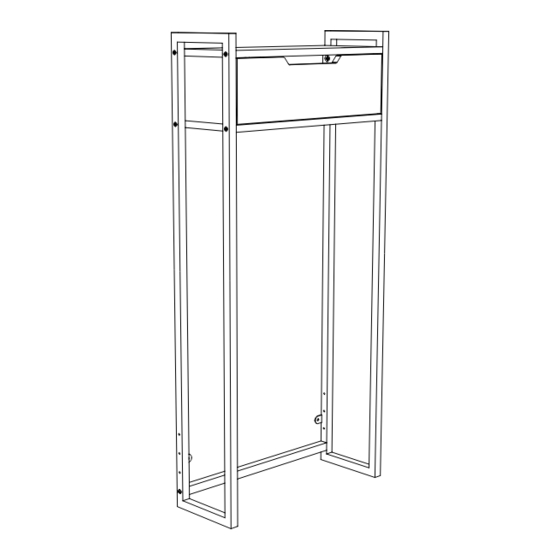
- Page 2 JAUG BRONX OVER TOILET UNIT M76551 Assembly instructions Actual product size H109.5 x W50 x D18.5cm Need Help ? With: Assembly instruction Missing or damaged parts IMPORTANT - RETAIN FOR FUTURE REFERENCE CALL: 0333 777 8999 Produced in China for Next Retail Ltd. M76551-2022-V1.
- Page 3 JAUG BRONX OVER TOILET UNIT M76551 Assembly instructions M76551-2022-V1.
- Page 4 JAUG BRONX OVER TOILET UNIT M76551 Assembly instructions M76551-2022-V1.
-
Page 5: Getting To Know Your Product
JAUG BRONX OVER TOILET UNIT M76551 Assembly instructions GETTING TO KNOW YOUR PRODUCT Produced in China for Next Retail Ltd. M76551-2022-V1. - Page 6 JAUG BRONX OVER TOILET UNIT M76551 Assembly instructions 46x18.5x1.5cm 45.5x13.5x1.5cm 43.9x15x0.3cm 46x1.8x1.8cm 16.8x14x1.5cm 108.5x18.5x2cm 46x18.5x1.5cm 108.5x18.5x2cm Ø4 x 40mm Ø6 x 30mm Ø3 x 14mm Fixtures and fittings supplied (not to scale) Dimensions Visual Dimensions Visual Spare Qty Spare Qty 20 x 32 x 78mm 16 x 41 x 17mm 12 x 52 x 24mm...
- Page 7 Ø3 x 14mm not supplied not supplied Ø3 x 14mm not supplied 20 x 32 x 78mm 15 x 50 x 25mm 1 x 45 x 15mm 16 x 41 x 17mm Produced in China for Next Retail Ltd. M76551-2022-V1.
- Page 8 JAUG BRONX OVER TOILET UNIT M76551 Assembly instructions For this type of toilets where the waste For this type of toilets where the waste pipe is outside; the customer can either pipe is hidden and the toilet sits flush use the keyholes to fix the legs or use against the wall;...
- Page 9 JAUG BRONX OVER TOILET UNIT M76551 Assembly instructions M76551-2022-V1.
- Page 10 JAUG BRONX OVER TOILET UNIT M76551 Assembly instructions H109.5 x W50 x D18.5cm M76551-2022-V1.
- Page 11 JAUG BRONX OVER TOILET UNIT M76551 The product MUST be fixed to the wall to avoid toppling risk. M76551-2022-V1.
Need help?
Do you have a question about the JAUG BRONX M76551 and is the answer not in the manual?
Questions and answers