Table of Contents
Advertisement
Quick Links
Advertisement
Table of Contents

Subscribe to Our Youtube Channel
Related Manuals for Gaggenau CK 236


Summary of Contents for Gaggenau CK 236
- Page 1 Operating and Assembly Instructions CK 236 Glass ceramic cooking range...
-
Page 2: Table Of Contents
CK 236 Preface 1. Important notes Page 3 - 4 1.1 For your safety Page 3 1.2 Operating for the first time Page 4 1.3 About use Page 4 2. Structure and operating principle Page 5 2.1 Structure Page 5 2.2 Operating principle... -
Page 3: Preface
Preface Cooking with your new glass-ceramic cooker will be even more fun than before. The appliance offers you the following advantages – Short warm-up time – Very good heat distribution – Thanks to the novel installation method implemented, installation is child's play! To ensure that you will be able to use this appliance in all its diversity, read through the operating and assembly instructions... -
Page 4: Important Notes
Repairs must be carried out by authorised specialists, thus ensuring electrical safety. CK 236 can be combined with the built-in cooker EE 214/215 or EE 234/235 and with the built-in control console SP 212-114 or SP 384-104. -
Page 5: Operating For The First Time
If a problem has nothing to do with instructions. This quality control slip should be kept, the power supply, please contact your specialist for guarantee reasons, together with your operating dealer or your responsible Gaggenau after-sales and assembly instructions. service. Read through these instructions attentively before Use of aluminium kitchenware or stainless steel operating your appliance for the first time. -
Page 6: Structure And Operating Principle
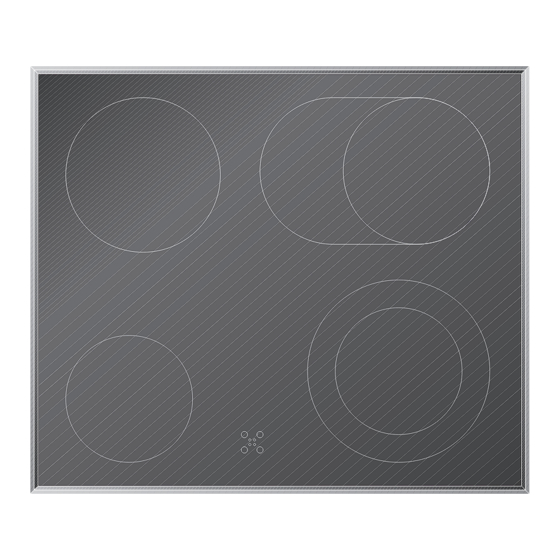
2. Structure and operating principle 2.1 Structure 1 SuperQuick cooking zone Ø 140 mm (1200 W) 2 SuperQuick cooking zone Ø 180 mm (1800 W) 3 SuperQuick cooking zone Ø 170 mm (1500 W) with connection to the roasting zone Ø... -
Page 7: Operation
3. Operation 3.1 Switching on / off Switching on: Switching on: Turn the corresponding control knob to the right to the required cooking level (1-9 / SP 384: 1-12). Note: a few seconds after switching on, the individual residual heat display indicating the chosen cooking zone lights up in the residual heat display panel. -
Page 8: Operating With The Combination Function
3.2 Operating with the combination Cooking zone 3 (rear right) has a combination function to turn the round cooking zone into an oval function cooking zone, which is suitable for heating oval roasters. Cooking zone 4 (front right) has a combination function to turn the small round cooking zone into a large round cooking zone. -
Page 9: Cleaning And Care
Remove baked-in food remainders and coarse dirt with our small scraper (nr.: 087670). Clean the cooking surface regularly with the Gaggenau cooker cleaner (nr.: 098690). Note: to avoid jeopardising the electrical safety of the appliance, it is forbidden to use high-... -
Page 10: Maintenance
If your appliance should not function properly, search for the fault in the list below. If you are not successful in remedying the fault with the aid of the list below, then contact your Gaggenau after-sales service. Fault... -
Page 11: Assembly Instructions
Note: do not stick the cooking surface onto the (Fig. 9). worktop with silicone! This appliance may be installed in kitchen combinations made of wood or similar combustible CK 236-114 FD xxxx materials, without taking additional measures. Pay 230 V AC 50/60 Hz max. 7600 W attention to the 'Important notes' (Chapter 1). -
Page 12: Installation And Removal
6.3 Installation and removal Installation Proceed as follows: – Produce the recess for the appliance in the worktop. Proceed as shown in the installation sketch and the dimension table. (Fig. 9) The angle between the cut surface and the worktop must be 90°. - Page 13 GAGGENAU HAUSGERÄTE GMBH CARL-WERY-STR. 34 · D - 81739 MÜNCHEN Y (0 89) 45 90 - 03 FAX (0 89) 45 90 - 23 47 www.gaggenau.com...
Need help?
Do you have a question about the CK 236 and is the answer not in the manual?
Questions and answers