Table of Contents
Advertisement
Quick Links
CD+G Karaoke System with
Bluetooth and Light Effects
EKS780-BT
Thank you for purchasing this Karaoke System. Please read this instruction manual carefully before
using this product to ensure proper use. Keep this manual in a safe place for future reference.
INSTRUCTION MANUAL
For thousands of free professional karaoke
tracks go to www.easykaraoke.com
Advertisement
Table of Contents

Related Manuals for Easy Karaoke EKS780-BT


Summary of Contents for Easy Karaoke EKS780-BT
- Page 1 CD+G Karaoke System with Bluetooth and Light Effects INSTRUCTION MANUAL EKS780-BT Thank you for purchasing this Karaoke System. Please read this instruction manual carefully before using this product to ensure proper use. Keep this manual in a safe place for future reference.
- Page 3 BEFORE WE BEGIN Thank you for purchasing the EKS780-BT Karaoke Machine. This is your assurance of quality, performance and value. This product was manufactured using the highest quality components and standards of workmanship. Our engineers have included many useful and convenient features in this product.
- Page 4 IMPORTANT SAFETY INSTRUCTION SAFETY CONSIDERATIONS 1. Ensure a minimum distance of 5 cm around the apparatus for sufficient ventilation. 2. The ventilation should not be impeded by covering the ventilation openings with items, such as newspapers, tablecloth, curtains, etc. 3. No naked flame sources, such as lighted candles, should be placed on the apparatus. 4.
-
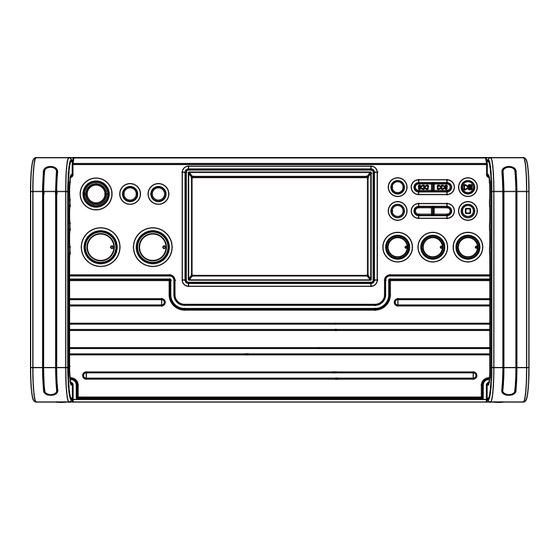
Page 5: Control Location
CONTROL LOCATION TOP VIEW CRADLE CD DOOR FRONT VIEW RECORD BUTTON SCREEN ON / OFF BUTTON PROGRAM / REPEAT BUTTON FUNCTION SKIP FORWARD / BUTTON BACKWARD BUTTON POWER INDICATOR PLAY / PAUSE / PAIR BUTTON ON/ OFF BUTTON STOP / LIGHT ON / OFF BUTTON TFT SCREEN KEY / PAGE +/-... - Page 6 TFT DISPLAY ICON TRK 10/10 PROG 00:16:04 PLAYING TIME REPEAT MODE PROGRAM MODE PLAY / PAUSE / STOP INDICATOR PLAYING MODE PAUSE MODE STOP MODE PLAYING TRACK NUMBER AND TOTAL TRACK NUMBER CDG= CD+G DISC PLAYING PLAYING CD/ CDR/ USB TABLET OPERATION Snap the tablet cradle via two mounting holes at the back of the unit till the cradle is locked...
-
Page 7: Making The Connections
MAKING THE CONNECTIONS CONNECTING TO YOUR TV OR VCR / HOME THEATER Your Karaoke machine is designed to connect to your TV the same way you would connect most video cameras, VCR / Home theater or video games consoles. We have provided RCA cables to connect your unit to a TV, VCR / Home theater, video device or an external audio / sound system. - Page 8 MAKING THE CONNECTIONS AUDIO CONNECTION Please follow the steps below to connect audio signal from the unit to your TV, VCR/Home Theater or home audio system. RCA connection 1. Locate the multi-colored RCA cables (White and Red) 2. Connect audio cables to the Audio Out of the back of your Karaoke Machine. 3.
- Page 9 MAKING THE CONNECTIONS SETTING UP YOUR MICROPHONE 1. Plug a microphone into the MIC1 or MIC2 jack at the rear of your Karaoke Machine. Their output is mixed with playback from CD/CD+G. 2. Located on the microphone, there is an ON/OFF switch. 3.
- Page 10 CD OR CD+G / MP3+G OPERATION This unit is designed to play CDs/CD+G/MP3/MP3+G disc bearing the identification logo respectively. If the disc does not conform to the standard, it may not play properly. NOTE: The unit may not be able to read CDR or CDRW disc correctly. The readability depends on the quality of recording produced by CD recorder or CD writer.
- Page 11 CD OR CD+G / MP3+G OPERATION SEARCH (For CD disc /MP3 disc only) When playing a CD disc or MP3 disc, you can press and hold the SKIP buttons ( ) to locate a specific point on a track. The system will search at high speed in the forward or reverse direction.
- Page 12 CD OR CD+G / MP3+G OPERATION ECHO Adjust the ECHO control to enhance your voice for a concert hall effect. BALANCE Adjust the BALANCE control between the pre-recorded singer’s voice and the music when using a multiplex karaoke disc. AUTO VOICE CONTROL control knob.
-
Page 13: Usb Operation
USB OPERATION INSERTING USB FLASH DRIVE 1. Insert a USB flash driver into the USB socket on the back of your karaoke system. 2. Make sure that USB is selected as the audio source. See "SELECTING THE AUDIO SOURCE” 3. Press PLAY/PAUSE to start playback. PLAY/PAUSE 1. - Page 14 USB OPERATION PROGRAMMING USB PLAYBACK This unit can be programmed to play up to 20 tracks/files in USB mode. Plug the USB flash drive and select USB mode. (without pressing the PLAY/PAUSE button). 1) Press PROGRAM/REPEAT button once in stop mode. “PRG SET 01:XXX” will be shown on the screen.
-
Page 15: Care And Maintenance
CARE AND MAINTENANCE *Carrying for Compact Discs 1. Treat the disc carefully. Handle the disc only by its edges. Never allow your fingers to come in contact with the shiny, unprinted side of the disc. 2. Do not attach adhesive tape, stickers, etc. to the disc label. 3. -
Page 16: Troubleshooting
TROUBLE SHOOTING PROBLEM POSSIBLE CAUSE SOLUTION AC adaptor is not plugged Plug the AC adaptor into a No power when POWER into a wall outlet or the wall outlet and plug the is on. connector is not plugged connector into the supply into the power supply jack jack on the unit. - Page 17 TROUBLE SHOOTING PROBLEM POSSIBLE CAUSE SOLUTION No song lyrics appear on Connect the video cable to Video cable is not the TV screen. the karaoke system’s VIDEO connected properly to the OUT and to the TV VIDEO Source selector on TV is Using your TV remote to not set to VIDEO.
-
Page 18: Specification
SPECIFICATION Audio Section Output power 3 watt + 3 watt RMS Output impedance 3 Ohms CD OR CD+G player Frequency response 100 Hz - 20 kHz Signal - to - noise ratio 50 dB Number of programs 20 STEPS RANDOM ACCESS PROGRAMMING Microphone -73 dB 600 OHMS IMPEDANCE WITH Ø... - Page 19 THE KARAOKE MACHINE (GLOSSARY OF TERMS) Following are some brief descriptions of karaoke terms you may need: Echo: By adding some minor feedback to your voice the Echo feature adds depth and resonance to a singer's voice. Echo affects only your voice and not the music. It will make you sound like you are singing in a big concert hall.
-
Page 20: End Of Life Disposal
END OF LIFE DISPOSAL Warning! This logo set on the product means that the recycling of this apparatus comes within the framework of the Directive 2002/96/CE of January 27, 2003 concerning the Waste of Electrical and Electronic Equipment (WEEE). This symbol means that used electrical and electronic products should not be mixed with general household wste.
Need help?
Do you have a question about the EKS780-BT and is the answer not in the manual?
Questions and answers