Advertisement
MINI BILBAO
Instrucciones de montaje
Assembly instructions
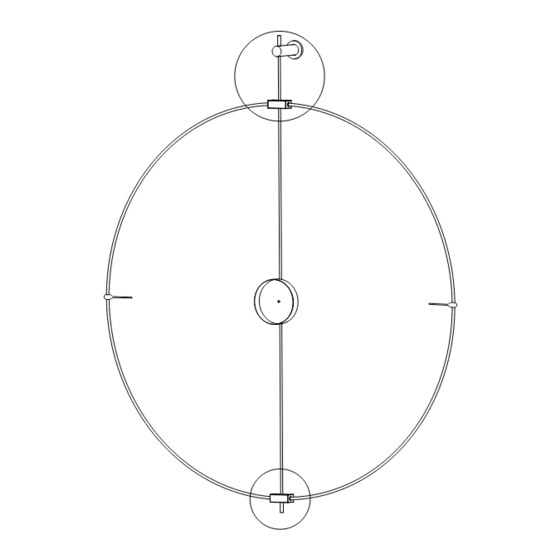
TALADRO M6
1
DRILL M6
2
1
st
ATENCIÓN:
Roscar primero el tornillo al anclaje y
luego el anclaje a la pared.
CAUTION:
Thread the screw to the wall anchor and then,
screw it to the wall.
2
nd
1
st
3
rd
3
4
1
st
-
Coloque la señal horaria recta.
2
-
nd
Manteniendo la señal horaria en
la posición correcta, apriete el
tornillo con la llave allen.
1
-
st
Place the time signal straight.
2
nd
-
Keep the position of the time
signal and tighten the screw
with the provided allen key.
ATENCIÓN!
!
NO APRIETE DEMASIADO EL TORNILLO!
APRIETE LO NECESARIO PARA QUE LA SEÑAL QUEDE FIJA.
W ARNING!
DO NOT TIGHTEN THE SCREW TOO MUCH!
SCREW ONLY THE NECESSARY TO FIX THE TIME SIGNAL.
2
nd
!
1
st
Advertisement
Table of Contents

Related Manuals for nomon MINI BILBAO


Summary of Contents for nomon MINI BILBAO
- Page 1 MINI BILBAO Instrucciones de montaje Assembly instructions TALADRO M6 DRILL M6 ATENCIÓN: Roscar primero el tornillo al anclaje y luego el anclaje a la pared. CAUTION: Thread the screw to the wall anchor and then, screw it to the wall.
- Page 2 ATENCIÓN: No olvide colocar la pila de 1,5v. C AUTION: Don’t forget to set the battery in place. Sección larga arriba Long section, upwards R6 1,5V Sección corta abajo Short section, downwards Gire cuidadosamente la aguja minutera en el sentido de las agujas del reloj hasta alcanzar las 12:00, continue girando la aguja minutera hastaalcanzar la hora deseada.
Need help?
Do you have a question about the MINI BILBAO and is the answer not in the manual?
Questions and answers