Advertisement
Features
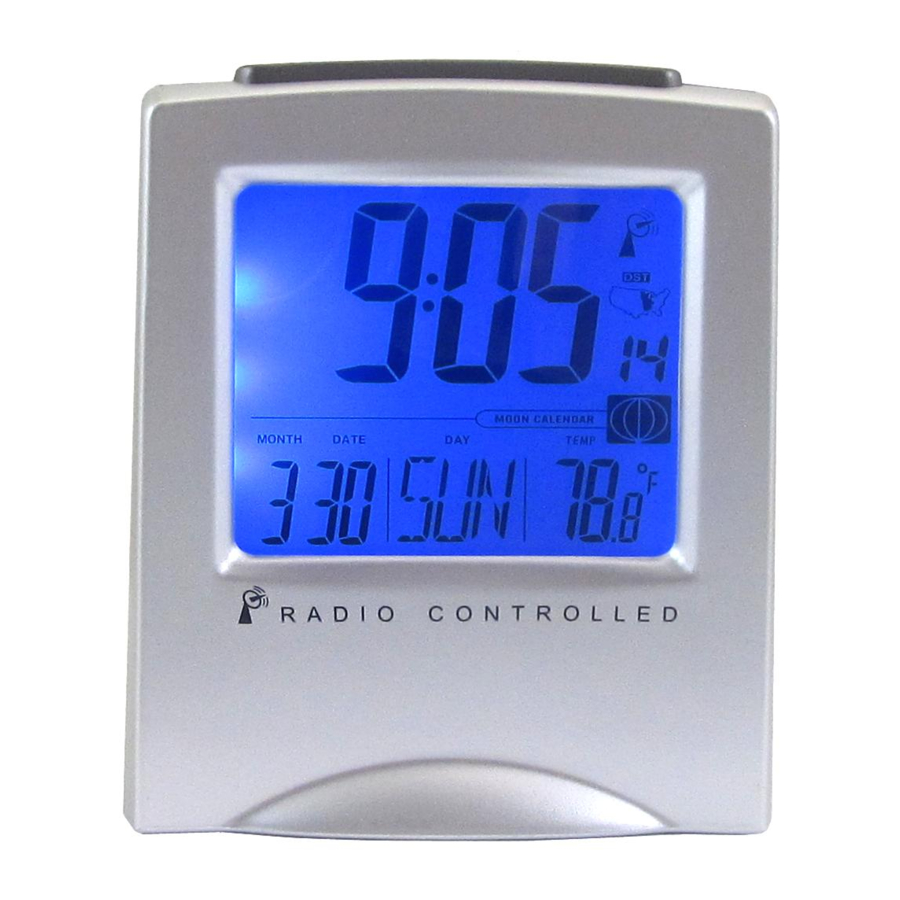
- 12 or 24 hour selectable Time Display
- Dual Alarm
- 5 Minute ID Timer (Snooze)
- Backlight
- Month, Date, and Day of week Display
- Receiver set at 60 kHz for WWVB reception.
BATTERY INSTALLATION & REPLACEMENT
- Replace batteries when the Low-Battery symbol is shown on the LCD display.
- Open the battery compartment cover on the back of the clock.
- Remove both old batteries and insert two new AAA batteries (Alkaline batteries recommended).
- Make sure that the positive (+) and negative (-) ends are in the correct positions.
- Close the battery compartment cover.
INITIAL USE
After installing two AAA alkaline batteries, the clock will display time and date. Immediately the radio signal reception is initiated and the aerial flashes. After 4 to 8 minutes, a full aerial tower shows that the MFJ-122 has successfully received the time signal and automatically set the time and date. Radio signal reception and time calibration is automatically initiated everyday at 3:00AM.
If the signal is too weak and the clock cannot receive the proper time information, reception will be terminated after 8 minutes and the aerial tower will disappear. After an unsuccessful attempt to receive the signal, the MFJ-122 will automatically attempt to acquire the signal at 4:00AM, 5:00AM, and 6:00AM. If the MFJ-122 fails to receive the radio signal, place the MFJ-122 near a window or rotate the clock in 45-degree steps. To enhance radio signal reception place your clock where minimum electrical disturbance or shielding effects are expected. Try to avoid positioning very close to TV sets or computers. The best reception time is at night when interference sources are lowest. After positioning the MFJ-122, press the MANUAL RECEIVE button once. The radio signal reception will be initiated again. Then if for any reason, your clock still has not acquired the time signal, set the time manually.
SELECTING THE TIME ZONE
Select your time zone by pressing the ZONE key. This can be done during signal reception, or after the signal has been received. There are four TIME ZONE options: Pacific, Mountain, Central, and Eastern.
SETTING THE TIME & DATE MANUALLY
- Hold down SET button until the LCD display changes.
- Press the + button or – button to toggle between 12 or 24 hour format.
- Press SET once. The YEAR digits will begin to flash.
- Press the + button or – button to adjust to the correct year.
- Press SET again. The MONTH digits will begin to flash.
- Press the + button or – button to adjust to the correct month.
- Press SET again. The DATE digits will begin to flash.
- Press the + button or – button to adjust to the correct date.
- Press SET again. The DAY of week segments will begin to flash.
- Press the + button or – button to adjust to the correct day of the week.
- Press SET again. The HOUR digits will begin to flash.
- Press the + button or – button to adjust to the correct hour.
- Press SET again. The MINUTES digits will begin to flash.
- Press the + button or – button to adjust to the correct minute.
- Press SET again. The SECONDS digits will begin to flash.
- Press the + button or – button to adjust to the correct second.
- Press SET to return to normal time display.
- Holding down the + button or – button changes the digits at high speed.
SETTING THE ALARM
- Press the ALARM button to enter Alarm 1 mode. A bell with the label 1 will begin to flash on the LCD.
- Hold the SET button until the HOUR digits begin to flash.
- Press + button or – button to adjust the Alarm 1 HOUR digits.
- Press the SET button and the MINUTE digits will begin to flash.
- Press + button or – button to adjust the Alarm 1 MINUTE digits.
- Press the SET button again to return the Alarm 1 mode.
- Press the ALARM button to enter Alarm 2 mode. A bell with the label 2 will begin to flash on the LCD.
- Hold the SET button until the HOUR digits begin to flash.
- Press + button or – button to adjust the Alarm 2 HOUR digits.
- Press the SET button and the MINUTE digits will begin to flash.
- Press + button or – button to adjust the Alarm 2 MINUTE digits.
- Press the SET button again to return the Alarm 2 mode.
- Press the ALARM button to return to normal time display
TURNING THE ALARM ON & OFF
- Press ALARM button to enter Alarm 1 mode
- Press + button to toggle Alarm 1 ON or OFF.
- Press ALARM button again to enter Alarm 2 mode
- Press + button to toggle Alarm 2 ON or OFF.
- Both alarms can be set ON at the same time.
- When the alarm sounds, press ALARM button to stop sounding.
5-MINUTE ID TIMER (SNOOZE)
- When the alarm sounds, press the SNOOZE / LIGHT button.
- The alarm will stop sounding and the alarm bell on the LCD will flash.
- Five minutes after the SNOOZE / LIGHT button is pressed, the alarm will sound again.
- This process will repeat until the ALARM button is pressed to disable alarm.
- If both alarms are ON and the time difference is less than 5 minutes, the timer for the first alarm will be turned off and the timer for the second alarm will be turned on.
BACKLIGHT
Press SNOOZE/LIGHT button to illuminate the LCD display.
DAY LIGHT SAVINGS TIME
Adjustment to daylight savings time will be done automatically in accordance with the time signal information. This feature cannot be disabled.
Documents / ResourcesDownload manual
Here you can download full pdf version of manual, it may contain additional safety instructions, warranty information, FCC rules, etc.
Advertisement


Need help?
Do you have a question about the 122 and is the answer not in the manual?
Questions and answers