Shorai BMS01 - Battery Management System Manual
- User manual (2 pages) ,
- User manual (2 pages) ,
- User manual (2 pages)
Advertisement
LFX BATTERY CAUTIONS
- Do not short battery terminals together!
- Remove all jewelry (ring, bracelet, necklace, watch, etc.) before working near batteries or chargers
- Do not short the 5-pin BMS port
- Attach ONLY Shorai Chargers to the BMS port
- Do not open or allow damage to the battery case
- Keep batteries away from pets and children
- Do not allow LFX discharge below 13.0V rating
- Fully discharge LFX battery before disposal/recycle (connect a 12V bulb until light is out, for example)
DEVICE CAUTIONS
- BMS01 are for charging and storage of Shorai LFX Lithium LiFePO4 batteries ONLY.
- Connect BMS01 AC Input plug to 100V~250V 50/60Hz single-phase AC wall socket, only.
- Never allow the charger to become wet. Keep out of snow, rain, and highly humid environments
- Chargers damaged by impact, moisture, or any other causeust NOT be used
- Use the built-in retractable hook to hang BMS01 off the floor whenever possible
- Keep 5' (1.5M) minimum clearance from flammables around battery or vehicle during charge or store mode
- Keep charge output cable connectors clean and dry. Apply an anti-corrosion electrical grease if in salty, humid, or wet environments
- Replace charge output cables after 1000 connect cycles
- BMS01 has 6V and 12V Output Ports. Only one type (12V OR 6V) may be used at a time. Again, only ONE output port can be cabled at any time.
DEVICE BOX CONTENTS
- Shorai BMS01 with Charge & Store modes
- AC input cord (US, EU, or UK version per sales location)
- Battery Charge Cable for 12V LFX, with weather cover
- Charge Extension Cable for 12V LFX
- This User's Guide
SETUP
Remove the BMS01 charger, AC Input cord, and the four charge cables from the packaging, and attach the AC Input power cord to the AC port shown below.

Note that the small 3-pin port to right of the AC Input is reserved for factory diagnostics, and should never be used, modified, or have anything attached to it.
The BMS01 is supplied with a set of cables for 12V LFX batteries. Each set has a long cable and a shorter cable.
The longer cable can be permanently attached to the battery via its 5-pin connector (which is labeled "to battery"), and tied off at a convenient location on the vehicle, where it is protected from water and damage. The opposite end of the cable can be plugged directly into the BMS01 charger output port, if it is long enough to reach. If extension is required, the shorter cable in the set can be used for that purpose. The 12V/6V charge ports are shown below.

At this point you should have the battery charge cable connected to the battery BMS port, and the AC input cord connected to the charger. Now insert the AC plug into an appropriate AC wall socket. Whenever possible, use the charger's retractable hook to hang the BMS01 above the floor, in a location which allows easy access to the battery charge cable. Now plug the battery charge cable into the correct LFX charge output port (or into the extensit cable).

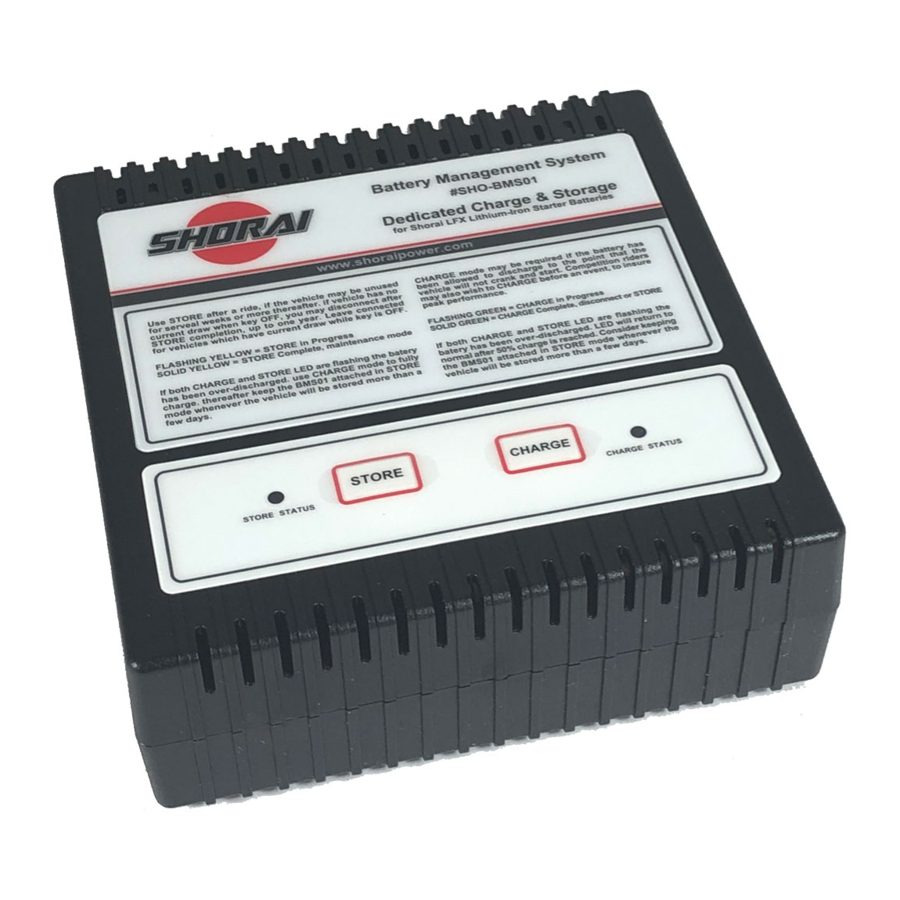
The charger will "beep" once when the LFX battery is connected to the charge cable, and you should see both the yellow Store and green Charge LED on solid, indicating that the charger is ready.

This photo shows the two operation buttons, and their corresponding LED indicators.
Store Mode
The BMS01 Store Mode is optimized to maintain Shorai LFX batteries for best lifespan and performance. Once Store Mode has been started, the BMS01 can remain attached to the LFX battery and wall power indefinitely, until the vehicle is to be used again. When Store Mode is activated, the BMS01 will either charge or discharge the LFX battery until an approximate 80% charged state is reached. At that point the BMS01 will monitor capacity, and when ~60% state is reached will recharge to ~80% level, and so on. This range is ideal for lithium-iron storage. LFX crank vehicles strongly even if below 60% capacity state, so you may disconnect the vehicle from Store Mode and crank immediately, whenever desired. But you may also choose to use Charge Mode for an hour or so after storage, just before first ride. That will insure a full charge and balance to start the season.
Charge Mode
The BMS01 charge mode charges at 2A peak rate, while balancing the internal LFX cells and performing battery diagnostics. Charge completion will typically occur within 30 minutes to 4 hours, depending on the size and state of the battery at charge start. When the Green LED is solid ON, charging is complete. Push the CHARGE button to stop charge mode, then disconnect the charter from the battery charge cable.
Specifications
| Charge Current/ Wattage | 2A peak / 30W max |
| Charge Type & Voltage | CC/CV, 14.4V terminal |
| Indicators | 1x Yellow & 1x Green LED, Buzzer |
| Input Voltage | 100V~250V, 50/60Hz, single phase AC |
| Weight (w/o cables) | 720g (1.58 lbs.) |
| Dimensions L x W x H | 11.4 x 11.4 x 3.8cm *4.5 x 4.5 x 1.5") |
LED Indication
| Status | LED Indicator | STORE LED | CHARGE LED |
| Ready Mode1 | Both Solid |  |  |
| Charge Active2 | Flashing Green |  |  |
| Charge Complete | Solid Green | | |
| Store Active | Flashing Yellow |  | |
| Store Maintain | Solid Yellow | | |
| Error Condition | Flashing Together | | |
1 When the AC power cord is first plugged to AC power, each LED will stay on solid, to indicate charger READY.
2 When the LFX battery is above 25% discharged state at START of CHARGE, only the Green LED will flash. However, if the LFX is at below 25% capacity at charge start, the yellow and green LED will flash alternately, until 50%+ capacity state has been reached (then returns to flashing green only). This warns you that the battery has been allowed to drop low in voltage, and that you may need to charge or ride more often, or use Store Mode while parked long term.
3 Errors are indicated by a flash/pause sequence of both LED together. An alarm buzzer may also sound until error is corrected or power off:
- 1 flash/pause = Internal input voltage error. Check that AC power is in range and properly connected. Try another outlet. Contact Shorai.
- 2 flashes/pause = Polarity error. Not typical. Contact Shorai.
- 3 flashes/pause = Open Circuit. Charge cables not properly connected, broken, or worn. Inspect and/or try new cable set
- 4 flashes/pause = Battery/Cell voltage error. Cables not properly connected, broken, or worn, or battery damaged. Contact Shorai.

Documents / ResourcesDownload manual
Here you can download full pdf version of manual, it may contain additional safety instructions, warranty information, FCC rules, etc.
Advertisement


Need help?
Do you have a question about the BMS01 and is the answer not in the manual?
Questions and answers