Advertisement
Quick Links
Advertisement

Summary of Contents for TUYA PC311-Z-TY
- Page 1 Smart Life App PC311-Z-TY Single-Phase Power Clamp Quick Start Guide...
-
Page 2: Technical Specifications
Technical Specifications Wireless Connectivity ZigBee • 3.0 • Operating frequency: 2.4GHz RF Characteristics • Internal antenna Physical Specifications Operating Voltage • 90~250 Vac 50/60 Hz • ≤ 100W ( Within ±2W ) Calibrated Metering Accuracy • >100W ( Within ±2% ) Reporting Cycle •... -
Page 3: Get To Know Your Device
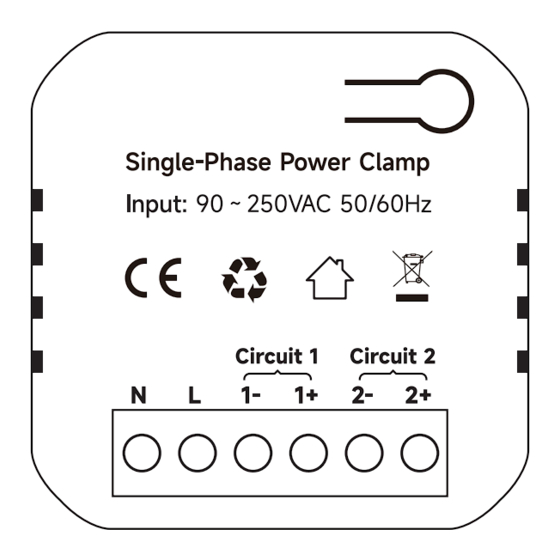
Get to know your device CT: Current Transformer LED indicator Reset Button AC cable The terminal corresponds to the color of the connected wire N: Connect to Black wire of AC cable L: Connect to Red wire of AC cable 1-: Connect to Black wire of CT1 1+: Connect to White wire of CT1 2-: Connect to Black wire of CT2... - Page 4 Mounting bracket Reset Button • Reset. Press and hold the reset button for 5 seconds until the LED indicator flashes Red 3 times quikly to clear network information (energy data will not be cleared). After that, the LED indicator will blink Red and wait for joining ZigBee network.
- Page 5 Get started: Please make sure the main main breaker is off before installing! 1. Open the clamp to see the arrow (P1→P2) or (K→L) or you can find it on the sticker on the outside of the clamp. This is the direction of CT.
- Page 6 •To measure energy consumption The arrow on the clamp should face to the correct direction of the electricity current flows like CT1 in the wiring diagram. In this case, the power will be positive, and the energy consumption will be accumulated.
- Page 7 •To measure energy generation The arrow on the clamp should face to inverter like CT2 in the wiring diagram. In this case, the direction of the current is opposite to that of the CT . The power will be negative, and the energy generation will be accumulated.
- Page 8 •To measure 'From Grid' or 'To Grid' To monitor how much energy is pulling from and sending back from the grid, install the CT on the leads coming from your mains like the CT1 below. Note: When installing, please ensure that the circuit measured by CT is in the same phase as the circuit powered by PC311 .
- Page 9 Mounting The Power Clamp has a mounting bracket for mounting purposes. You can choose the following two mounting methods : • Use the mounting bracket as template to mark the two holes on the wall for installing screws. Screw the mounting bracket onto the wall according to marked location.
-
Page 10: Configure Network
Configure Network Download App Please download the application: Smart Life from App Store or App Market. Also you can scan below QR code to download and install. 1. Open Smart Life app and click the 'Scan' button in the upper right corner of the App Home page.
Need help?
Do you have a question about the PC311-Z-TY and is the answer not in the manual?
Questions and answers