Table of Contents
Advertisement
Quick Links
Advertisement
Table of Contents

Summary of Contents for Returnstar Interactive Tech IQConference CV800
- Page 1 IQConference PTZ Camera CV800 User Manual...
-
Page 2: Attentions
Attentions Please read this manual carefully before installation and use. 1.How to use In order to prevent this product or products connected to it from being damaged, please use it within the specified range. 1)Keep the device from rain or moisture; 2)To prevent electric shock, do not open the main case;... - Page 3 Therefore, user should take corresponding measures.
-
Page 4: Table Of Contents
Content ATTENTIONS........................... 1 1. FAST INSTALLATION........................5 1.1 Camera Interface Explanation......................5 1.2 Power on Initial Configuration......................5 1.3 Video Output............................5 2. PRODUCT OVERVIEW......................9 2.1 Product Introduction........................9 2.1.1 Dimension..........................9 2.1.2 Accessory..........................9 2.2 Main Features..........................10 2.3 Technical specification........................11 2.4 Interface Instruction........................12 2.4.1 External Interface........................ - Page 5 4.2.6 Network configuration......................33 4.2.7 System configuration......................33 4.2.8 Logout.............................34 4.2.9 Wireless network........................34 5. SERIAL COMMUNICATION CONTROL................36 5.1 Visca Protocol List.........................36 5.1.1 Camera return command......................36 5.1.2 Camera control command.......................36 5.1.3 Inquiry command........................39 5.2 Pelco-D Protocol Command List....................40 5.3 Pelco-P Protocol Command List....................41 6.
-
Page 6: Fast Installation
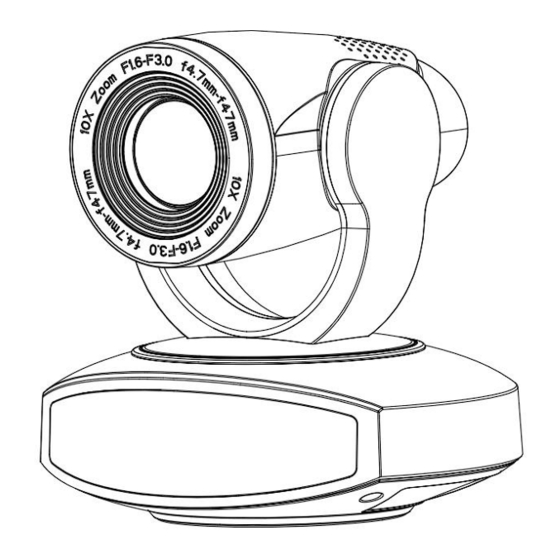
1. Fast Installation 1.1 Camera Interface Explanation Figure 1.1 Interface Interface: 1. Camera Lens 4、Locating Hole 7、USB3.0 Interface 2、Remote Controller Receiver Light 5、RS232 Control Interface (input) 8、DC12V Input Power Supply Socket 3、Tripod Screw Hole 6、LAN Interface 1.2 Power on initial configuration 1) Power on: Connect DC12V power supply adapter with power supply socket. - Page 7 a. Network Cable Connection Port: No. 6 in Figure1.1. b. Web page Login: Open your browser and enter 192.168.5.163 in the address bar (factory default); press Enter to enter into the login page; click on the “player is not installed, please download and install!" and follow the installation steps for installation.
- Page 8 2. Upside down mount step...
-
Page 10: Product Overview
2. Product Overview 2.1 Product Introduction 2.1.1 Dimension Figure 2.1 Camera dimension 2.1.2 Accessory Model NO. Configuration CV800 Power adapter *1 pcs RS232 cable *1 pcs Accessory Standard USB3.0 cable *1 pcs User manual *1pcs... -
Page 11: Main Features
Double-side glue shim Warranty card *1 pcs IR Remote controller *1 pcs Wireless controller *1 pcs Optional Wall mounting bracket (optional) Upside-down mounting bracket (optional) 2.2 Main Features IQConference PTZ camera offers perfect functions, superior performance and rich interfaces, which includes advanced ISP processing algorithms to provide vivid images with a strong sense of depth, high resolution and fantastic color rendition. -
Page 12: Technical Specification
2.3 Technical specification Model CV800 Camera Parameter Optical Zoom 10X,f=4.7~47mm Sensor 1/2.8 inch high quality HD CMOS sensor 16: 9 2.07 megapixel CV800 interface video format Effective Pixels CV800:1920X1080P60/50/30/25;1280X720P60/50/30/25;960X54 Video Format 0P30;640X360P30;640X480P30;352X288P30;960X540P View Angle 6.43°(tele)--64.2°(wide) Digital Zoom Minimum 0.5Lux (F1.8,AGC ON) Illumination 2D &... -
Page 13: Interface Instruction
HD IP Interface 100M IP port(100BASE-TX) Network Protocol RTSP/RTMP,ONVIF,GBT28181; Support Visca control protocol; Distance update,Distance restart,Distance reset Control Interface RS232 Control protocol VISCA/Pelco-D/Pelco-P;Boad Rate:115200/9600/4800/2400 Power Interface HEC3800 outlet (DC12V) Supply Adapter AC110V-AC220V to DC12V/1.5A Input Voltage DC12V±10% Input Current 1A(Max) Consumption 12W (Max) PTZ Parameter... -
Page 14: Rs-232 Interface
Figure 2.2 external interface diagram 2.4.2 RS-232 Interface 1) RS-232C interface specification as shown below Computer or keyboard and camera connection method WindowsDB-9 Camera 1.DTR 1.DCD 2.DSR 2.RXD 3.TXD 3.TXD 4.GND 4.DTR 5.RXD 5.GND 6.GND 6.DSR 7.IR OUT 7.RTS 8.NC 8.CTS 9.RI 2) RS-232 Mini-DIN 8-pin Port Definition... - Page 15 Port Definition Data Terminal Ready Data Set Ready Transmit Data System Ground Receive Data System Ground IR Commander Signal IR OUT No Connection 3) RS232 (DB9) Port Definition Definition Port Data Carrier Detect Receive Data Transmit Data Data Terminal Ready System Ground Data Set Ready Request to Send...
-
Page 16: Application Instruction
3. Application Instruction 3.1 Video Output 3.1.1 Power-On Initial Configuration Connecting the power, camera will have initial configuration, R indicator light will be flashing. When the camera return to the HOME position (middle position for P/T),and lens finish zoom in/out, the auto-testing is finished. IR led will also stop flashing. -
Page 17: Remote Controller
3.2 Remote Controller 3.2.1 Keys Instruction 1. Standby Key After 3S long press, the camera will step into standby mode. Long press 3S again, the camera will self-test again and back to HOME position. (Note: If power-on mode is turned on and Preset 0 is set, and there is no operation within 12s, it will automatically point to the specified preset position. -
Page 18: Applications
17)【#】+【#】+【9】:Switch the video format to 720P25 3.2.2 Applications Finishing initialization, it can receive and execute the IR commands. Press the remote controller button, the indicator light is flashing; release the button, the indicator light stops flashing. Users can control the pan/tilt/zoom, setting and running preset positions via the IR remote controller. -
Page 19: Menu Setting
5) BLC Setting BLC ON / OFF: support 6) Presets Setting, Running, Clearing 1. Preset setting: to set a preset position, the users should press the “【SET PRESET】” key first and then press the number key 0-9 to set a relative preset, Note: 10 preset positions in total are available by remote controller. -
Page 20: System Setting
MENU =============== Language English (Setup) (Camera) (P/T/Z) (Video Format) (Version) (Restore Default) [↑↓]Select [← →]Change Value [Menu]Back [Home]OK LANGUAGE: Language setting, Chinese / English SETUP: System setting CAMERA OPTION: Camera setting PTZ OPTION: Pan tilt setting VERSON: camera version setting Restore Default: Reset setting [↑↓] Select: for selecting menu [←... -
Page 21: Camera Setting
3.3.3 Camera Setting Move the pointer to the (CAMERA) in the Main Menu, click the 【 HOME】 key and enter the (CAMERA) as follow, CAMERA =============== (Exposure) (Color) (Image) (Focus) (Noise Reduction) Style Default [↑↓]Select [← →]Change Value Back EXPOSURE: Enter into Exposure setting COLOR: Enter into color setting Image: Enter into image setting Focus: Enter into focus setting... - Page 22 Gain Limit: 0~15(only available in Auto/ Iris priority /Brightness priority mode) WDR: Off,1~8 Shutter Priority:1/25,1/30,1/50,1/60,1/90,1/100,1/120,1/180,1/250,1/350,1/500,1/1000,1/2000,1/3000,1/4000,1/6000,1/10 000(only available in Manual and Shutter priority mode) IRIS Priority:OFF,F11.0,F9.6,F8.0,F6.8,F5.6,F4.8,F4.0,F3.4,F2.8,F2.4,F2.0,F1.8(only available in Manual and Iris priority mode) Brightness: 0~23 (only available in Brightness priority mode) 2) COLOR SETTING Move the pointer to the (COLOR) in the Main Menu, click the【HOME】and enter the (COLOR SET) as follow, COLOR...
- Page 23 IMAGE =============== Brightness Contrast Sharpness Flip-H Flip-V B&W-Mode Color Gamma Default DZoom Close [↑↓]Select [← →]Change Value Menu back Brightness: 0~14 Contrast: 0~14 Sharpness: 0~15 Flip-H: On/Off Flip-V: On/Off B&W Mode: color, black/white Gamma: default, 0.45, 0.50, 0.55, 0.63 DZoom: digital zoom options: On/Off DCI: Dynamic Contrast: Off,1~8 4) FOCUS Move the pointer to the (FOCUS) in the Menu, click the【HOME】and enter the (FOCUS) as follow,...
-
Page 24: P/T/Z
NOISE REDUCTION ================ NR-2D NR-3D Dynamic Hot Pixel [↑↓]Select [← →]Change Value [Menu]Back 2D Noise Reduction: Auto, close, 1~7 3D Noise Reduction: Close, 1~8 Dynamic Hot Pixel: Close, 1~5 3.3.4 P/T/Z Move the pointer to the (P/T/Z) in the Main Menu, click the【HOME】and enter the (P/T/Z) as follow, P/T/Z ===============... -
Page 25: Version
VIDEO FORMAT =============== 1080P60 1080P50 1080I60 1080I50 1080P30 1080P25 720P60 720P50 720P30 720P25 1080P59.94 1080I59.94 1080P29.97 720P59.94 720P29.97 [↑↓]Select [Menu]Back [Home]OK Note: 1. S: 1080P60 Downward Compatibility; M: 1080P30 Downward Compatibility 2. Exit menu after modifying parameter to save it after powered off 3.3.6 Version Move the pointer to the (VERSION) in the Main Menu, click the【HOME】and enter the (VERSION) as follow, VERSION... - Page 26 RESTORE DEFAULT ================= Restore Default? [↑↓]Select [← →]Change Value [Menu]Back [Home]OK Restore default: options: yes/no; after restoring default, the video format won’t be restored. Note: If the address of former remoter is not 1 but another one from 2,3,4,the corresponding camera address will restore to 1 when all parameters or system parameters are restored.
-
Page 27: Network Connection
4. Network Connection 4.1 Connecting Mode Direct connection: Connect the camera and computer by network connecting cable. Internet connection mode: Connect the camera to Internet by Router or Switch and user can log in the device by browser. Note: Please do not put the power and network cable in places where can be easily touched to prevent video quality lowered by unstable signal transmission due to poor contact of cables. - Page 28 Note: The IP address to be added cannot be same with that of other computers or devices. The existence of this IP address needs to be verified before adding. Click the “Start” and select “Operation” to input cmd as picture below to verify if the network segment has been successfully added.
- Page 29 Click “OK” and open the DOS command window, input ping 192.168.5.26 and press Enter key, it will show message as below: which means network segment adding is succeed. User can also to verify network connection as steps above mentioned after the finish of camera self-check. If IP is default, open DOS command window and input 192.168.5.163,then press Enter key.
-
Page 30: Ie Log In
4.2 IE Log In 4.2.1 Web client 1) Web client Log In Input the IP address 192.168.5.163 of the device in the address filed of browser and click Enter button to enter into Web Client login page as below picture. User can login as administrator and normal user. If login as administrator (Default User name/Password: admin), users can preview, playback, configuration and cancel in the Web Client;... -
Page 31: Playback
2) Login as normal user Default User name/password: user1 or user2 PTZ control can be carried out, zoom, focus, video capture, sound, zoom, full screen and set the preset position, un,and delete; you can preview, playback and log off. NOTE: There is no configuration right for normal user login. 4.2.3 Playback 1) Playback video files First,please record,snapshot and save the file when previewing. -
Page 32: Video Configuration
Input Audio volume: Set the volume of input volume (Default 2, 1~10 optional) Click “SAVE”,it will remind”Enable has changed. Restart the device to take effect after the success of the save.”,then please reboot the camera to make new setting effect. Note: CA540 do not have audio input port and without audio config option. - Page 33 BLC: Set back light compensation,valid when it is auto status (default is off). Anti-flicker: Set up anti-flicker mode,valid when status of automatic,aperture or brightness priority (default 50Hz,closed,60Hz optional). Gain limit: set the gain limits,auto,active when it is status of aperture or brightness priority(default 3, 0-15 optional).
-
Page 34: Network Configuration
Display subtitles: Check the box (after checking, USB video output is displayed on the screen caption content) Font color: Default white, black/ Yellow/red/blue optional Subtitle: Users can fill in their own Ticker: according to the user demand, down, left and right to move the display position of subtitles 4.2.6 Network configuration 1) Network port Data port: set the data port,the device will restart automatically after changed(default 3000,0-65535 optional). -
Page 35: Logout
2) System Time Date Format: Set the date format (YYYY-MM-DD default That year - month - day,MM-DD-YYYY namely Month - Day - Year,DD-MM-YYYY date - month - year Optional). Date separator: set the date separator (default '/','.','-' Optional). Time Zone: Set the time zone (default East eight districts,other time zones optional). Time Type: Set the time types (default 24 hours,optional 12 hours). - Page 36 Network interface enable: can check,to set the following items after checked. DHCP:can check,if check,it can obtain IP automatically. IP address:set wirelss WIFI IP(default 192.168.1.250,if checked DHCP,IP could assigned automatically) Note:wireless IP address can not be in the same segment with wired IP address. Subnet Mask: Set the wireless IP subnet mask (default255.255.255.0) Default Gateway: Set the wireless IP default gateway (default 192.168.1.1) SSID: The user can modify their own (the default test)
-
Page 37: Serial Communication Control
5. Serial Communication Control Under common working condition,the camera could be controlled through RS232/RS485 interface(VISCA),RS232C serial parameter are as follows: Baud rate: 2400/4800/9600/115200 bits / sec; Start bit: 1; data bits: 8; Stop bit: 1; Parity: None. After power on,the camera first go left,then back to the middle position.Self-test is finished after the zoom moved to the farthest and then back to the nearest position. - Page 38 Near (Variable) 8x 01 04 08 3p FF Direct 8x 01 04 48 0p 0q 0r 0s FF pqrs: Focus Position Auto Focus 8x 01 04 38 02 FF Manual Focus 8x 01 04 38 03 FF 8x 01 04 47 0p 0q 0r 0s pqrs: Zoom Position CAM _Zoom Focus Direct...
- Page 39 8x 01 04 21 02 FF Down 8x 01 04 21 03 FF Direct 8x 01 04 51 00 00 00 0p FF p: WDR Level Positon CAM_NR(2D) 8x 01 04 53 0p FF P=0-7 0:OFF CAM_NR(3D) 8x 01 04 54 0p FF P=0-8 0:OFF p = 0 –...
-
Page 40: Inquiry Command
Upleft 8x 01 06 01 VV WW 01 01 FF YYYY: Pan Position ZZZZ: Tilt Position Upright 8x 01 06 01 VV WW 02 01 FF DownLeft 8x 01 06 01 VV WW 01 02 FF DownRight 8x 01 06 01 VV WW 02 02 FF Stop 8x 01 06 01 VV WW 03 03 FF 8x 01 06 02 VV WW... -
Page 41: Pelco-D Protocol Command List
y0 50 03 FF p: Color Gain setting 0h (60%) to Eh CAM_ColorSaturationInq 8x 09 04 49 FF y0 50 00 00 00 0p FF (130%) CAM_IDInq 8x 09 04 22 FF y0 50 0p FF p: Gamma ID y0 50 02 FF IR_ReceiveInq 8x 09 06 08 FF y0 50 03 FF... -
Page 42: Pelco-P Protocol Command List
DownRight 0xFF Address 0x00 0x12 Pan Speed Tilt Speed Zoom In 0xFF Address 0x00 0x20 0x00 0x00 Zoom Out 0xFF Address 0x00 0x40 0x00 0x00 Focus Far 0xFF Address 0x00 0x80 0x00 0x00 Focus Near 0xFF Address 0x01 0x00 0x00 0x00 Set Preset 0xFF... - Page 43 Query Tilt Position 0xA0 Address 0x00 0x5B Value High Byte Value Low Byte 0xAF Response Query Zoom Position 0xA0 Address 0x00 0x55 0x00 0x00 0xAF Query Zoom Position 0xA0 Address 0x00 0x5D Value High Byte Value Low Byte 0xAF Response...
-
Page 44: Camera Maintenance And Troubleshooting
6. Camera Maintenance and Troubleshooting 6.1 Camera Maintenance 1)If camera is not used for long time,please turn off power adapter switch and AC plug. 2)Use soft cloth or tissue to clean the camera cover. 3)Use soft cloth to clean the lens; Use neuter cleanser if bad smeared. No use strong or corrosive cleanser or corrosive cleanser avoiding scuffing.
Need help?
Do you have a question about the IQConference CV800 and is the answer not in the manual?
Questions and answers