NK EmPower Oarlock - Measuring Instrument Quick Start Guide
- Quick start manual (2 pages)
Advertisement
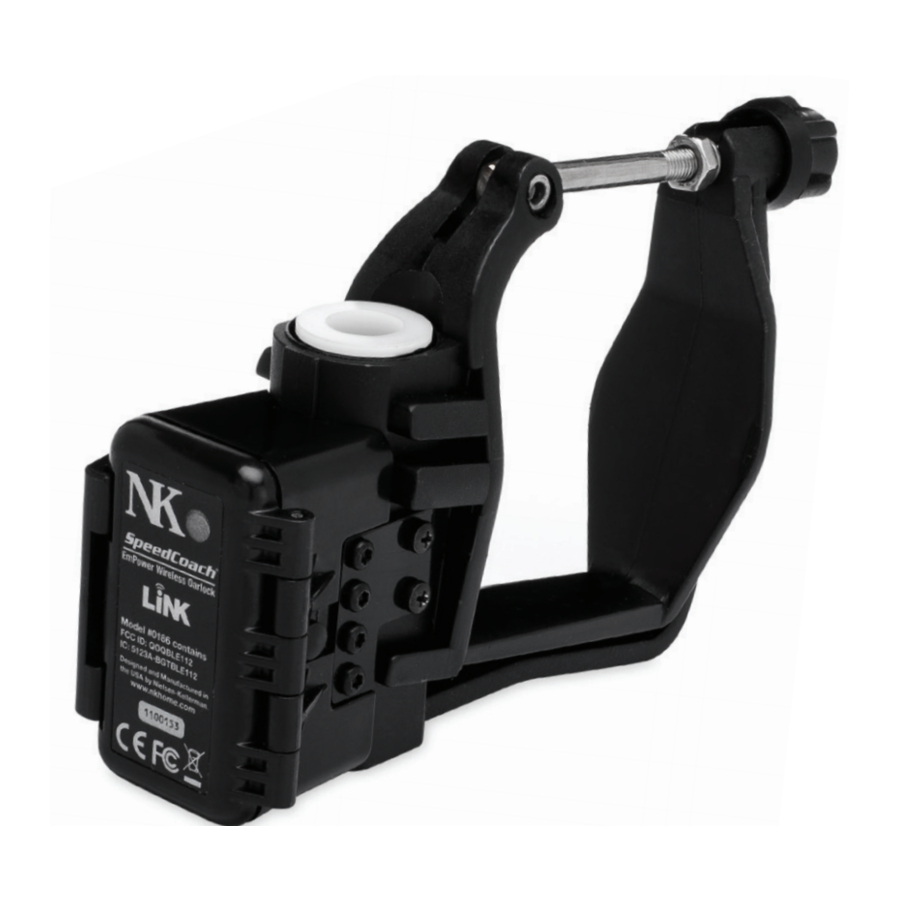
Congratulations on your new EmPower Oarlock!
You now own one of the most advanced athlete performance tools in rowing.
Please follow ALL of these instructions to properly Install, Pair, Configure, and Calibrate your Oarlock. Completing these steps should take under 15 minutes, and will ensure you get accurate measurements. You can find videos covering these steps at www.nkhome.com/empower-install.
LIGHT INDICATORS
Button on Oarlock is used to turn unit on (hold 1 sec)/off (hold 2 sec) or pair with a SpeedCoach (double tap).
| Slow blink green | not connected to a SpeedCoach |
| Fast blink green | in pairing mode |
| Solid green | connected to a SpeedCoach |
| Slow blink red | battery has less than 1 hour capacity |
| Fast blink red | battery is very low, oarlock is about to power down |
| Solid red | oarlock error; contact customer service |
CHANGING THE BATTERY

 Keep battery door shut when on the water. If water is introduced into the battery cavity, make sure it is dried out before next use.
IN THE BAG

Included in bag:
| EmPower Oarlock | 2x Bushings |
| Magnet Bar | Lithium AA Battery |
| 2.5mm Allen Wrench | Angle Calibration tool |
Also needed:
- SpeedCoach GPS 2 with Training Pack with firmware version 2.12 or higher (you can purchase a TP upgrade or download the free firmware update from our website).
- Standard rigging tools for your boat.
- Long straight edge or level optional but helpful.
INSTALLATION

Replace 10mm of washers from BELOW oarlock!

- Remove existing oarlock.
- Remove 10mm of spacers from below existing oarlock, and replace with magnet bar, sticker side up.
- Install bushings into top and bottom of EmPower Oarlock.
- Install EmPower Oarlock directly on top of Magnet Bar.
![]() NO washers between oarlock and magnet bar.
NO washers between oarlock and magnet bar. - Replace remaining washers and hardware. Tighten hardware.
![warning]() Oarlock must spin freely after tightening!
Oarlock must spin freely after tightening! - Align magnet bar parallel with center line of boat. A long straight edge helps ensure alignment (Fig a). Hold straight edge flush against magnet bar and adjust angle until it is perpendicular to centerline.
![]()
- Tighten both set screws in magnet bar with 2.5mm Allen wrench. Retain Allen wrench for future use!
![warning]() To adjust oarlock height, loosen magnet bar and adjust both oarlock and magnet bar together. Repeat magnet bar alignment process after adjusting.
To adjust oarlock height, loosen magnet bar and adjust both oarlock and magnet bar together. Repeat magnet bar alignment process after adjusting.

PAIRING
- On the SPC GPS, go to Setup -> Accessory Setup -> Oarlock Setup -> Connection -> Pair Oarlock.
- Double-press the button on the oarlock. The oarlock LED will blink green rapidly.
- The oarlock ID and angle measurement will be displayed once the oarlock is paired.
Note: Once a SPC is paired to an oarlock, they will automatically reconnect whenever both are in range and powered on. The SPC only remembers the most recently connected oarlock.

CONFIGURATION

Configuration of Boat ID and Seat Number helps identify which oarlock is paired with the SpeedCoach. Upon reconnection, the SPC will display this information.

Configuration of Oar Length, Inboard, and Side are required for accurate measurement of Force, Work, and Power.
Configuration of Force, Work, and Power by 2 determines whether set to YES for sculling with one oarlock to allow the force, work, and power values to be doubled. This allows the effective athlete output to be shown.
Configuration of Battery Type allows the oarlock to accurately determine low battery conditions.
These menu items will only be available if SPC GPS has an active connection with an oarlock!
- On the SPC GPS, go to Setup -> Accessory Setup -> Oarlock Setup
- Boat ID - Adjust the 5 character Boat ID using the up and down buttons to change the character, and the enter button to advance to the next character.
![]()
- Seat Number - Adjust from 1-8 using the up and down buttons, and the enter button to accept the value
- Side - Toggle the Side between "Port" and "Starboard" using the up and down buttons, and the enter button to accept the value.
- Oar Length - Adjust the Oar Length using the up and down buttons to change the value, and the enter button to accept the value.
- Inboard - Adjust the Inboard using the up and down buttons to change the value, and the enter button to accept the value.
- Multiply F, W, P by 2 - Adjust between "Yes" and "No" by using the up and down buttons, and the enter button to accept.
- Battery Type - Adjust between Lithium, NiMH, and Alkaline.

BATTERIES
We recommend rechargeable NiMH batteries such as Panasonic Eneloop and Eneloop Pro or Maha Powerex. Rechargeable AA's can be expected to provide 8-20 hours of operation depending on capacity, and multi-packs make it easy to have fresh batteries standing ready to use. For disposable batteries, we recommend Energizer Ultimate Lithium batteries, which will provide roughly double the run time of rechargeable batteries. We do NOT recommend the use of standard alkaline batteries. Particularly if they become damp when stored or installed, alkaline batteries are prone to leaking and the highly corrosive acid will destroy the EmPower Oarlock's electronics. Damage from leaking batteries is not covered under warranty.

BATTERY HAZARDS
Lithium is a toxic substance and ingestion may cause serious injury or death. Keep lithium batteries out of the reach of children. If swallowed, immediately seek medical help. Have doctor phone 24-hour hotline at (202) 625-3333, call collect if necessary. Dispose of batteries properly and according to local regulations. Do not puncture or burn batteries. If the battery compartment does not close securely, stop using the product and keep it away from children.
CALIBRATION
Calibration ensures accurate angular measurement by compensating for magnetic variations in each individual pin.
Setting the Zero Angle accounts for any misalignment in the magnet bar.
Setting the Zero Force accounts for any residual strain due to use or change in temperature.
| When to perform | |
| Pin Calibration | New Installation |
| Zero Angle | New installation Change in oarlock height After de-rig/re-rig Any possible shift in magnet position |
| Zero Force | New installation Every 1-2 weeks Change of +/- 20°F / °C |
These menu items will only be available if SPC GPS has an active connection with an oarlock!
Pin Calibration
- Your order includes a Calibration tool. Fit this tool to the magnet bar on the stern side.
Make sure to press tool snug against magnet bar. - On the SPC GPS, go to Setup -> Accessory Setup -> Oarlock Setup -> Pin Calibration.
- Follow instructions on SPC GPS for calibrating pegs A and B.
- Remove the Angle Calibration tool, flip it over to the C&D side, and fit it into the magnet bar.
- Follow instructions on SPC GPS for calibrating pegs C and D.
- Remove the Angle Calibration Tool.
- Follow instructions for rotating oarlock as shown.

![]()


 DO NOT THROW AWAY THE ANGLE CALIBRATION TOOL.
This tool will be needed each time you move the oarlock to a new rigger or boat, or wish to check your angle calibration. Replacement tools can be purchased on our website.

Set Zero Angle
- On the SPC GPS, go to Setup -> Accessory Setup -> Oarlock Setup -> Set Zero Angle
- Align oarlock parallel with the boat (Fig a). A long straight edge or level can help with visual alignment. Hold the straight edge flush against back face of oarlock and adjust its angle until it is perpendicular to the boat.
- Press enter button to zero any angular offset.
Set Zero Force
- On the SPC GPS, go to Setup -> Accessory Setup -> Oarlock Setup -> Set Zero Force
- With no oar in the oarlock or other pressure applied, press enter to zero any force offset.
SPECIFICATIONS
| Rowing style | Sweep | Sculling |
| Pin Diameters | 13mm (blue) 1/2" (white) 9/16" (black) | 13mm (blue) 1/2" (black) 7/16" (white) |
| Weight | .63lbs (288g) including magnet bar (std oarlock is 0.22lbs/100g) | .55lbs (251g) including magnet bar (std oarlock is 0.17lbs/80g) |
| Dimensions | 6.5"x4"x1.75" (16.51cmx10.16cmx4.445cm) | 6"x3.5"x1.75" (15.24cmx8.89cmx4.445cm) |
US Toll-Free 800-784-4221 | Int'l Phone +1 610-447-1555 Email support@nkhome.com | www.NKhome.com


Documents / Resources
References
Download manual
Here you can download full pdf version of manual, it may contain additional safety instructions, warranty information, FCC rules, etc.
Download NK EmPower Oarlock - Measuring Instrument Quick Start Guide
Advertisement

Need help?
Do you have a question about the EmPower Oarlock and is the answer not in the manual?
Questions and answers