
Related Manuals for Struers CitoVac

Summary of Contents for Struers CitoVac
- Page 1 Manual No.: 15927025-01 Revision A CitoVac Date of Release: 2023.01.12 Instruction Manual...
-
Page 2: Table Of Contents
CitoVac Instruction Manual Table of Contents Page Intended use .............. 3 Safety Precaution Sheet ..........5 User’s Guide .............. 8 Reference Guide ............34 Appendix Pre-Installation Checklist .......... 45 Contents of the Declaration of Conformity ....50... -
Page 3: Intended Use
For professional materialographic impregnating or gluing of materials for further materialographic inspection. Only to be operated by skilled/trained personnel. The machine is designed only to be used with Struers consumables specially designed for this purpose and this type of machine. Do NOT use the machine for: Impregnating or gluing of materials other than solid materials suitable for materialographic studies. - Page 4 The manual may mention accessories or parts not included in the present version of the equipment. The contents of this manual are the property of Struers. Reproduction of any part of this manual without the written permission of Struers is not allowed.
-
Page 5: Safety Precaution Sheet
The equipment is designed for use with consumables supplied by Struers. If subjected to misuse, improper installation, alteration, neglect, accident or improper repair, Struers will accept no responsibility for damage(s) to the user or the equipment. Dismantling of any part of the equipment, during, service or repair, should always be performed by a qualified technician (electromechanical, electronic, mechanical, pneumatic, etc.). - Page 6 CitoVac Instruction Manual Icons and typography Struers uses the following icons and typographical conventions. A list of the Safety Messages used in this manual can be found in the chapter on Cautionary Statements. Always consult the Instruction Manual for information on the potential hazards marked by the icons fixed to the machine.
- Page 7 CitoVac Instruction Manual General Messages NOTE: indicates a risk of damage to property, or the need to proceed with special care. HINT: indicates additional information and tips. Colour Inside Logo The 'colour inside' logo on the cover page of this Instruction Manual indicates that it contains colours which are considered to be useful for the correct understanding of its contents.
-
Page 8: User's Guide
Main Switch ................12 Supplying Power ................13 Connection to the Machine ............. 13 Connection to Compressed Air/ Vacuum ......... 14 CitoVac for External Vacuum Pump ........15 Noise ....................15 2. Operation ............16 Using the Controls ................16 Control Panel of CitoVac ............ - Page 9 CitoVac Instruction Manual 5. Transport and Storage ........32 Relocating CitoVac ................32 6. Disposal ............. 33...
-
Page 10: Getting Started
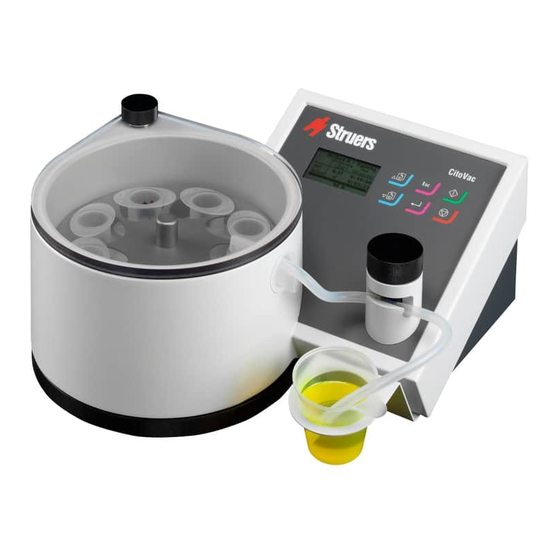
Instruction Manual 1. Getting Started Device Description CitoVac is a vacuum unit for impregnating of porous solid and stable (non-explosive) materials with Struers' impregnation (mounting) materials specially designed for vacuum impregnation. The level of vacuum and process time can be adjusted during the process. -
Page 11: Checking The Contents Of Packing
1 Dispensing tube 1 Clip for dispensing tube Placing CitoVac Place CitoVac on a safe and stable support table or work bench. The table must be able to carry at least 20 kg/45 lbs. − The table should have an adequate working height. -
Page 12: Getting Acquainted With Citovac
Pivot joint of the lid Front Panel Vacuum valve Washer Dispensing tube Vacuum chamber Mixing cup holder Wheel for rotating mounting cups The main switch is located at the rear of CitoVac. Main Switch... -
Page 13: Supplying Power
Disconnection of the power supply may only be performed by a qualified technician (electromechanical, electronic, mechanical, pneumatic, etc.) CitoVac is shipped with 2 types of Mains cables: European plug The 2-pin (European Schuko) plug is for use on single-phase connections. -
Page 14: Connection To Compressed Air/ Vacuum
Mount the coupling on the vacuum hose and secure with a hose Air/ Vacuum nipple. Connect the vacuum hose to the rear of CitoVac. Mount the hose on the compressed air / vacuum supply. NOTE: Technical Data in the rear of the Instruction Manual for information on the maximum and minimum levels. -
Page 15: Citovac For External Vacuum Pump
CitoVac Instruction Manual CitoVac for External Vacuum CitoVac models for use with an external vacuum pump can be Pump connected to the vacuum pump using a Cooli-1 Control Unit. Accessory Connect the CitoVac and the Cooli-1 Control Unit using the communication cable supplied. -
Page 16: Operation
Starts the vacuum process. Stops the vacuum process: START STOP Press once to pause the process, press twice to stop the process. The Main switch is located at the rear of CitoVac. Main switch... -
Page 17: Software Settings
CitoVac Instruction Manual Software Settings When CitoVac is initially powered up, using the mains switch, the following two screens will be displayed: Initial Start Up Screen HINT The sample screens in this Instruction Manual show a number of possible texts. The actual display screen may differ from the samples in the Manual. -
Page 18: Using Software Menus
Units Units can be set to Bar (default), kPa or PSI. Ambient Pressure CitoVac measures the difference in relative pressure and not the actual absolute pressure. The actual value of ambient pressure can be input for greater accuracy. This is particularly important when using Absolute Pressure mode (see below). -
Page 19: Options
CitoVac Instruction Manual Keep Vacuum CitoVac can be set to On to maintain vacuum after the process is complete or to Off to release the vacuum. The default is Off. Options Language The language can be set to English (default), German, French, Spanish or Italian. - Page 20 CitoVac Instruction Manual Select Options and then Language. Push ENTER to activate the Language pop-up. Select the required language and press ENTER activate. Press ESC to return to the MAIN MENU.
-
Page 21: Selecting A Method
CitoVac Instruction Manual Selecting a Method CitoVac has three built-in methods where the pressure/ vacuum and process time can easily be set and saved. From the MAIN MENU: Select Methods, then select one of the three programmed methods. The Vacuum and Process Time settings for each method will be shown. -
Page 22: Running A Process Without Cycles
CitoVac Instruction Manual Running a Process without From the METHODS menu: cycles Select the required method (A, B, or C) For running the process without cycles, select 0, close the lid and press Start . The screen will change to show the process view. -
Page 23: Running A Process With Cycles
CitoVac Instruction Manual Press start to resume or to stop the process: Press Stop again. Once the process is completed the screen will show - completed successfully. Running a Process Cycles are fluctuations from high to low vacuum. - Page 24 CitoVac Instruction Manual Once vacuum is obtained, the screen will show a tick mark and is ready to start the cycling process. To start the cycle process, press ENTER. While the cycles are running, the cycle number is shown as a count down and the arrow is spinning around.
-
Page 25: Preparing The Impregnation
Check that each of the cups will be directly under the nozzle of the dispensing tube by turning the rotating wheel. HINT Struers have a holder specially designed for Struers mounting cups. The mounting cup holder is delivered with a support for safe storage when not placed in the vacuum chamber. -
Page 26: Checking The Vacuum Chamber
CitoVac Instruction Manual Checking the CAUTION Vacuum Chamber Before operation, check that the lid is not cracked or has fissures, or it might implode when exposed to vacuum. Check that the washer is clean and undamaged. Put the nozzle of the dispensing tube through the opening in the vacuum chamber and press firmly into place. -
Page 27: Impregnation
Should some leaking occur, release the vacuum, reposition the lid and reapply vacuum. Impregnation For mounting, Struers manufactures a number of mounting cups that can be used without releasing agent. When the specimens have been under vacuum for an appro-... - Page 28 CitoVac Instruction Manual Turn the Holder with the mounting cups until one of the cups is directly under the dispensing tap. Slowly open the vacuum valve until the impregnation material runs into the cup with an appropriate flow.
-
Page 29: Gluing
pressing rod Place the lid with the pressing rod on CitoVac. Position the support ring underneath the holder so that it does not move when gluing. Apply a suitable amount of mounting material or epoxy to the specimen. -
Page 30: Maintenance
Check the vacuum to ensure there are no leaks. Should leaks occur, take the washer out and reposition. Clean thoroughly if CitoVac is not to be used for a longer period of time. Spare Parts For further information, or to check the availability of replacement parts, please contact your local Struers Service department. -
Page 31: Cautionary Statements
CitoVac Instruction Manual 4. Cautionary Statements List of Safety Messages in the Manual ELECTRICAL HAZARD Switch the power off when installing electrical equipment. The machine must be earthed (grounded). Check that the mains voltage corresponds to the voltage stated on the type plate on the side of the machine. - Page 32 Place the machine in the transport box and tape closed. NOTE: Package the machine securely before transportation. Insufficient packaging could cause damage to the machine and will void the warranty. Contact Struers Service for advice. Struers recommends that all original packaging and fittings are kept for future use.
- Page 33 CitoVac Instruction Manual 6. Disposal Equipment marked with a WEEE symbol contain electrical and electronic components and must not be disposed of as general waste. Please contact your local authorities for information on the correct method of disposal in accordance with national legislation.
-
Page 34: Reference Guide
4. Spare Parts and Diagrams ....... 38 Spare Parts ..................38 Diagrams ..................38 15923050, Block Diagram, CitoVac with ejector ..... 39 15923450, Wiring Diagram, CitoVac with ejector....40 15922000, Air diagram, CitoVac with ejector ......41 15922001, Air diagram, CitoVac without ejector ..... 42 5. -
Page 35: Accessories And Consumables
CitoVac Instruction Manual 1. Accessories and Consumables Please refer to the Struers Cold Mounting Accessories brochure CitoVac brochure for details of the range available. Additional Accessory Specification Cat. No. Cooli-1 Control Unit For controlling of external vacuum pump 05761116 four pole plug to connect the lead from the 2XM10221 pump to Cooli 1. -
Page 36: Trouble Shooting
Check the washer in the vacuum chamber. Check that the compressed air/ vacuum supply is functioning adequately, for example, that there are no bends or kinks in the hose. If the problem persists, contact a Struers Service Technician. -
Page 37: Service
Reset configuration: To reset configuration to factory settings Reset Methods: To reset Methods to factory settings NOTE: Servicing may only be performed by a Struers engineer or a qualified technician (electromechanical, electronic, mechanical, pneumatic, etc.). Contact Struers Service for information. -
Page 38: Spare Parts And Diagrams
To check the availability of replacement parts, please contact your local Struers Service department. Contact information is available on Struers.com. Diagrams Block Diagram, CitoVac with ejector ........15923050 Wiring Diagram, CitoVac with ejector ........15923450 Air diagram, CitoVac with ejector ........15922000 Air diagram, CitoVac without ejector ........15922001... -
Page 43: Legal And Regulatory
Pursuant to Part 15.21 of the FCC Rules, any changes or modifications to this product not expressly approved by Struers ApS could cause harmful radio interference and void the user’s authority to operate the equipment. -
Page 44: Technical Data
Current spikes (usually start-up and 0.039 A start of operation) Air supply Compressed air: 4.5 - 6 bar 58 - 87 psi CitoVac with Recommended Air quality: Class-3 as specified in ISO 8573-1 built-in ejector: Consumption of compressed air: 12.5 l/min 3.2 gallon/min Hose connection: ø1/4"... -
Page 45: Pre-Installation Checklist
(Please refer to the and the Struers Cold Mounting Accessories brochure CitoVac brochure for details of the range available.). CitoVac for external pump – an external vacuum pump is required (See Accessories on page for details). Crating Specifications 14 kg/ 31 lbs 51 cm / 20”... - Page 46 CitoVac, Pre-Installation Checklist Dimensions 38 cm / 15” Vacuum Chamber Inner diameter: ø200 mm/ 7,9” Inner height: 100 mm/ 4” Footprint 38 cm / 15” Page 2 of 5...
- Page 47 Unpacking Cut the packing tape on the top of the box. Remove the bag of loose parts. Carefully lift CitoVac from the box, supporting from underneath the machine. Lifting Weight: 9.5 Kg/ 21 lbs. Power Supply The machine shipped with 2 types of Mains cables (length 2.5 m/ 8.2').
- Page 48 ¼" dia. pressure hose x 3m, coupling and hose nipple. Hose connection: 5/16". Exhaust Required Option Not required. NOTE Impregnation materials such as epoxy may produce fumes. CitoVac should only be operated where ample ventilation is possible, e.g. in a fume cupboard. Page 4 of 5...
- Page 49 Other products (e.g. coolants) may contain aggressive solvents, which dissolve e.g. rubber seals. The warranty may not cover damaged machine parts (e.g. seals and tubes), where the damage can be directly related to the use of non-Struers consumables. Page 5 of 5...
-
Page 50: Contents Of The Declaration Of Conformity
Based on: 15927901 D Declaration of Conformity Manufacturer Struers ApS • Pederstrupvej 84 • DK-2750 Ballerup • Denmark Name CitoVac Model Function Vacuum impregnation unit Type Cat. no. 05926119, 05926219 Serial no. Module H, according to global approach We declare that the product mentioned is in conformity with the following legislation, directives and standards: 2006/42/EC EN ISO 12100:2010, EN 60204-1:2018,EN 60204-1-2018/Corr.:2020,... - Page 51 Pederstrupvej 84 DK-2750 Ballerup Denmark...
Need help?
Do you have a question about the CitoVac and is the answer not in the manual?
Questions and answers