Table of Contents
Advertisement
Advertisement
Table of Contents

Summary of Contents for Advwin T09D7
- Page 1 Motorized Treadmill T09D7...
-
Page 2: Warning And Safety Information
Warning & Safety Information 1. Ensure that you read the manual carefully before attempting to assemble or use Power Electric Treadmill. 2. The Power Electric Treadmill must be positioned on a firm flat surface. 3. The Power Electric Treadmill is designed for indoor use only. It is not to be used outdoors. 4. -
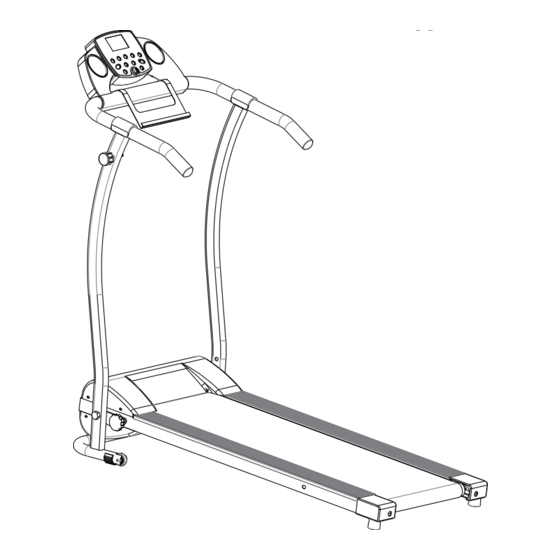
Page 3: Parts List
Parts List Control Panel Emergency Stop Magnet Shelf Spring Latch Hand Rail Column Running Belt Toe Cap Technical Specifications Product Name Motorized Treadmill Voltage Rate 220V Rated Frequency 50/60HZ Rated Power 1000W Maximum User Weight 120KG... - Page 4 Accessories Console Knob #5 Hex Key Red emergency stop magnet M6*40 Spring Knob Knob x1 M16*φ8*44 M12*50...
- Page 5 Assembly Instructions 1.Pick up the pole and use a nut to secure the treadmill frame. 2. Mount the handrail on frame leg and tighten screw with accompanying Allen key(found in the accompanying bag) . Insert the crystal head of the handrail into the right side of the column crystal hole ,and insert the decorative covers of the the handrail.
- Page 6 3. Mounting the control panel Align the control panel with the screw hole, screwing in place tightly by hand. 5. Put the Emergency Stop Magnet on the control panel. Perfect machine with finished assembly.
-
Page 7: Control Panel
Control Panel OPERATING THE COMPUTER Flip the Master Power Switch that is located at the front of the treadmill to the ON position. Before beginning a workout session ensure that the Safety Tether Key is properly placed onto the Computer Console and the Safety Clip is securely attached to an article of your clothing. -
Page 8: Function Buttons
FUNCTION BUTTONS: START: Press the START button to start training on different training mode. STOP: Press the STOP button to stop training on different training mode. PROG (PROGRAM): Press the PROG button to select the pre-set training program (P01-P12) mode before training. - Page 9 SPEED: Displays the current speed from the minimum 1.0 KPH to the maximum 10.0 KPH. You may increase or decrease the speed by pressing the SPEED + or SPEED - button on the computer console or handlebar. DISTANCE: Displays the accumulative distance travelled during workout. Press the START button on the computer to begin exercising, the LCD window will countdown 3 seconds with the LCD showing "3-2-1"...
- Page 10 To set DISTANCE press the MODE button on the computer console until you see the split window of DISTANCE begin blinking. Press the SPEED + or SPEED - button on the computer console to change the setting. The pre-set target distance range is from 0.50 to 99.5 kilometers, the default distance is 1 kilometer.
- Page 11 Unfolding/folding the machine 1.Unfolding the machine 2.Folding the machine...
-
Page 12: Maintenance
Maintenance 1. Before moving or cleaning your Power Electric Treadmill unplug it from the main power supply. 2. Always clean the Power Electric Treadmill with a damp cloth avoiding the control panel. DO NOT USE ROUGH CLEANING AGENTS. 3. Clean the power switch and control panel with a soft dry cloth. DO NOT USE A WET CLOTH IN THESE AREAS. - Page 13 LUBRICATION Lubricating under the running belt will ensure superior performance and extend its life expectancy. After the first 25 hours of use (or 2-3 months) apply some lubricant, and repeat for every following 50 hours of use (or 5-8 months). How to check running belt for proper lubrication Lift one side of the running belt and feel the top surface of the running deck.
- Page 14 CARE, MAINTENANCE & TROUBLESHOOTING GUIDE WARNING: To prevent electrical shock, please turn off and unplug the treadmill before cleaning or performing routine maintenance. WARNING: Always check the wear and tear components like spring knob and running belt to prevent injury. CLEANING After each exercise, ensure that the unit is wiped down and any sweat is removed from the unit.
-
Page 15: Warm Up And Cool Down Routine
WARM UP AND COOL DOWN ROUTINE The WARM-UP is an important part of any workout. The purpose of warming up is to prepare your body for exercise and to minimize injuries. Warm up for two to five minutes before aerobic exercising. It should begin every session to prepare your body for more strenuous exercise by heating up and stretching your muscles, increasing your circulation and pulse rate, and delivering more oxygen to your muscles. - Page 16 QUADRICEPS STRETCH With one hand against a wall for balance, reach behind you and pull your right foot up. Bring your heel as close to your buttocks as possible. Hold for 15 counts and repeat with left foot. INNER THIGH STRETCH Sit with the soles of your feet together and your knees pointing outward.
Need help?
Do you have a question about the T09D7 and is the answer not in the manual?
Questions and answers