
Summary of Contents for aquate 1350 Series
- Page 1 Installation and Operating Manual 1350 Series Aquate Pump Station www.aquate.co.nz Vers 3: March 2016...
-
Page 2: Table Of Contents
Foreward This installation manual is a guide only. All relevent Health and Safety laws and codes of construction must be adhered too and take precedence over any information in this manual. Installers must practice good professional practice and are required to understand all National and Local regulations in respect to the installation of drainage materials. - Page 3 Grinder Pump Range (Zenit Blue GR Range) ................. 25 10 Trouble Shooting Guide ......................... 27 11 Tips and advice ..........................30 12 Maintenance schedule ........................31 12.1 Six monthly ..........................31 12.2 Annually ..........................31 13 Guarantees ............................ 32 14 Aquate Commissioning Sheet......................33 Vers 3: March 2016...
-
Page 4: Product Records For The Homeowner
1 Product Records for the Homeowner This section is to be completed by the drainlayer or the homeowner upon installation of the pump station and kept in case the pump station requires maintenance in the future. Installer details This pump station was installed on the …………………………………..20……….. Company name: ………………………………………………... -
Page 5: Intended Use
2 Intended use The Aquate Pump Station is intended for conveying domestic wastewater or stormwater only. As with any pumping system, large objects will block the system and must be prevented from entering the system. A list of potentially damaging items are included below and further advice is detailed in the Tips and Advice Section. - Page 6 Pump (your system will have one of the following pumps – check your quote for details). Manufacturer: Zenit Type: Drainage DR Blue 75, Vortex DG Blue 75 Grinder GR Blue 100 or Grinder GR Blue 150 Connection: 230 V, 50 Hz Power: 0.55 kW, 0.55 kW, 0.74 kW, 1.1 kW Weight:...
-
Page 7: Holiday Mode (For Wastewater Pump Stations Only)
Basic information about safety-conscious work No work should be completed on the Aquate system other than by trained and approved personnel. If work is undertaken, a full health and safety review is to be completed by the relevant contractor /... - Page 8 workman. The aim of this is to identify all possible hazards and take measures to eliminate, isolate or minimise them. The following section summarises important safety information, however this should not be substituted for a full and thorough site evaluation using the company’s own safety procedures. Frequent risks when operating, checking and maintaining pumping stations are: ...
-
Page 9: Forbidden Modes Of Operation
There is a general ban on smoking in the vicinity of the pump stations (risk of explosion). 6.3.4 Risks from electricity Before entering any part of the pump station and making contact with the water or working on or near motorised equipment, make sure that the power to the relevant components are switched off and safely isolated using standard isolation procedures. -
Page 10: Lifting The Pump Chamber
Excavation and Backfilling All relevant National and Local Health and Safety regulation must be observed during the installation of an Aquate Pump Station. Procedure 1. The excavation must be at least 1.8m diameter wide to allow access around the tank for pipe connections and compacting equipment. -
Page 11: High Ground Water Conditions
1750mm Figure 3 – backfilling the excavation High ground water conditions For sites where the expected ground water table is higher than half way up the pump station. It is recommended that low strength concrete be poured around the base of unit such that it covers the flange at the base of the pump station. -
Page 12: Inlet And Outlet Connections
Inlet and Outlet Connections The inlet hole must be completed on site once the gravity line into the pump chamber has been laid and the minimum falls have been achieved. A hole needs to be drilled at the appropriate height, taking care to ensure it is between the ribs in the pump station. -
Page 13: Electrical Outlet
Electrical outlet 40mm Wallace Seal is provided with the unit to provide a simple reliable seal for the electrical cables. This is designed to fit 40mm electrical conduit. Simply drill the hole, fit the seal and push in the conduit. The standard hole required for a 40mm Wallace seal is 52 mm. -
Page 14: Pump Installation
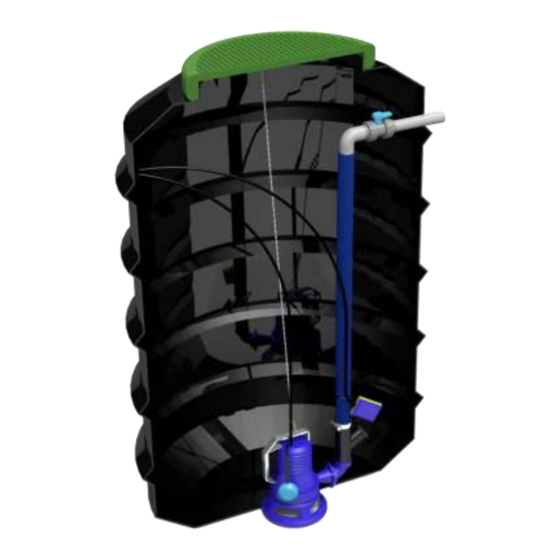
8 Pump Installation Safety WARNING: Never lift the pump using the electrical cable or float switch cable as this can damage the cables. Only use the rope provided. Do not allow the electric pump to be used by children or non-qualified persons. ... -
Page 15: Vortex Or Drainage Pump Models (Dg Or Dr Pumps)
Vortex or Drainage Pump Models (DG or DR pumps) Step 1 Open the lid of the pump chamber and unscrew the quick release union couple located 200mm below the lid. ‘ Remove the pipework below the coupler as shown in photo 1 Photo 1 Step 2 Unscrew the hex nipple form the barrel union as shown... - Page 16 Step 3 Remove the pump from the box and screw the hex nipple into the outlet as shown Photo 3 Step 4 Screw the barrel union into the hex nipple as shown Photo 4 Vers 3: March 2016...
- Page 17 Step 5 Secure the electrical cable to the pipework with the four cable ties supplied. Photo 5 Step 6 Tie the rope supplied to the handle of the pump Step 7 Lower the complete pump and pipework unit into the pump station (to a central position) WARNING: Never lift the pump using the electrical cable or float switch cable as this can damage the...
-
Page 18: Grinder Pump Models (Gr Pumps)
Grinder Pump Models (GR pumps) Step 1 Open the lid of the pump chamber and unscrew the quick release union couple located 200mm below the lid. ‘ Remove the pipework below the coupler as shown in photo 1. The elbow as shown in the photo will be supplied loose in the controller box. - Page 19 Step 3 Screw the hex nipple into the elbow as shown Photo 3 Step 4 Secure the electrical cable to the pipework with the four cable ties supplied. Photo 4 Vers 3: March 2016...
-
Page 20: Installation Notes
Step 5 Tie the rope supplied to the handle of the pump Step 6 Lower the complete pump and pipework unit into the pump station (to a central position) WARNING: Never lift the pump using the electrical cable or float switch cable as this can damage the cables. -
Page 21: Float Switch
With the joining foot (Figs. 4-5): Fix the joining foot to the bottom of the tank first, using expansion plugs. Install the delivery pipe with the relative non-return valve and gate valve. Engage two guide pipes on the joining foot, fixing them in the upper part using the spacer bracket provided by Zenit with the joining foot. - Page 22 High Level Float Switch The high level float switch comes pre-installed in the tank through an eye bolt at the top of the tank. The cable tie holding the float simply needs to be removed so the float switch can be gently lowered to the bottom of the tank.
-
Page 23: Controller Installation
9 Controller Installation Vortex or Drainage Pumps (Zenit Blue DR or DG range) Note Carefully The electrical duct for the float(s) and power cable must be at least 40mm diameter. This is to ensure the cables can be replaced if necessary and also to avoid potential damage to the cables during installation. - Page 24 Wiring Diagram Circuit Diagram S ta rt/Stop H ig h Leve l Phase supply Neutral supply Earth Supply Pump Phase Pump Neutral Pump Earth Start/Stop (NO) Start/Stop (NO) High Lvl (NO) High Lvl (NO) Vers 3: March 2016...
-
Page 25: Grinder Pump Range (Zenit Blue Gr Range)
Grinder Pump Range (Zenit Blue GR Range) Note Carefully The electrical duct for the float(s) and power cable must be at least 40mm diameter. This is to ensure the cables can be replaced if necessary and also to avoid potential damage to the cables during installation. - Page 26 Vers 3: March 2016...
-
Page 27: Trouble Shooting Guide
The full wiring diagram for the capacitor and the GRBlue grinder pump is shown below: 10 Trouble Shooting Guide Note: the following procedures should only be undertaken by suitably qualified personnel This guide is for the following Aquate Controller: Vers 3: March 2016... - Page 28 Symptom Possible Causes Correction Power light not illuminated Tripped circuit breaker or Have an electrician verify that the other interruption of power; pump is wired according to the improper voltage. installation instructions. Also check all wiring for proper connections and adequate capacity On/Off switch on the side of Turn switch to “On”...
- Page 29 per the wiring diagram below. Tripped circuit breaker in the Have an electrician verify that the house or other interruption pump is wired according to the of power; improper voltage. installation instructions. Also check all wiring for proper connections and adequate capacity Defective float switch...
-
Page 30: Tips And Advice
Pump is rotating in reverse. rotation is reversed, have an electrician interchange two of the power leads in the control panel. Impeller wear Consult Aquate additional troubleshooting and replacement parts. Low Voltage Have electrician check wiring for proper capacity and measure voltage while pump is in operation. -
Page 31: Maintenance Schedule
varnishes, phenols Fatty or oily substances, e.g. edible fat, deep- Deposit in the pipes, cause Put this in the waste bin fry fat plugging when cold Hygiene articles, e.g. cotton-wool balls, Clog the pipes, deposit and Waste bin sanitary towels, nappies, dressings, paper do not decompose, towels, cotton swabs, plaster, razor blades Block the pump... -
Page 32: Guarantees
Aquate assumes no liability for bodily harm, property damage or economic losses as a result of its pump stations. -
Page 33: Aquate Commissioning Sheet
14 Aquate Commissioning Sheet AQUATE PUMP STATION - COMMISSIONING SHEET Project: Address: Pump Station Details: Size: Pump Type: Date : Person Commissioning: Items to check Yes/No Comments 1 Tank Installation Sub- base laid and compacted Pump station installed on sub-base...
Need help?
Do you have a question about the 1350 Series and is the answer not in the manual?
Questions and answers