Table of Contents
Advertisement
Quick Links
Installation Guide
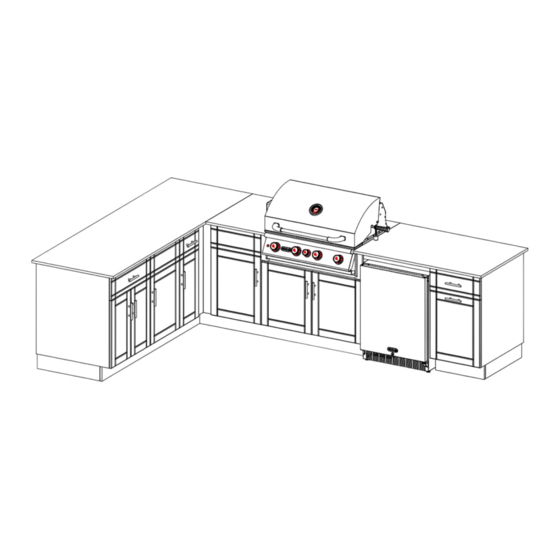
DuraBull 8ft. x 7ft. Left Return Savannah Kitchen
SKU # 15916 (Dune Base w/ Coffee Brown Granite)
SKU# 15917 (Symphony Blue Base w/ Galaxy White Granite)
SKU # 15918 (Charcoal Base w/ Midnight Black Granite)
DuraBull 8ft. x 7ft. Right Return Savannah Kitchen
SKU # 15919 (Dune Base w/ Coffee Brown Granite)
SKU# 15920 (Symphony Blue Base w/ Galaxy White Granite)
SKU # 15921 (Charcoal Base w/ Midnight Black Granite)
DuraBull 10ft. x 7ft. Left Return Augusta Kitchen
SKU # 15922 (Dune Base w/ Coffee Brown Granite)
SKU# 15923 (Symphony Blue Base w/ Galaxy White Granite)
SKU # 15924 (Charcoal Base w/ Midnight Black Granite)
DuraBull 10ft. x 7ft. Right Return Augusta Kitchen
SKU # 15925 (Dune Base w/ Coffee Brown Granite)
SKU# 15926 (Symphony Blue Base w/ Galaxy White Granite)
SKU # 15927 (Charcoal Base w/ Midnight Black Granite)
Advertisement
Table of Contents

Summary of Contents for DuraBull 15916
- Page 1 Installation Guide DuraBull 8ft. x 7ft. Left Return Savannah Kitchen SKU # 15916 (Dune Base w/ Coffee Brown Granite) SKU# 15917 (Symphony Blue Base w/ Galaxy White Granite) SKU # 15918 (Charcoal Base w/ Midnight Black Granite) DuraBull 8ft. x 7ft. Right Return Savannah Kitchen...
-
Page 2: Table Of Contents
TABLE OF CONTENTS Cabinetry Layouts for Savannah Kitchen........2 Cabinetry Layouts for Augusta Kitchen.........3 Parts List (8' Section of Savannah Kitchen)........4 Parts List (10' Section of Augusta Kitchen)........5 Parts List (7' Left Return)..............6 Parts List (7' Right Return)............7 Replacement Toe Kicks..............8 Tools Required................9 Prepping Cabinets................10 Installing Cabinet Legs..............11... -
Page 3: Cabinetry Layouts For Savannah Kitchen
15883 DuraBull 8ft. x 7ft. Left Return Savannah Kitchen 15870 15874 SKU # 15916 (Dune Base w/ Coffee Brown Granite) 15882 SKU# 15917 (Symphony Blue Base w/ Galaxy White Granite) SKU # 15918 (Charcoal Base w/ Midnight Black Granite) 15869... -
Page 4: Cabinetry Layouts For Augusta Kitchen
15865 15871 15875 15883 15870 DuraBull 10ft. x 7ft. Left Return Augusta Kitchen 15874 15882 SKU # 15922 (Dune Base w/ Coffee Brown Granite) SKU# 15923 (Symphony Blue Base w/ Galaxy White Granite) SKU # 15924 (Charcoal Base w/ Midnight Black Granite) -
Page 5: Parts List (8' Section Of Savannah Kitchen)
DuraBull 8ft. x 7ft. Left Return Savannah Kitchen DuraBull 8ft. x 7ft. Right Return Savannah Kitchen SKU # 15916 (Dune Base w/ Coffee Brown Granite) SKU # 15919 (Dune Base w/ Coffee Brown Granite) SKU# 15917 (Symphony Blue Base w/ Galaxy White Granite) -
Page 6: Parts List (10' Section Of Augusta Kitchen)
Parts List DuraBull 10ft. x 7ft. Left Return Augusta Kitchen DuraBull 10ft. x 7ft. Right Return Augusta Kitchen SKU # 15922 (Dune Base w/ Coffee Brown Granite) SKU # 15925 (Dune Base w/ Coffee Brown Granite) SKU# 15923 (Symphony Blue Base w/ Galaxy White Granite) -
Page 7: Parts List (7' Left Return)
DuraBull 8ft. x 7ft. Left Return Savannah Kitchen DuraBull 10ft. x 7ft. Left Return Augusta Kitchen SKU # 15916 (Dune Base w/ Coffee Brown Granite) SKU # 15922 (Dune Base w/ Coffee Brown Granite) SKU# 15917 (Symphony Blue Base w/ Galaxy White Granite) -
Page 8: Parts List (7' Right Return)
Parts List DuraBull 8ft. x 7ft. Right Return Savannah Kitchen DuraBull 10ft. x 7ft. Right Return Augusta Kitchen SKU # 15919 (Dune Base w/ Coffee Brown Granite) SKU # 15925 (Dune Base w/ Coffee Brown Granite) SKU# 15920 (Symphony Blue Base w/ Galaxy White Granite) -
Page 9: Replacement Toe Kicks
Replacement Toe Kicks Note: The 8ft. x 7ft. Savannah and 10ft. x 7ft. Augusta DuraBULL kits come standard with toe kicks precut. When installing a left or right return, the length of the toe kick changes on the 8ft. Savannah and 10ft Augusta on the front return side. -
Page 10: Tools Required
TOOLS REQUIRED FOR INSTALLATION 72" Level Minimum 4' level Carpenter Measuring Pencil or Square Tape Marker 7/64" Drill Hole Saw Bits Power Drill (x2) C-Clamps Jig Saw Quick Clamps Circular Saw Welding Vise Grip Clamps Miter Saw Drill driver bits Philips &... -
Page 11: Prepping Cabinets
PREPPING CABINETS FOR ASSEMBLY Bottom Bottom 18" Bottom 24" 30" 36" 18" 1. Place cabinets on their backs near the location where they will be installed (leaving the cardboard underneath the back of the cabinets to protect them from getting scratched) Side Bottom 2. -
Page 12: Installing Cabinet Legs
INSTALLING THE CABINET LEGS 3. Screw on the leg bases to the pre-drilled holes with the sloped end facing to the center of the cabinet. 4. Set the leg length to the desired height. (Keep in mind the toe kick is 5" tall from the factory. -
Page 13: Standing The Cabinets Upright
STANDING THE CABINETS UPRIGHT TEAM LIFT When standing up the cabinets, lift straight up... Do not stand the cabinets up by rotating on bottom edge of the cabinet to the legs. This could damage both the edge of the cabinet and the legs. Rotate the cabinet 90 degrees... -
Page 14: Setting And Leveling The Cabinets
SETTING & LEVELING CABINETS IMPORTANT NOTE: Cabinet must be 1" off any walls to ensure proper venting for the grill cabinet. 7. It is best to start with the corner cabinet, as it is one of the heaviest, so you will want to set cabinet in place maintaining 1"... - Page 15 LEVELING CABINETS 9. Place next cabinet against first cabinet, making the height equal and leveling it together. Note: Add one cabinet at a time. Remembering to lift up when moving them. Do not slide the cabinets, this may cause damage. Page 14...
-
Page 16: Adding Optional Cabinet Wall Filler Strips
ADDING OPTIONAL CABINET WALL FILLER STRIPS Note: If the cabinets are going to be placed against a wall, the kit comes with (x2) 1" x 30" x 3/4" filler strips. These can be installed on the sides of your outside cabinets flush with the top as shown. -
Page 17: Securing The Cabinets Together
SECURING CABINETS TOGETHER 10. When the cabinets are level with one another, clamp the cabinets together using two clamps positioned per the image. 11. Pre-drill the cabinets in the approximate locations as shown below. Screw together with the 1-1/4" cabinet screws. Page 16... -
Page 18: Determining Vertical Trim Cabinets
3" x 30" vertical trim. (Note: This vertical trim keeps the cabinets 3" apart so the doors or drawers can open properly.) Your end cabinet on the side of your return will get the vertical trim, as shown. Savannah Kitchen DuraBull 8ft. x 7ft. Right Return 15794 15804... -
Page 19: Adding Vertical Filler Pieces
ADDING VERTICAL FILLER PIECES (CONTINUED) 13. Install the 30" x 3" x 3/4" vertical spacer using the single hole "L" brackets provided, making sure your vertical spacer is flush with the back of the cabinet. When installing the front vertical spacer. Be sure the vertical spacer is flush with cabinet, not the door and or drawers, as shown. -
Page 20: Securing The Cabinets Together
SECURING CABINETS TOGETHER Find your DuraBull model below or on the next page for installation order and then join against the cabinet with the filler pieces to the corner return cabinet and proceed outward 14. The Savannah Kitchen with the Right Return will require setting the grill cabinet 24 inches from the cabinet you added the vertical filler strips,to then add the refrigerator filler pieces. - Page 21 SECURING CABINETS TOGETHER (CONTINUED) Find your DuraBull model below or on the next page for installation order and then join against the cabinet with the filler pieces to the corner return cabinet and proceed outward. 14. The Augusta Kitchen with the Right Return will require setting the grill cabinet 24 inches from the cabinet you added the vertical filler strips,to then add the refrigerator filler pieces.
- Page 22 SECURING CABINETS TOGETHER 15. Use the same technique as used on the return cabinets to level and screw together. ADDING 24" SPACING FOR REFRIGERATOR 16. Set the trash can cabinet (or the triple drawer cabinet, depending on your model) 24" from the grill cabinet.
-
Page 23: Adding Refrigerator Panel
ADDING REFRIGERATOR PANEL 18. Once level and flush to the top and back of the cabinets, pre-drill through the holes on the refrigerator panel to the cabinets 19. Using the 1-1/4" screws, screw the panel into the grill cabinet from the top, middle, and bottom. Page 22... -
Page 24: Adding Refrigerator Front Filler Piece
ADDING FRONT FILLER PIECE 20. Install the 24" x 2" x 3/4" filler to the top, between the grill cabinet and the trash can cabinet (or triple drawer), making sure it is square and flush with top of the cabinets. Use two angle brackets with the double holes on the backside of the panel to secure the filler to the cabinets. -
Page 25: Toe Kick Preparation And Installation
TOE KICK PREPARATION & INSTALLATION RIGHT RETURN ONLY 21. Put a toe kick clip on the right side front leg parallel with the side of the end cabinet, as shown. With the front toe kick on the return cabinets, lay the precut toe kicks face down in front of the cabinets. - Page 26 TOE KICK PREPARATION & INSTALLATION LEFT RETURN ONLY 21. Put a toe kick clip on the left side front leg parallel with the side of the end cabinet, as shown. With the front toe kick on the return cabinets, lay the precut toe kicks face down in front of the cabinets.
- Page 27 FRONT TOE KICK PREPARATION & INSTALLATION 23. Line up the clip mounts, center of the marked lines and approximately center up and down. (The mount & clip will hold the toe kick best and straight when it is approximate in the center horizontal line of the toe kick marks).
- Page 28 FIND YOUR MODEL FRONT TOE KICK PREPARATION & INSTALLATION SAVANNAH KITCHEN LEFT AND RIGHT ONLY 26. Starting with the front toe kicks. Place the precut toe kicks down on cardboard in front of the cabinets. Butt up the 59-1/2" toe kick against the return toe kick and make the 17-1/2" toe kick flush with the refrigerator opening, before proceeding to the next step.
- Page 29 FIND YOUR MODEL FRONT TOE KICK PREPARATION & INSTALLATION AUGUSTA KITCHEN LEFT AND RIGHT ONLY 26. Starting with the front toe kicks. Place the precut toe kicks down on cardboard in front of the cabinets. Butt up the 83-1/2" toe kick against the return toe kick and make the 17-1/2" toe kick flush with the refrigerator opening, before proceeding to the next step.
-
Page 30: Side Toe Kick Installation
SIDE TOE KICK INSTALLATION 5" x 22-3/4" Toe Kick (Qty. 2) 14006 (Charcoal) 29. Lay down the side toe kick flush with the 14007 (Symphony Blue) 14008 (Dune) inside front toe kick. Use a sharpie to mark the center of the legs. 31. -
Page 31: Handle Installation
HANDLE INSTALLATION Savannah Kitchen with Left Return Shown 33. Screw in the door handles using the pre-drilled holes in the doors. The drawer fronts are pre- drilled, the backs are not. You must use the pre-drilled holes on the fronts to drill out the backs using a 5/32"... -
Page 32: Countertop Installation
COUNTER TOP INSTALLATION 34. Starting with the largest piece of granite first. Set the granite onto the cabinets as shown in the order below, allowing approximately 1" on side and 1" on back. TEAM LIFT Savannah Kitchen with Left Return Shown Note: When the granite is set, the counter tops should have 1"... -
Page 33: Adhering The Countertop To The Cabinets
ADHERE THE COUNTER TOP Savannah Kitchen with Left Return Shown 35. When all granite is in place, lift the front edge of granite top pivoting on the back edge about 3", being careful not to let the top slide or move to maintain that back 1". Apply the adhesive strips (provided) in the locations shown, then rest the counter back into position, verifying your 1"... -
Page 34: Grouting Countertop Seams
GROUTING COUNTERTOP SEAMS 36. After all steps are completed, and granite is firmly adhered to the adhesive strips, you can apply the colored caulking provided in the granite counter joints. Clean the surface around the joints when finished. Savannah Kitchen with Left Return Shown Page 33... -
Page 35: Grill And Refrigerator Installation
Grill and Refrigerator Installation 33. Remove the grill from the box and set on even ground. It is recommended to remove the grates, heat shields, flame tamers, box of knobs and the rotisserie motor before installing. (This will remove unnecessary weight while lifting, which makes it easier to maneuver) BE CAREFUL NOT TO CHIP THE GRANITE WHEN SLIDING THE GRILL IN PLACE. -
Page 36: Hinge Adjustment
Hinge Adjustment Doors might need adjustment and tightening after assembly due to shipping movement. Adjustment point for door left and right position when door is closed. Adjustment points for door elevation. Adjustment point for door gap between cabinet box and door Page 35... -
Page 37: Cabinet Cleaning And Care
MAXIMUM RESILIENCY MEANS MINIMAL HARDWARE CLEANING CARE Decorative surface hardware such as drawer and door pulls, MAINTENANCE and knobs should be stainless steel, with stainless steel cabinetry is built to be UV and weather resistant. Dura Bull Crafted from high-density polyethylene (HDPE), screws for best results. -
Page 38: Warranty
LIFETIME LIMITED WARRANTY If a warranty claim is filed after a product or color is discontinued, Bull Outdoor Products Inc reserves the right to honor the Warranty Thank you for purchasing A Dura Bull high-quality Outdoor Kitchen! in one of the following fashions: We trust that our products will bring you many years of outstanding •...
Need help?
Do you have a question about the 15916 and is the answer not in the manual?
Questions and answers