
Summary of Contents for RAEV BULLET PRO
- Page 1 Note: BULLET PRO version means a single battery and GT version means double batteries PRO / GT User Manual of Electric Bicycle...
-
Page 2: Table Of Contents
Contents 1.Basic Information 1.Basic Information 6.Precautions about Use ..............02 ..............02 ............11 1.1 Unpacking Information............02 1.1 Unpacking Information............02 6.1 Compliance with Traffic Laws and Traffic 1.2 Parts Description..............03 1.2 Parts Description..............03 Safety Tips ....................11 2.Installation Procedure 2.Installation Procedure 6.2 Safety Precautions about Electric Bicycle .....11 .............04 .............04 2.1 Handlebar Installation ............04... -
Page 3: Basic Information
1. Basic Information 1.1 Unpacking Information 1x Bicycle 1x Wheel 1x Light 1x Charger 2x Pedal 1x Bicycle 1x Wheel 1x Light 1x front fender GT Version 1x Battery 8x Tool PRO Version 2x Keys GT Version 4x Keys 1x User Manual 1x Charger 2x Pedal 1x Front Fender... -
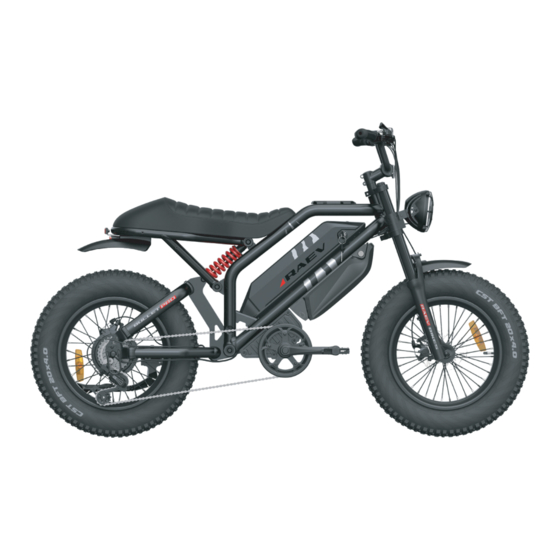
Page 4: Parts Description
1.2 Parts Description Trigger shifter LCD Display Handlebar cover Brake handlebar Cushion Car light Taillight Battery Rear suspension GT version battery Front fork Controller Front disc Motor brake Rear gearbox Pedal... -
Page 5: Installation Procedure
2. Installation Procedure 2.1 Handlebar Installation Remove the pre-tightened set screws of the handlebar end cover using 4mm socket head wrench Place the handlebar, adjust it to a suitable angle, close the end cover of the handlebar and pre-tighten 4 screws using 4mm socket head wrench Tighten set screws of the handlebar end cover in the order of 1, 2, 3 and 4 90°... -
Page 6: Pedal Installation
2.3 Pedal Installation Differentiate the identifiers of left and right pedals, L means left pedal and R means right pedal When installing pedals, keep the pedal bolt end face vertical to the mounting hole of the crank and tighten and fix it using 15mm open spanner (When installing the left pedal, rotate it anticlockwise;... -
Page 7: Headlamp Installation
2.4 Headlamp installation Take the headlamp accessories out of the accessory box and install the fixed support of the headlamp; Adjust the headlamp angle and tighten set screws of the supports on both sides using 5mm socket head wrench; Connect the connecting line of the headlamp 2.5 Battery Installation and Removal Insert the key, rotate it to ON state and place the battery in the body preset position Forcibly push the battery until you hear a crisp sound... -
Page 8: Battery Charging
3. Battery Charging Open the soft cover on the battery side Insert the plug of the charger into the charging port of the battery and connect the other plug to the power supply; The status light of the charger is red in the charging process After the battery is fully charged, the status light of the charger is green Remove the charger, keep it properly and close the soft cover after charging If the battery is charged on board, please power off the instrument... -
Page 9: Riding Introduction
4.Riding Introduction 4.1 Riding mode In EV mode, press and hold ON. After power-off, adjust the gears (1-3) by Instrument ± Key, and pull the speed thumb shifter to enter EV mode In assistant mode, press and hold ON. After power-on, adjust the gears (1-3) by Instrument± Key, step on the pedal for more than half a cycle to enter assistant mode In manual riding mode-press and hold ON. -
Page 10: Introduction To Instrument Key Functions
4.2 Introduction to Instrument Key Functions ON/OFF: Press and hold ON for more than 2s to turn on the power; in startup state, press and hold ON for more than 2s to turn off the power; In startup state, short press ON/OFF, and the displayed information is switched among total distance (mileage/h), trip distance (mileage/h), riding time (h), output power (W), total distance (mileage/h), maximum speed (mileage/h) and average speed (mileage/h);... -
Page 11: Use Of Gearbox
5. Use of Gearbox 5.1 Gearbox Diagram Gear Strength Speed Gear indicator Relaxed Slow Moderate Medium Laboursome Fast For acceleration, run at a low speed at first. With acceleration, switch to a high gear. When driving uphill, the speed will decrease. Lower the gear to keep a certain riding speed It is easier to accelerate in the wind direction. -
Page 12: Precautions About Use
6. Precautions about Use 6.1 Compliance with Traffic Laws and Traffic Safety Tips 6.3 Preparation for Riding Do not refit the electric bicycle without permission; with maximum load of 100kg, the electric bicycle must not be overloaded Check whether the power circuit and the light are normal;... -
Page 13: Battery
7. Battery 7.1 Precautions about Use of Lithium Battery Confirm the battery model if it’s original. Do not use batteries of other brands without permission Check whether the lithium battery is intact and has damage, leakage, heat emission, moisture, smoke and other obvious phenomena To ensure transportation safety, the battery quantity is about 30% upon delivery. -
Page 14: Charging Environment
7.3 Charging Environment Charge the battery using original charger instead of charger of other brands or models Please charge the battery at 0℃ -40℃ in a well-ventilated place and keep off combustibles Charging time: Do not charge the battery for more than 12h; otherwise, the battery life will be affected and a potential safety hazard will be caused The battery capacity will rise quickly in the early charging process and then slow down, which is a normal procedure to ensure safety... -
Page 15: Technical Parameters
1 and constant speed of 12mph, on flat road surface, in a windless environment. Actual endurance mileage may differ with load, temperature, wind speed, road surface, operating habit and other factors. Product name Bullet PRO Bullet GT Net weight... - Page 16 Company: E-LINK TECHNOLOGY CO.,LTD Address: 4~5F/ B Block, Ding Bao Hong Green High-Tech ParkNo.8 Industrial2nd Road, ShiYan BaoAn District, Shenzhen, China. Email: support@raevbikes.com Website: raevbikes.com Made In PRC...
Need help?
Do you have a question about the BULLET PRO and is the answer not in the manual?
Questions and answers