Table of Contents
Advertisement
Quick Links
Advertisement
Table of Contents

Related Manuals for airinspace PLASMAIR Guardian

Summary of Contents for airinspace PLASMAIR Guardian
- Page 1 MOBILE AIR DECONTAMINATION UNIT USER MANUAL ™ PLASMAIR Guardian European Directive Low Voltage Directive (LVD) 2014/35/CE European Directive Electromagnetic Compatibility (EMC) 2014/30/CE User Manual PA Guardian EN_ed17 04-juillet-2022 1 / 51...
- Page 2 WARNING ™ We strongly recommend that you fully read these instructions before operating the PLASMAIR for the first time (see section 2 – Use). This user manual is divided into 4 sections: • Section 1: General information. • Section 2: Operating instructions for the end user. •...
-
Page 3: Table Of Contents
TABLE OF CONTENTS Safety Instructions ....................5 Regulatory standard ....................6 Normative standards ....................6 Classification ......................6 DEscription of the device ..................7 Overview ....................7 1.5.1 Internal access ..................8 1.5.2 Markings and Warnings ................9 1.5.3 Pictograms ..................... 10 1.5.4 Functional description of the device ................. - Page 4 3.7.2 Display and uploading of recordED DATA ..............31 Maintenance - Biocleaning ..................32 Products ........32 ® 3.9.1 Products Chemically compatible with AirInSpace Standard procedure ................... 33 3.9.2 Other procedures ..................38 3.9.3 3.10 Maintenance ......................39 Prefilter management ................. 39 3.10.1...
-
Page 5: Safety Instructions
Do not operate the device without the prefilter. • ® Strictly use airinspace supplies to replace the prefilter (see section 3 - §3.9.1 - Prefilter management). • Switch off the equipment and unplug the mains supply before opening the front door. Do not place your hands near the fan before it has come to a complete stop. -
Page 6: Regulatory Standard
REGULATORY STANDARD ™ PLASMAIR Guardian equipment carry CE marking and comply with European regulations: European Directive Low Voltage Directive (LVD) 2014/35/CE European Directive Electromagnetic Compatibility (EMC) 2014/30/CE NORMATIVE STANDARDS - NF EN 61010-1 (2011 + A1 2019). Safety requirements for electrical equipment for measurement, control, and laboratory use. -
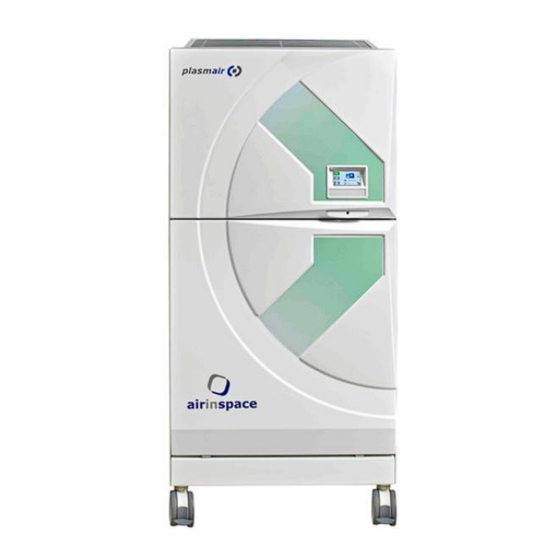
Page 7: Description Of The Device
DESCRIPTION OF THE DEVICE 1.5.1 OVERVIEW Painted steel chassis Hinged front door (tailgate opening) for HEPA-MD modules access Control panel + LED Mains plug with double-pole switch and fuses Electrical connector USB / RJ45 Pivoting castor (the front castors are fitted with brakes) Prefilter access flap Removable housing Opening door lock + handle... -
Page 8: Internal Access
1.5.2 INTERNAL ACCESS Removable outlet grille HEPA-MD Reactor modules Electrical panel Prefilter Ventilation chamber access panel User Manual PA Guardian EN_ed17 04-juillet-2022 8 / 51... -
Page 9: Markings And Warnings
1.5.3 MARKINGS AND WARNINGS Label Wording Position On the right side of the unit, near the Product mains socket On the right side of the mains socket Electrical characteristics (different label depending on the (according to country) country's tension) On the ventilation chamber access Fan danger warning panel On the mains socket protective cover... -
Page 10: Pictograms
Guardian, the airflow passes through a HEPA-MD technology decontamination reactor. This innovative technology, which equips all airinspace® devices, combines the destruction of airborne microorganisms with very high efficiency particulate filtration through the joint action of non-thermal plasmas and electrically active collection media. -
Page 11: Airflow Direction In The Plasmair ™ Guardian
™ AIRFLOW DIRECTION IN THE plasmair Reactor HEPA-MD User Manual PA Guardian EN_ed17 04-juillet-2022 11 / 51... -
Page 12: Physical Characteristics
1.6.2 PHYSICAL CHARACTERISTICS Electrical supply ~ 100 V, ~ 110/120 V, ~ 230 V; 50/60 Hz Maximum electrical power 600 VA / 600 W Power at 1000 m /h (new prefilter and reactors) 160 W Isolated by removable power cable Electrical protection Fused Ph + N bipolar switch ventilation speeds continually adjustable between... -
Page 13: Setting Up Instructions
SETTING UP INSTRUCTIONS NOTA : If the device is delivered without carrying case, skip to step 3. Unpacking (optional) Move the transport case as close as possible to a clean, flat floor space. Remove the unit from the transport case: remove the side panels and the cover, fit the case access ramp, carefully remove the unit from the case. -
Page 14: Instructions For Removal And Storage
10. Switch on the unit and check that it starts up correctly (see Section 2.2 - Starting). ® 11. Note anomalies and any damage on the delivery sheet and notify the distributor or airinspace If you wish to contact the manufacturer or distributor, please make sure to provide the serial number and date of purchase. -
Page 15: Transport
Lock the brakes on the two front pivoting castors. The unit must be stored in a clean area with an atmosphere not polluted by industrial activities. The unit must be protected from dust, sunlight, heat, frequent changes in temperature and humidity, chemicals or other corrosive products. -
Page 16: Section 2 - Operation
SECTION 2 - OPERATION OPERATING PRINCIPLES ™ PLASMAIR unit has been programmed to offer simple, user-friendly interface to its many levels users. On the basis of a single software, it therefore presents different display levels, adapted to everyone's expectations. 2.1.1 USERS AND ACCESS LEVELS Two levels of intervention are defined for this material: •... -
Page 17: User Interface
2.1.2 USER INTERFACE main screen LEDs Green led Active decontamination Yellow led Warning Red led Alarm This icon indicates that the device is working correctly This icon indicates a warning This icon indicates an alarm This icon indicates the ventilation speed: DAY/NIGHT These icons indicate the actual air flow and the programmed room volume Access key to the Setup Menu... -
Page 18: Startup
STARTUP ™ to a power outlet ~ 100 V, 110/120V, 230 V – 50/60 Hz using the Connect the PLASMAIR 2P+T 10 A power supply cable provided. ATTENTION : THE ELECTRICAL SUPPLY PLUG MUST COMPLY WITH REGULATORY TEXTS AND PERIODICALLY CHECKED. Toggle the stop-start switch to "1"... -
Page 19: Handling Warnings And Alarms
HANDLING WARNINGS AND ALARMS 2.4.1 DEFINITIONS A warning message is sent by the controller when a malfunction leads to degradation of device performance (decontamination, pressure drop, sound level) or when a filter needs to be replaced. NOTA : The warning situation is indicated by the yellow backlight of the key, the ventilation still works but the filtering performance may be degraded. -
Page 20: Processing
2.4.2 PROCESSING 2.4.2.1 Displaying an alert or warning • Press the key to display the default. example: • Press the key to go back to the previous screen. 2.4.2.2 Deleting an alert or warning Keep the device in operation. Remove default (e.g., close the front door left open). In the case of an alarm, press the icon and in the case of a warning, press the icon. - Page 21 • Remove default by inserting the prefilter more deeply in the back in its drawer. • Press the button. The machine will check whether the fault has been corrected. • If no other fault or warning is present, the machine restarts: LED reappears.
-
Page 22: Recommendations For Use
2.4.2.4 Alarms list Status area Alarm definition Fault condition(s) display Fan not rotating Fan likely to fail or blocked (Error A) Module stage 1 weak current alarm I < Intensity minimum threshold (Error B) Module stage 1 weak tension alarm HV <... -
Page 23: Fresh Air Intake
An intervention of airinspace® to ensure this biocleaning will be taken outside the framework of the manufacturer's warranty contract or the service contract subscribed by the establishment for the device concerned, if necessary and subject to a commercial offer issued by Airinspace. -
Page 24: Section 3 - Software Management - Cleaning - Maintenance
SECTION 3 - SOFTWARE MANAGEMENT – CLEANING - MAINTENANCE AVIGATION MENU ™ Navigating the PLASMAIR setting menu is done by pressing the setup key from the main screen: Parameter access is protected by a password to be entered in the screen. Enter access code using the keypad and confirm by pressing 'Enter'. -
Page 25: Language Setup
This button provides access to the machine's settings (read only mode). This button provides access to the recorded data of the unit. This button allows you to go back to the previous screen. • If the entered access code corresponds to level 2 (Technician level – default password : 1234) the following parameter supervision screen pops up: This screen is identical to the main screen except for the Maintenance key that replaces... -
Page 26: Setting Procedures For The Room Size And Ventilation
SETTING PROCEDURES FOR THE ROOM SIZE AND VENTILATION From the maintenance screen, press the room size and flow setting button , the following screen pops up: This screen allows you to select 3 different flow setting modes: • Automatic mode by pressing the button. -
Page 27: Setting Ventilation For Immunair
SETTING VENTILATION FOR IMMUNAIR CONFIGURATION As described in the previous section 3.3 § for the setting of the ventilation, the screen offers a third option ™ ™ when the PLASMAIR unit is associated to the IMMUNAIR Fixed Deployable Plenum (FDP) or Mobile Deployable Plenum (MDP). -
Page 28: Night Time Programmer Setting Procedure
NIGHT TIME PROGRAMMER SETTING PROCEDURE From the maintenance screen, press the programmer button The following screen pops up: This screen allows you to turn the programmer on or off. If enabled, the icon and switching mode hours are displayed. The starting and ending hours of the NIGHT mode are editable. You can disable the automatic switching from DAY to NIGHT mode by pressing the icon, the following screen appears:... -
Page 29: Parameters Access
PARAMETERS ACCESS NOTA : The arrows on the bottom of the screen allow you to scroll through the parameters pages. 3.7.1 ON DISPLAY MODE (LEVEL 1-USER) From the maintenance screen, press the parameters display button the following screen pops up: This screen allows you to view the software version of the user interface and the operation counters of the different reactors modules (stages 1, 2, 3, 4), the prefilter counter and... -
Page 30: On Supervision Mode (Level 2-Technician)
(L), door (P), prefilter pressure switch (S) and reactor (U) ; their activation (green) / desactivation (red). CAUTION: MODIFICATION OF THE SUPERVISION MODE SETTINGS IS RESTRICTED TO THE INITIATIVE OF THE AIRINSPACE® MANUFACTURER OR A DULY TRAINED TECHNICAL PERSON FOR MORE THAN DIAGNOSTIC OR TRANSIENT FUNCTIONS User Manual PA Guardian... -
Page 31: Display And Uploading Of Recorded Data
DISPLAY AND UPLOADING OF RECORDED DATA From the maintenance screen, press the datalog button " " The following screen pops up: This screen displays the events (alarms or warnings) and frequency (operating parameters recorded every hour) recorded. Pressing the key enables the downloading of all recorded data to a USB stick inserted previously in the Datalog port (A) on the unit side (see §1.5.1 marker No. -
Page 32: Maintenance - Biocleaning
SWITCH OFF THE MACHINE DURING WET CLEANING OF THE FLOORS, THEN ALLOW TO DRY BEFORE RESTARTING, OTHERWISE THE PARTS WILL BE REPLACED QUICKLY. ® 3.9.1 PRODUCTS CHEMICALLY COMPATIBLE WITH AIRINSPACE PRODUCTS airinspace ® devices are compatible with all cleaning and disinfection products commonly used in most hospitals. -
Page 33: Standard Procedure
3.9.2 STANDARD PROCEDURE ™ By default, the standard disinfection procedure applies for maintenance of the PLASMAIR unit. In particular it is suitable for maintenance of the unit in the event of exposure to any pathogenic agent other than bacterial spores and germs at risk of airborne droplet transmission. 3.9.2.1 Material required •... - Page 34 Patient’s shifts Biocleaning: 3.9.2.3 Parts of the unit concerned: - All accessible external surfaces (1) - Front control screen (2) - Power supply cable (3) - Pivoting castors (4) - Removable outlet grille (5) For parts (1) to (4), apply the full daily biocleaning procedure; Disinfect the removable outlet grille (5).
- Page 35 3.9.2.4 Yearly biocleaning ATTENTION : SINCE YEARLY BIOCLEANING OF THE UNIT REQUIRES ACCESS TO INTERNAL PARTS OF THE UNIT, IT MUST BE CARRIED OUT BY DULY AUTHORISED MAINTENANCE PERSONNEL. ™ BEFORE ACCESSING THE INTERNAL PARTS OF THE PLASMAIR UNIT, PLEASE TURN THE POWER OFF. UNPLUG AND TAKE ALL THE PRECAUTIONS NECESSARY TO ENSURE THAT THE EQUIPMENT CANNOT RESTART BY ACCIDENT.
- Page 36 Parts of the unit concerned: - All accessible external surfaces (1) - Front control screen (2) - Power supply cable (3) - Pivoting castors (4) - Removable outlet grille (5) - Suction chamber (6) - Internal door surfaces (7) - Internal bodywork (8) - Blowing pipework (9) - Prefilter housing (10) - Reactor connection flexible compensator (11)
- Page 37 Clean the inside surface of the front door, the modules cabinet and the newly accessible parts of the bodywork then remove the suction chamber access panel using a 2.5 mm Allen key (x6 screws). Clean the internal surface of the suction chamber access panel then clean the walls of the internal cavities as well as the fan blades.
-
Page 38: Other Procedures
3.9.3 OTHER PROCEDURES ® The maintenance/biocleaning procedures recommended by airinspace , i.e. frequency and scope of cleaning, may depend on the nature of the germs encountered. 3.9.3.1 Selection of the applicable disinfection procedure: Transmission Necessary microbial activity of Applicable reference of... -
Page 39: Maintenance
The prefilter, located at the base of the PLASMAIR components from airborne macroparticles and the excessive accumulation of dust. ® To provide this protection, airinspace recommends and uses a made to measure HQ high quality ™ ® filter on all new... - Page 40 6 months and 1 year depending on the level of dust in the environment. CAUTION: TO AVOID POTENTIAL PATIENT EXPOSURE TO MATERIAL FROM THE OUTER SURFACE OF THE PREFILTER DURING THE REPLACEMENT PHASE, AIRINSPACE RECOMMENDS THAT THE REPLACEMENT BE PERFORMED BETWEEN PATIENTS IF POSSIBLE.
- Page 41 Disposal CAUTION : SINCE THE USED PREFILTER IS HIGHLY LIKELY TO PRESENT DUST THAT CONTAINS BIOLOGICAL CONTAMINANT, AIRINSPACE RECOMMENDS DISPOSAL OF THE PREFILTER IN ACCORDANCE WITH THE APPLICABLE REGULATIONS FOR THE HANDLING OF SPECIAL WASTE (BIOHAZARD MEDICAL WASTE TREATMENT FOR EXAMPLE).
- Page 42 Infection ® agents, airinspace Control department to define the scope of the equipment’s deployment, and in particular with respect to any changes of sector. In addition, applying the principle of precaution with regard to any risk of cross contamination, we recommend that you explicitly label the unit if used for septic confinement.
-
Page 43: Changing A Reactor
3.10.2 CHANGING A REACTOR Changing reactor modules must only be carried out by personnel with sufficient knowledge, ® suitably trained and duly authorised by airinspace 3.10.2.1 Composition of reactor modules The reactor consists of four dedicated modules: Module 4: Module 3:... - Page 44 3.10.2.4 Removal procedure ™ CAUTION : DANGER! BEFORE OPERATING ON THE PLASMAIR , SWITCH OFF THE EQUIPMENT, UNPLUG AND TAKE ALL THE PRECAUTIONS NECESSARY TO ENSURE THAT THE EQUIPMENT CANNOT RESTART BY ACCIDENT. ™ Stop the PLASMAIR using the I/O switch and disconnect from the mains by unplugging the electric cable (1).
- Page 45 Unplug the connectors to the powered modules (if they must be replaced): Unplug the high voltage connector on the front of module 1 Disconnect the grounding lugs to the right of the reactors (1 per module). High voltage connexion Toggle the 2 lateral locking levers accessible on the panel on the left and right sides of the reactor module block...
-
Page 46: Changing A Fuse
3.10.3 CHANGING A FUSE Two fuses (6.3 AT) protect elements of the electric circuit. They are located in the base area (marker 4 §1.5.1). 3.10.3.1 Tools required: • A multimeter to measure resistance and voltage. • A small flat screwdriver to facilitate the opening of the drawer and removing fuses. 3.10.3.2 Fuse Replacement procedure ™... -
Page 47: Resetting A Counter
3.10.4 RESETTING A COUNTER 3.10.4.1 Consumable replacement frequency Reminder: ™ In order to ensure maximum efficiency at all times, the consumables of the PLASMAIR unit (prefilter and reactors modules) have limited lifetimes managed by timers. When the lifetime of a consumable is reached, a warning message appears on the unit screen indicating that it should be replaced. - Page 48 • Check the counter in the settings: • Replace the prefilter (see §3.9.1) • Open the unit front door (units on / door alarm on) • Use the NFC reader to the left of the reactor modules to scan the prefilter label (simply touch the tag with the flat part of the reader).
-
Page 49: Electrical Block Diagram
3.11 ELECTRICAL BLOCK DIAGRAM Reference Désignation Designation point Interrupteur bipolaire Bipolar switch Fusible F1 F1 Fuse Filtre secteur ECM filter Transformateur isolement Isolating transformer Alimentation 24 Vdc 24 Vdc power supply Ventilateur Minirupteur porte avant Front door switch Minirupteur présence préfiltre Prefilter switch Minirupteur module Module switch... -
Page 50: Distributor Warranty
Any problems resulting from unauthorized attempts at repairs, modifications, tipping over, use of inappropriate voltage or any operations contrary to the instructions in the User Manual are not covered by the present warranty. (see General Conditions of sales) airinspace S.E. 14, rue Jean Monnet ... - Page 51 User Manual PA Guardian EN_ed17 04-juillet-2022 51 / 51...
Need help?
Do you have a question about the PLASMAIR Guardian and is the answer not in the manual?
Questions and answers