Table of Contents
Advertisement
Advertisement
Table of Contents
Troubleshooting

Subscribe to Our Youtube Channel
Summary of Contents for DMS Q31
- Page 1 DM-System GmbH, Heid 14/3, 77855 Achern, +49 78418310590 www.dm-system.eu...
-
Page 2: Table Of Contents
Operating Manual / Spare Parts CONTENT 1. SAFETY INSTRUCTION ......................3 1.1 Personal Safety ........................3 1.2 Work Area Safety ........................ 4 1.3 Power Tool Use And Care ....................4 1.4 Battery Tool Use And Care ....................4 1.5 Hazards of Incorrect Operation ................... 5 1.6 Straps Dispenser ........................ -
Page 3: Safety Instruction
7.2 Common Faults and Troubleshooting ................21 8. REPLANCEMENT OF WEARING PARTS ................22 9. SPARE PARTS LIST ........................23 10. EXPLODED VIEW OF SPARE PARTS(需要替换清晰图片) ..........27 1. SAFETY INSTRUCTION Read all safety warnings and all instructions. Failure to follow the warnings and instructions may result in electric shock, fire and/or serious injury. -
Page 4: Work Area Safety
and cutting area of the machine. Do not use the bonded straps to carry, drag or suspend the heavy object, which may cause accidents. Work Area Safety Keep work area clean and well lit. Cluttered or dark areas invite accidents. ... -
Page 5: Hazards Of Incorrect Operation
Do not charge the waste batteries. If you find that the battery charging is abnormal, please do not charge it by force and replace it with a new one to avoid accidents. Recharge only with the charger specified by the manufacturer. A charger that is suitable ... -
Page 6: Correct Strap Cutting
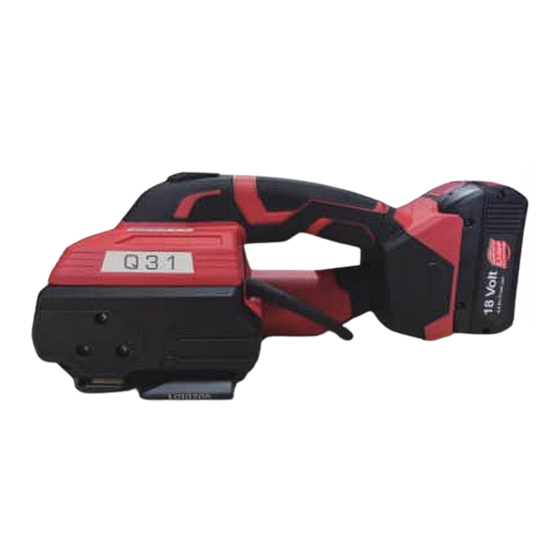
2. TECHNICAL PARAMETERS 2.1 Machine Introduction Q31 series electric battery powered strapping machine has been improved greatly in functions, performance and appearance after continuous tests and improvements by our R&D team. It overperforms competitors' similar machine in quality. Theoretically, up to 700 strap beats can be achieved for a battery charging, the maximum tension force can reach 2800N (the direct tension force of strap tension wheel can reach 4200N), and the welding time is as short as 1s. -
Page 7: Dimensions
2.2 Dimensions Length: 335mm Width: 145mm Height: 145mm Weight(without battery & charger): 3.45kg Battery weight: 0.6kg 2.3 Strap Specification Strap material: Flat or Embossed PET(polyester) or PP (polypropylene)strap. Strap width: 13mm-16mm;Strap thickness: 0.5-1.2mm Please choose a strap with an appropriate size according to the strapping tool you purchased. 2.4 Strap Strength Tension: 400N-2800N(adjustable,the tension force of the tension wheel can reach 4200N). -
Page 8: Charger Specification
3.2 Charger Specification Standard Chargers: Input: 230V - 50/60Hz, 75W (110V optional) Output: 10.8V-18V Max DC 3.5A Charging time: Lithium batteries 5.0A/h (4.0A/h): about 90 minutes. 3.3 One Set of Tool Kit For Free 3.4 Suspension System(optional) Figure 1: Selection 1 of suspension position during operation Figure 2: Selection 2 of suspension position during operation... -
Page 9: Machine Appearance And Operating Panel
4. MACHINE APPEARANCE AND OPERATING PANEL... -
Page 10: Operation Steps
Light Indicates Blue Light Normal Working Red Light Flash The battery is low, please charge it Red Light ON Machine failure, please power it off and check Purple Light ON Work Completion 5. OPERATION STEPS 5.1 Installation Please don't expose the machine in the rain or wet environment! ... -
Page 11: Operation Function Description
Battery Disassembly: Remove the battery following the direction shown in the figure. When removing the battery, move it out while pressing and holding the red button, as shown in the right figure. Battery Charging: Insert the battery to be charged into the charger slot and plug it into a power supply, as shown in the figure on the right... - Page 12 The machine will enter the sleep state if no operation is carried out within 120s after the machine is unlocked, and all the indicator lights go out. All buttons will be invalid, except the button Tensioning A1. To wake up the tool, short press the button Tensioning A1 to restore it to the standby mode.
-
Page 13: Basic Settings
Rocker lever/Handle: Holding up the rocker lever, you can lift the tension wheel; retract the strap or stop the machine in an emergency. 5.2.2 Basic Settings Manual mode (MAN): Tensioning function and welding function will be operated separately. Press and hold the button Tensioning A until the set tension force is reached and then press the button Welding B for manual strap welding &... - Page 14 Grade: 1-9 button SET on the operation panel, Note: This mode is used when objects to be strapped are required to be strapped relatively loosely (or when a PP and “H - -" on the digital display will strap is used). flash for 3 times, which means the tool enters the...
-
Page 15: Strapping Operation Steps
5.2.3 Strapping Operation Steps a. wrap the pp/pet straps around the object to be packed: The operator faces the tool, holding the machine in his right hand, and the machine is on the right side of the operator. Place the strap Object(simulation) Object(simulation) around the object to be... -
Page 16: Operation Methods For Three Modes
movement of the tool in balance during the tensioning process. Lift the rocker lever to stop working when an emergency stop is required during the tensioning process. Therefore, do not block the movement direction of the strapping tool. d.Weld and cut off the strap: Weld and cut off the strap to finish the strapping operation by referring to the Method for... -
Page 17: Operation Essentials For Three Modes
"Beep", and at this time, hold the rocker lever to retract the strap and remove the machine. Fully Automatic(AUT): Short press the button Tensioning until the set tension grade is reached, and the tool will automatically weld and cut off the strap. The strap welding will be finished after three short sounds of "Beep", and at this time, hold the rocker lever to retract the strap and remove the machine. -
Page 18: Strapping Effect And Adjustment
2. The machine can be wakened up by pressing the button Tensioning, and then enter the state of step a; 3. Strapping (the same as step b). e.Red light flashing It indicates the power is low, so replace the battery or remove the battery and charge it. -
Page 19: Reference For Tension Force (Unit: N)
Case 1: Machine adjustment during PP strap and PET strap conversion: Method: Replace the cutter spring(Q-0080) on the cutter Steps: First loosen the screw(Q-T509 M4×20) on the side shield (Q-3007). Remove the left side shield cover; Loosen the screw on the cutter (Q-0078) with an Allen key, and take off the cutter; Replace the pressure cutter spring(Q-0080) on the cutter: replace the pressure cutter spring suitable for PP strap with the pressure spring suitable for PET strap. -
Page 20: Wiring Diagram
6. WIRING DIAGRAM 7. COMMON FAULT INDICATION AND TROUBLESHOOTING... -
Page 21: Machine Fault Code Description
7.1 Machine Fault Code Description E0.2 tension motor timeout fault (tension function not completed after more than 10 seconds) E0.3 short circuit fault of tension motor E0.4 Tension motor Hall abnormal/abnormal current induction of tension motor E0.5 short circuit fault of welding motor E0.6 Welding motor Hall abnormal/abnormal current induction of welding motor E1.0... -
Page 22: Replancement Of Wearing Parts
The tension wheel cannot be Check if it is stuck by residual strap Operation completed, lifted up but failed to remove the Strap retraction function Check if the strap retraction switch tool failure is faulty The cutter worn or the cutter Replace the cutter or the cutter Uneasily strap cutting spring losing its elasticity... -
Page 23: Spare Parts List
9. SPARE PARTS LIST Q31 Spare Parts List Item No. Drawing No. English Description Ratio 1030102202 Screw M5x16 2010013130 Q-A001 Welding lower teeth plate 2010013147 Q-A002 Welding lower teeth plate fixing screw 1030102658 Q-A003 Split ring Φ4 2010013675 Q-A004 Pulley gasket... - Page 24 2010096287 Q-0005 Planet carrier 2 Pin 2010096288 Q-0006 Planet carrier 2 gear 2010096289 Q-0007 Planet carrier 2 2011000194 Q-0008 Slide spring fixing pin 2010096290 Q-0010 Tension wheel 2010096291 Q-0011 Planet gear of tension gear 2010100170 Q-0019 Fusion spring fixing sleeve-1 2015000503 Q-0020A Welding spring fixing sleeve B...
- Page 25 1030128981 Q-3007 Side shield 1030130954 Q-3008A Circuit board upper cover 1030130955 Q-3008B Circuit board lower cover 1030130270 Q-3S001 Left shell 1030130271 Q-3S002 Right shell 1030130272 Q-3S009 Handle 2010100264 Q-S3012 Base seat 2015000512 Q-3S023 Tighten motor mounting plate 2015000115 Q-5008 Ratchet wheel 2015000112 Q-5009 Gear m0.8, z39...
- Page 26 1030126739 Q-T019 Screw M4×8 1030126745 Q-T026 Screw M4×25 1030126746 Q-T027 Countersunk screw M4×6 1020609694 Q-T046 Charger ( Standard ) 1020609985 Q-T050 Battery 1030118355 Q-T206 Cylindrical pin Φ3×8 1030127414 Q-T207 Screw M3×6 1030128551 Q-T212 Screw M4×10 1021401289 Q-T215 Equal height bolt M5-Φ6-10 1030131499 Q-T215A Equal height bolt M5-Φ6-8...
-
Page 27: Exploded View Of Spare Parts(需要替换清晰图片)
1021401565 T504 Bearing NSK627-ZZ(7-22-7) 1031012719 T611 Circlip for hole Φ22 1030126918 T631 Shaft retaining ring Φ10 1030116838 TD34 Set screw M3×5 1021403753 T1104A Bearing JNS NK10/12 10. EXPLODED VIEW OF SPARE PARTS(需要替换清晰图片)
Need help?
Do you have a question about the Q31 and is the answer not in the manual?
Questions and answers