Advertisement
- 1 Safety Considerations
- 2 Installation Applications
- 3 What is Included
- 4 Also Included
- 5 Product Description
- 6 IP67 Water Resistance Rating
- 7 Receiver Module Placement & Connection
- 8 Remote Cradle Mounting
- 9 Surface Mount Example
- 10 Pipe/Rail Mount Example
- 11 Steering Wheel Mount Example
- 12 LED Signal Confirmation
- 13 Receiver Module Programming
- 14 Remote Control Functions
- 15 Replacing the Battery
- 16 Specifications
- 17 2-Year Limited Warranty
- 18 FCC Compliance Statement
- 19 Documents / Resources
Safety Considerations
- Install the receiver module in a dry, well-ventilated location that does not interfere with your factory-installed systems. If a dry environment is not available, a location that is not exposed to heavy splashing may be used. Do not install where it will be directly exposed to the elements.
- Securely mount the receiver module to avoid coming loose in the event of a collision, sudden jolt or as a result of repeated vibrations during normal use.
- While the remote transmitter is designed to be water-resistant, it should never be submerged under water for prolonged periods or subjected to high-pressure water spray.
- Do not mount the remote cradle or receiver module in an engine compartment or areas of extreme heat. Areas exposed to a heater or hot air should also be avoided.
- Check before drilling to make sure that you will not be drilling into an exterior panel/hull, fuel tank, gas/brake line, wiring harness or other vital system.
- Protect all wiring from sharp edges and wear by carefully routing them, tying them down and using grommets and loom where appropriate. Secure all wiring using cable ties or wire clamps, as needed.
Installation Applications
This product is designed for operation in 12 volt, negative-ground electrical systems. Using this product in systems with positive ground and/or voltages other than 12 volts may result in damage to the product and will void the warranty. This product is not certified or approved for use in aircraft.
What is Included
(1) MMR-10W Remote Transmitter
(1) Remote Cradle
(2) Plastic cable ties
(1) Flat head screw
(1) User Manual
Also Included
MMR-10W only
(1) MMR-10W Receiver Module
(2) Pan head screws
(1) Quick-release lanyard
Product Description
The MMR-10W is a wireless remote controller designed to add handheld control functionality to MediaMaster® source units. Utilizing state-of-the-art, 2.4 GHz wireless technology, the MMR10W permits control of your MediaMaster® source unit (with LED signal confirmation), from up to 150 ft. (45 m) away. The MMR-10W system consists of a hideaway receiver module and water-resistant (IP67 rated) remote transmitter. The receiver module is designed to connect directly to your MediaMaster and is programmable, with the ability to pair with up to ten MMR-10W remote transmitters.
A versatile mounting cradle is included, along with a lanyard for convenient, on-the-go functionality.
IP67 Water Resistance Rating
The MMR-10W remote transmitter has been tested to withstand immersion in water, up to 1 meter (3.28 ft.) deep, for up to 30 minutes. Note: While designed to be water resistant, the remote should never be submerged under water for prolonged periods or subjected to activity that creates pressure on it that exceeds its depth rating.
Receiver Module Placement & Connection
While the MMR-10W receiver module can be mounted in any orientation, its installation location should be considered to optimize RF performance. For example, we recommend that you avoid mounting the receiver module directly to metal surfaces or to wire harnesses, especially those containing high-current circuits. Mounting locations in close proximity to other electronics should also be avoided to minimize wireless interference. Use the two supplied pan head screws to mount the receiver module.
The receiver module is designed to connect directly to the 5-pin "Remote" plug of your MediaMaster®. Use caution when mating the connectors, as they are keyed and must be aligned to fit properly. Note: If a MMR-20 wired remote controller is installed with your MediaMaster®, you may use a Y-adaptor (MMC-2Y) (sold separately) to add/connect the MMR-10W receiver module. If space directly behind your MediaMaster® is limited, you may use a remote controller cable (MMC-6 or MMC-25) (each sold separately) to extend the receiver module's mounting options. Once connected, make sure that cables are securely routed using cable ties and wire clamps, keeping connections away from areas where they could be submerged in water.
Remote Cradle Mounting
For convenience, a plastic cradle is included to mount the MMR10W remote transmitter. The base of the cradle is designed so it can be installed on a flat surface or a tubular structure, such as a pipe/ rail or steering wheel. Note: Select a location that does not interfere with other factory installed devices or safety equipment. Refer to the following installation examples for more information.
Surface Mount Example

Attach to a flat surface using the included flat head screw.
Pipe/Rail Mount Example

Attach to a straight pipe/rail using the included plastic cable ties.
Steering Wheel Mount Example

Attach to a steering wheel using the included plastic cable ties.
LED Signal Confirmation
The MMR-10W transmitter is equipped with a red LED mounted beneath the  button.
The LED will flash once when any button is pressed, and then a second time when the button is released to verify that the remote's transmitted signal was successfully received by the receiver module.
- Two short flashes indicate the signal was sent/received successfully.
- Two long flashes indicate the signal was sent, but not successfully received. Possible failure causes include low battery level, out of operating range, or the receiver module is not active (MediaMaster® is turned OFF).
Receiver Module Programming
Note: The transmitter and receiver included with the MMR-10W system are already paired.
Up to ten (10) MMR-10W Remote transmitters may be paired to a single receiver module.
To Pair A New Transmitter (Required for MMR-10W-Remote)
- Disconnect +12V power from your MediaMaster® by removing the 5-amp fuse from its fuse holder, unplugging its 4-pin power plug, or switching off its +12V supply circuit.
- Press and hold both
![]() and
and ![]() buttons on the transmitter, then reconnect +12V power to your MediaMaster®.
buttons on the transmitter, then reconnect +12V power to your MediaMaster®. - Continue holding both
![]() and
and ![]() buttons for 5 to 10 seconds, then release both buttons.
buttons for 5 to 10 seconds, then release both buttons. - If successful, the status LED will emit two quick flashes with any button press.
- If unsuccessful, the status LED will emit two long flashes with any button press.
- Repeat steps 1 to 4 to pair additional transmitters (up to ten total).
In case of misplaced transmitters, you may delete all remotes from the receiver module's memory.
Note: All paired transmitters will stop working after deletion. Subsequent remote functionality will require each transmitter to be paired with the receiver.
To Delete All Transmitters
- Disconnect +12V power from your MediaMaster® by removing the 5-amp fuse from its fuse holder, unplugging its 4-pin power plug, or switching off its +12V supply circuit.
- Press and hold both
![]() and
and ![]() buttons on an existing (paired) transmitter, then reconnect +12V power to your MediaMaster®.
buttons on an existing (paired) transmitter, then reconnect +12V power to your MediaMaster®. - Continue holding both
![]() and
and ![]() buttons for 5 to 10 seconds, then release both buttons.
buttons for 5 to 10 seconds, then release both buttons. - If successful, the status LED will emit two long flashes with any button press and the transmitter will no longer control your MediaMaster.
- If unsuccessful, the status LED will emit two quick flashes with any button press and the transmitter will still control your MediaMaster.
 and
and  buttons on an existing (paired) transmitter, then reconnect +12V power to your MediaMaster®.
Remote Control Functions
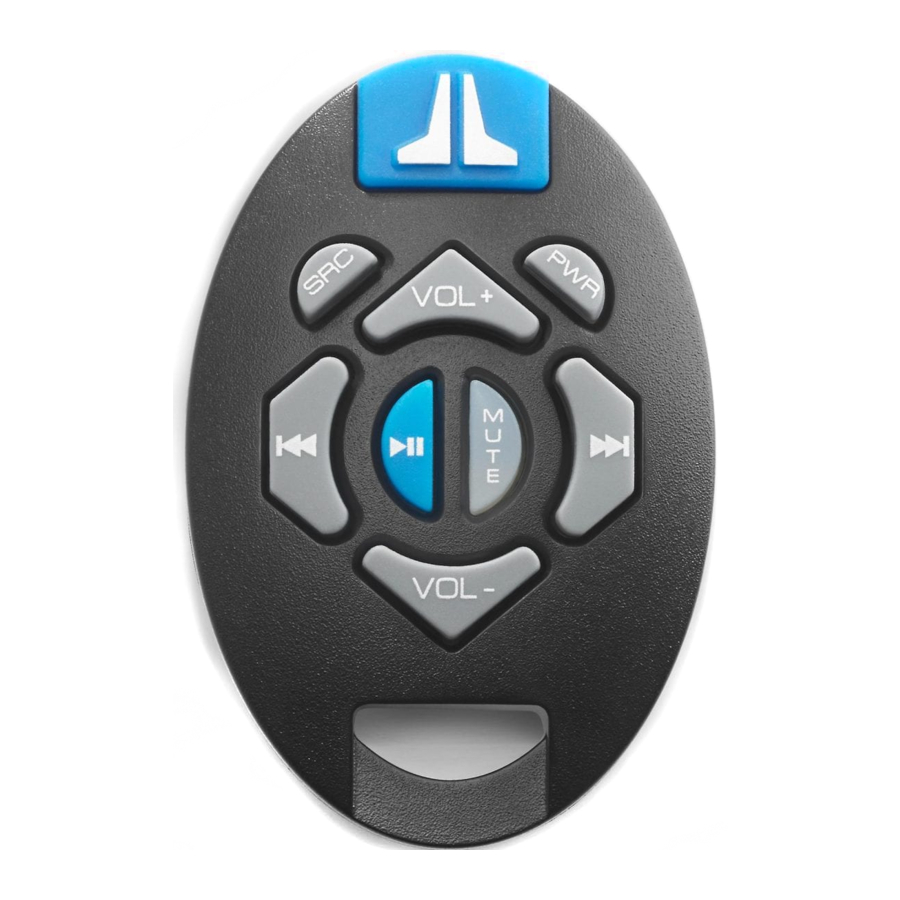
Below is a list of MMR-10W command functions. The functionality of some controls will vary depending on the current source and/or last tuner selected. Note: The MediaMaster source unit only accepts commands from the MMR-10W when its display is on a Now Playing Screen or in the SOURCE: Select menu screen:
| PWR |
|
| SRC |
|
| VOL+ |
|
| VOL– |
|
| MUTE or  |
|
 |
|
 |
|
Replacing the Battery
- Remove the four screws from the back of the remote.
![]()
- Gently separate the front half of the remote.
- Lift and remove the silicone keypad from inside the remote.
- Turn the remote over to remove the circuit board.
The battery is installed on the back of the circuit board. - Carefully remove the battery from its holder and replace with a CR2032 style battery or equivalent.
- Reassemble the remote to ensure a watertight seal.

Specifications
| Operating Frequency | 2.4 GHz |
| Operating Range* | Up to 150 ft. (45 m) |
| Operating Temperature | -4°F to +167°F (-20°C to +75°C) |
| IP Rating (Transmitter) | IP67 |
| IP Rating (Receiver) | IP65 |
| Dimensions (Transmitter) | 2.99 in x 2 in x 1.07 in 76 mm x 50.8 mm x 27.2 mm |
| Dimensions (Receiver) | 4.02 in x 3.01 in x 1.42 in 102.1 mm x 76.5 mm x 36.1 mm |
| * Maximum operating range will vary based on installation specifics and transmitter battery level. | |
2-Year Limited Warranty
Visit www.jlaudio.com for warranty details.
For Service Information in the U.S.A. please call JL Audio customer service: (954) 443-1100 during normal business hours (Eastern Time) JL Audio, Inc • 10369 N Commerce Parkway, Miramar, FL 33025
International Warranties:
Products purchased outside the United States of America are covered only by that country's distributor and not by JL Audio, Inc.
FCC Compliance Statement
NOTE: This equipment has been tested and found to comply with the limits of Part 15 of the FCC Rules. These limits are designed to provide reasonable protection against harmful interference in a residential installation. This equipment generates, uses and can radiate radio frequency energy and, if not installed in accordance with the instructions, may cause harmful interference to radio communications. However, there is no guarantee that interference will not occur in a particular installation. If this equipment does cause harmful interference to radio or television reception, which can be determined by turning the equipment off and on, the user is encouraged to try to correct the interference by one or more of the following measures:
- Reorient or relocate the receiving antenna.
- Increase the separation between the equipment and receiver.
- Connect the equipment into an outlet on a circuit different from that to which the receiver is connected.
- Consult the dealer or an experienced radio/TV technician for help.
Any changes or modifications not expressly approved by the party responsible for compliance could void the user's authority to operate this equipment.

Documents / Resources
References
Download manual
Here you can download full pdf version of manual, it may contain additional safety instructions, warranty information, FCC rules, etc.
Download JL Audio MMR-10W, MMR-10W-Remote - MediaMaster Wireless Remote Controller Manual
Advertisement


Need help?
Do you have a question about the MMR-10W and is the answer not in the manual?
Questions and answers