Advertisement
Quick Links
Advertisement

Summary of Contents for Sipura performance & style SPEEDO-REVCOUNTER 2.0
- Page 2 Mounting instruction speedometer VNA and VNB SIP Art. No. 51002100, 51002200 and similar types Thank you for purchasing the SIP speedometer for your vintage Vespa. Before starting to upgrade your vehicle, we gently advise to watch the tutorial video on our youtube-channel which shows the application of all the following steps in very detail.
- Page 3 heat shrink tube D 5 heat shrink tube D 8 3p socket housing (1x) (1x) (1x)
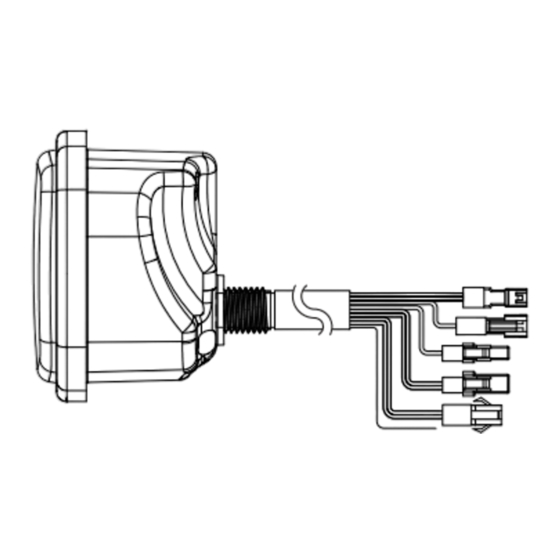
- Page 4 MECHANICAL INSTALLATION WIRING SCHEME Main wire (part no. 3) Power box (part no. 2) Switch button (part no. 6) Extension temperature sensor (part no. 11) Temperature sensor (part no. 5) Speedsensor (part no. 7) Extension fuel reserve gauge (part no. 14) Voltage measurement (12V DC) Wiring Instructions: Binder (part no.9)
- Page 5 2.2 SPEEDO CABLE Disattach the genuine speedometer and pull the speedo cable and cable-tube out of the steering column. Push a clutch cable as the cable guide inside the steering column until it exits at the bottom end. Attach the speedsensor wire to the cable guide. The speed sensor cable is NOT exiting at the genuine speedometer cable hole.
- Page 6 2.5 POWER SUPPLY AND SENSOR CONNECTION Place the powerbox, for example underneeth the fuel reservoir, and connect the cable no. 4 according to the following wiring scheme: Front View (Black) Connector 3 pin (power supply wire) Black (GND) Black / Ground: Connect to chassis ground. Ensure good ground connection. Red (+12V) Red / +12V: Connect to AC voltage regulator or switched +12V DC source (clamp 86) Brown (RPM)
- Page 7 2.7 SPEEDOMETER FIXATION To mount the speedo to the vehicle, use the genuine holding bracket or appropriate spare part. Fix the bracket to the speedo, applying the M10 slotted nut and slotted washer. Insert the speedo to the steering head and retract unnecessary cable length to the chassis. If you dont like the optical appearance of the button, it is also possible to remove it and operate the speedo without the button, after the basic NOTE! adjustments have been done.
-
Page 8: Main Screen
FUNCTIONS AND SCREENS 3.1 DISPLAY OVERVIEW Tachometer Odometer Fuel level warning Display range: 0-12k rpm Display range: 00000.0 - 99999.9 km (miles) Speedometer reset automatically after 99999.9 km (miles). Display range: 0-120 km/ h (mph) Display unit: 0.1 km (miles) Trip meter A, B Average speed A,B The display reads “FUEL ”... - Page 9 TRIP B SCREEN POWER TEST SCREENS Press button once to switch from average speed A Press button once to switch from MAX record to to trip B. POWER TEST. Same sequence as described in 3.3 but trip B Bottom: "POWEr" indicates the power-test mode recordings are displayed.
- Page 10 SETTINGS 4.1 ENTER THE ADJUSTMENTS MENUS 4.3 ADJ.2 SPEEDO DRIVE TRANSMISSION Starting from the MAIN SCREEN (see 3.2), press tires circumference in mm. The relevant tire is the one with the speed the button for more than 3 seconds to enter the sensor attached to.
- Page 11 Table of possible teeth numbers and common tire circumferences. Last step in AdJ2: Set the sensor points value. Using the speed sensor which comes with the speedo, "06p" is the appropriate value. Teeth number front Teeth number Tire circumference for Push the button short to choose the value.
- Page 12 ADJ.3 IGNITION PULSE PER ROTATION ADJ.4 BACKLIGHT BRIGHTNESS electrical current, which is sensed by the speedometers RPM detection (brown cable). The amount of detected waves per engine Setting range: The backlight is adjustable in NOTE! rotation depends on the number of coils 5 steps: 1-5 (dark), 5-5 (bright).
- Page 13 ADJ.6 SELECTED GEAR DETECTION The speedo can tell what gear your engine is shifted to, by reading the ratio of rpm to velocity. Before the system works, it´s needed to pass a learning mode, in which Step 1 the speedo measures the relevant ratios. A continously held speed gives a clear speed to rpm ratio reading.
- Page 14 ADJ.7 POWER TEST TARGETS Setting range: NOTE! 50 - 1000 m (1/32 - 20/32 mile) AdJ7 menu lets you change the speed and distance limit up to which the Setting unit: 50 m (1/32 mile) power test timer will count. The factory setting: 50 m (1/32 mile) For example if you change the speed limit to 100 km/h, the target-speed NOTE!
-
Page 15: Troubleshooting
TROUBLE SHOOTING The following situations do not necessarily indicate a malfunction of the meter. Please check the following before sending it back for repair. Symptom Cause Solution The speedometer has no connection to the Make sure it is connected correctly and all cables are intact. No display at running engine / power supply. - Page 16 TROUBLE SHOOTING Symptom Cause Solution Wrong ignition pulse set. Please refer to section 4.4, adjustment menu 3 (AdJ3) to make a RPM’s are not displayed or displayed incorrectly. The brown wire of the power supply cable correct adjustment. Info: The correct input value is often half the or ignition / rpm pulse detection is not connected correctly.
-
Page 17: Signs And Symbols
TROUBLE SHOOTING Symptom Cause Solution Display, numbers and letters fade. In strong sunshine and heat, numbers and During cooling, numbers and letters return to normal and letters fade in the display up to contrast-strong appearence. contrastlessness against the background. (Operating range tachometer: -10- + 60°C) Connector inserted to speedo upside-down Control lights PX Lusso without function, Pay attention to marking at the contact No. -
Page 18: Functions List
6.3 FUNCTIONS LIST Digital speedometer Display range: 0-199 km/h (0-140mph) Low volt warning setting Setting range: 8.0 V - 13.0 V Setting unit: 0.1 V Display unit: 1km/h (1 mph) MAX speed record RPM input pulse Setting range: 0.5, 1,2, 3, 4, 5, 6 Display range: 0-199 km/h (0-140mph) Speedometer Thermometer... - Page 19 SPARE PARTS AND OPTIONAL PARTS Black Box 2.0 Active Speed Sensor SIP revcounter/speedometer for Vespa KOSO, SA-07 50 SS/90 SS/125/PV/ET3/GTR/TS/ enables speedometer function for Vespa Super/150 Sprint V/Super/Rally models without mechanical speedo drive. 12V AC/DC, made by KOSO Art. No.: 50000112 Art.
- Page 20 L : SIP-2021-01-19 C : SIP-2021-01-19...
Need help?
Do you have a question about the performance & style SPEEDO-REVCOUNTER 2.0 and is the answer not in the manual?
Questions and answers