Advertisement
- 1 Overview
- 2 STEP 1 Connect the Wire Panels
- 3 STEP 2 Fill Scatter-less Base with Bedding
- 4 STEP 3 Attach Wire Panels
- 5 STEP 4 Roof Top Attachment
- 6 STEP 5 Spiral Slide Assembly
- 7 STEP 6 Petting Zone Assembly
- 8 STEP 7 Removing Petting Zone
- 9 STEP 8 Accessory Attachment
- 10 STEP 9 Wheel Assembly
- 11 STEP 10 Attach Wheel to Cage
- 12 STEP 11 Using the Water Bottle and Food Dish
- 13 Cleaning the Wheel
- 14 Cleaning Your CritterTrail Extreme Challenge
- 15 Videos
- 16 Documents / Resources

Carefully Unpack and Sort All Components on the Parts List
If your CritterTrail® Extreme Challenge Habitat™ experienced damage during shipping or if there are missing parts, do not return your cage to the store. Our Customer Service Department is available to help with any problems. Our Toll-Free Number, within the USA and Canada only is:
1 - 800 - 954 - 3003
Monday-Friday 8:00 AM to 4:00 PM
Central Standard Time
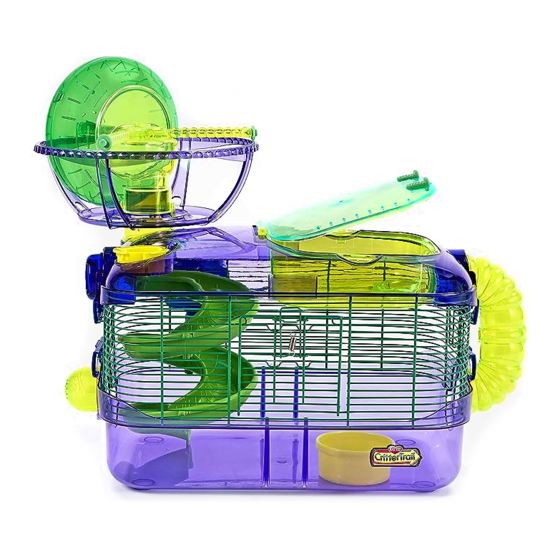
Overview
Examine each part and identify each component using the parts identification list.
Habitat Measures: 20" (51cm) L x 11.5" (29cm) W x 18" (46cm) H

Parts Identification: Item #100079213
| QTY. | KEY | DESCRIPTION | COLOR |
| 1 | A | Scatter-less Base | Purple |
| 1 | B | Roof Top | Purple |
| 1 | C | Petting Zone™ Lid | Neon Green |
| 1 | D | Petting Zone™ Base | Neon Green |
| 1 | E | Front Wire Panel w/ Door | Neon Green |
| 1 | F | Back Wire Panel | Neon Green |
| 4 | G | Side Latch | Blue |
| 1 | H | Spiral Slide Top | Neon Green |
| 3 | I | Spiral Slide Sections | Neon Green |
| 1 | J | Spiral Slide Support | Neon Green |
| 1 | K | Xtreme Wheel | Neon Green |
| 1 | L | Wheel Hub | Neon Green |
| 1 | M | Wheel Support Arm | Neon Green |
| 1 | N | Wheel Base | Purple |
| 1 | O | Wheel Support Tube | Neon Green |
| 1 | P | U-Tube | Neon Green |
| 1 | Q | Bubble Plug | Neon Green |
| 1 | R | Water Bottle | Blue |
| 1 | S | Round Food Dish | Yellow |
| 1 | T | Petting Zone™ Cap | Yellow |
| 1 | U | Twist Lock Sliding Cap | Blue |
| 2 | V | Roof Top Passageway | Blue |
STEP 1 Connect the Wire Panels
Place the Front Wire Panel w/ Door (E) so the spring loaded door latch opens downward. Place the Back Wire Panel (F) so that the opening for the bottle nozzle is on the bottom. Connect the Front Wire Panel w/ Door (E) to the Back Wire Panel (F) by hooking the wire into each other (as pictured).

STEP 2 Fill Scatter-less Base with Bedding
Fill the Scatter-less Base (A) with a liberal amount of bedding material. (Not Included)

STEP 3 Attach Wire Panels
Place the assembled Front Wire Panel w/ Door (E) and the assembled Back Wire Panel (F) on to the Scatter-less Base (A). The Wire Panel Assembly should fit inside the tabs of the Scatter-less Base (A). To secure, snap the two Side Latches (G) on the Scatter-less Base (A) to the Wire Panel Assembly (E &F).

STEP 4 Roof Top Attachment

First, attach a Roof Top Passageway (V) with Latch Assembly (G) to the left and right side of the Roof Top. Press firmly, the Assembly snaps tightly into Roof Top.
Place the Roof Top (B) onto the top of the assembled bottom portion of the habitat. Line up the Roof Top (B) over the assembled Wire Panel Assembly (E & F). To secure, connect the two Side Latches (G) on the RoofTop (B) to the Wire Panel Assembly (E & F).
STEP 5 Spiral Slide Assembly
Assemble the four sections of the Xtreme Spiral Slide by snapping the pins into the holes.
Attach the Spiral Slide Support (J) to the assembled Xtreme Spiral Slide by pressing the 3 tabs on the Support into the 3 slots on the Slide. Insert the Xtreme Spiral Slide into the cage. Secure the assembled Slide by pressing it into the left, rear hole located on the underside of the Roof Top (B).

STEP 6 Petting Zone™ Assembly
Next, insert the assembled Petting Zone™(C/D) into the large hole on the Roof Top (B).

STEP 7 Removing Petting Zone
The entire Petting Zone™ can be removed for use as a temporary pet carrier, or to hold your pet while you clean its cage. Simply remove the Petting Zone™ from the Roof Top and insert the Petting Zone™ Cap (T) into the opening of the Petting Zone™. (Do not leave your pet unattended in the removable Petting Zone™.)

Special Note: The Petting Zone™ Cap (T) can also be used to close off the Roof Top openings in the CritterTrail® Extreme Challenge Habitat™ unit.
STEP 8 Accessory Attachment
On the left side, lock the Bubble Plug (Q) into the bottom hole opening and slide the Twist Lock Opening Cap (U) downward into the Roof Top hole opening. To lock the Twist Lock Opening Cap, turn it so the gap on the cap faces downward. To unlock the Twist Lock Opening Cap, turn so the gap on the cap faces upward and slide the cap up. Next, slide the U-Tube (P) onto the circular openings on the right side. The U-Tube will allow your pet to have access to the Petting Zone™.

Hint: Accessory Access Holes
There are three unused access holes that will allow you unlimited expansion of your pet's home with the use of CritterTrail® Add-on accessories. DO NOT punch out the additional access holes with plastic disks until you are ready to expand your pet's home and have already purchased your accessories! Access holes CANNOT be closed once opened. To close an opened access hole on the RoofTop (B) you will need to use a CritterTrail® 10" Fun-nel #100079222 with any of the Critter Trail® Fun-nel™ Tube accessories.
STEP 9 Wheel Assembly
Insert the shaft of the Wheel Hub (L) into the hole in the center of the Xtreme Wheel (K) until it snap-locks into place. Next, insert the Support Arm (M) into the opening on the back of the Wheel Hub (L).

Special Note: It is important that the grooves in the bottom of the Support Arm are facing DOWNWARD when assembled.
TIP: To keep your Xtreme Wheel silent, place a drop of vegetable oil directly on the Wheel Hub shaft.
STEP 10 Attach Wheel to Cage
First, attach the Wheel Support Tube (O) to the Wheel Base (N). Next, insert the assembled Wheel Base section in the left rear hole located on the Roof Top (B). Secure the Wheel Base by turning it clockwise until fully locked in place. Finally, lower the assembled Xtreme Wheel onto the Wheel Base so that the Wheel Hub (L) rests on the tube in the center of the Base and the Wheel Rollers slide smoothly along the rim of the Wheel Base when the Wheel is turned.

SPECIAL NOTE: Carefully line up the Nylon Wheels, the Rollers and the Track.
STEP 11 Using the Water Bottle and Food Dish
To fill Water Bottle (L), remove the twist off cap with rubber stopper. Fill bottle completely by placing it under a light stream of running water. Close the bottle by pushing in the rubber stopper and twisting the cap. Turn the bottle upright and allow the vacuum to form. You may experience a few initial drips. Locate the attached wire bottle holder and bottle sipper tube hole location on the Back Wire Panel (F). Place the sipper tube into the hole and pull the wire holder down to secure the bottle in place. When refilling your Water Bottle, never squeeze it. This may cause a fracture in the plastic and make it impossible for the necessary vacuum to form.

Note: Temperature fluctuations and excessive cage vibrations sometimes cause occasional dripping. Whenever you move your CritterTrail® Extreme Challenge™ always remove the Water Bottle.
Place a quality food mixture (Not Included) into your pet's Round Food Dish (S). Place the Round Food Dish (S) into any corner of your new CritterTrail® habitat. Do not place Food Dish (S) under the Water Bottle (L).
Cleaning the Wheel
To clean the Xtreme Wheel, pinch together the tabs on the shaft of the Wheel Hub (L) where it emerges from the front of the wheel and pull the wheel completely off. Clean only with soap and water. Do not use any cage cleaners or disinfectants.

TIP: To keep wheel silent, apply a small drop of vegetable oil to the shaft of the Wheel Hub (L) each time you clean the wheel.
Cleaning Your CritterTrail® Extreme Challenge™
Remove the U-Tube (P) and set aside. Push the bottom Side Latches (G) down and lift the entire upper assembly off the Scatter-less Base (A). Set the assembly on a flat surface while you empty the base (A).

Empty and wash the Scatter-less Base (A) with soap and water or spray with Super Pet® Clean Cage (Item #100079553), and wipe dry. Super Pet® Clean Cage neutralizes odors, safely cleans surfaces and is non-toxic to all pets.
After cleaning, replace the soiled bedding. Place the upper cage portion back onto the Scatter-less Base (A). Line up the grooves and gently press up on the bottom Side Latches to secure the cage assembly. Re-attach the U-Tube to side openings and any other parts removed during cleaning.
Pets International, Ltd.
2121 Touhy Avenue, Elk Grove Village, IL 60007 U.S.A.
visit us at superpetusa.com

VideosSuper Pet CritterTrail Extreme Challenge Habitat How to Assembly Video
Documents / Resources
References
Download manual
Here you can download full pdf version of manual, it may contain additional safety instructions, warranty information, FCC rules, etc.
Download Super Pet CritterTrail Extreme Challenge Habitat Assembly Manual
Advertisement

Need help?
Do you have a question about the CritterTrail Extreme Challenge Habitat and is the answer not in the manual?
Questions and answers