
Summary of Contents for Tador KX-T918-AVL
- Page 1 Door Access Communicator Instruction Manual Codephone KX-T918-avl KX-T918-AVL-2P KX-T918-AVL-4P KX-T918-AVL Please read this manual carefully before using the product.
-
Page 2: Parts And Functions
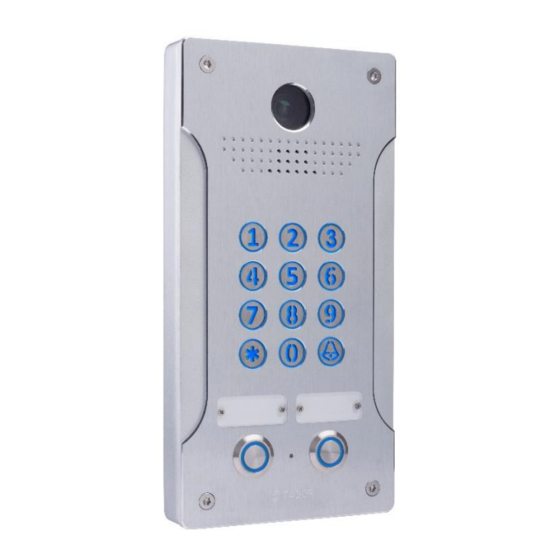
Parts and Functions Screws Speaker Leds ▪ Red – Power on ▪ Green - Programming mode ❖ Anti vandal keypad Microphone Screws General TadorCodephone is a door communicator places the traditional door entry system which would traditionally have to have a whole cabled distribution infrastructure behind it.The unit can connect to any telephone system via either an analogue extension or trunk port.The Codephone can also connect to any network provider's analogue telephone line.Codephoneis also easy to use. -
Page 3: Before Installation
Push to exit button(if installed). Assemble the wires through the hole on the back box of Tador Codephone. Mark the four drill points of the back box on the wall. Drill and install the back box to the wall. -
Page 4: User Programming Mode
2323 222222 Programming speed dial numbers There are 10 cells in Tador Codephone memory to store 10 speed dial numbers. Cells 41 to 49 are used for speed dial 0 to 9 keys respectively (cell 41 – 1, 42-2…). ). - Page 5 IP PBX 1. When using an IP PBX, it is required to add Hash (#) to the end of the call. Hash can be done when pressing 2 then . Example:When pressing on the bell buttontheCodephone extension dialing347#. Make the following sequence on the Codephone (from left to right). Programming code Approval Cell #...
- Page 6 RFID – Proximity card programming The device could be programmed with up to 150 RFID cards The RFID initialization should be done for virgin device, follow: Programming code Approval Cell number Initialization code Approval Exit Programming mode (Bell) 5555 123456 4.1.
- Page 7 – the lock delay time is the time that passes from the moment the valid access code pressed to the moment the lock latch (suitable for situations where there is a distance between Tador Codephone to the door). Cell number01 (default timeis 0 seconds.) Example: changethe"lock delay"...
- Page 8 Number of Rings to Answer –This programming section sets the number of rings that the Tador Codephone will allow to pass through the system before it picks up the call. Enter in cell number 12, (default one ring). Example: changethe number of rings to picks upto 3.
- Page 9 – Set the camera relay strike time (default 30 seconds) stored in cell 14,(the camera turns on automatically after pressing the bell door when calling Tador Codephone unit). Example: changethe camera running time to 60 seconds. (In technician programming mode) Enter the cell number 14, followed bythe new value that you want to set 60 (two digits), and then press (*) asterisk to approve.
- Page 10 11. RFID – Proximity card programming The device could be programmed with up to 150 RFID cards The RFID initialization should be done for virgin device, follow: Programming code Approval Cell number Initialization code Approval Exit Programming mode (Bell) 5555 123456 11.1.
- Page 11 RFID – Proximity card erasing or replacing (remove programmed card and set new one instead) For erasing/replacing RFID card you have know the memory sell number where card have been stored e. Enter the user program mode by 123456* (default) f.
- Page 12 10 seconds. Programming speed dial numbers There are 10 cells in Tador Codephonememory to store 10 speed dial numbers. Cells 41 to 49 are used for speed dial 0 to 9 keys respectively (cell 41 – 1, 42-2…). ).
- Page 13 Call Codephone ##(Hash) Dial Symbols * (hold long Asterisk) # Hash * (hold long Asterisk) -Pause * (hold long Asterisk) * Asterisk In the two push button, and four buttonTador Codephone Model KX-T918-AV-2P/L, to program the push button from 1 - 9 use the cell consecutively from 41 - 49 Settings relay strike time for the first relay –(default 3 seconds).
-
Page 14: Number Of Rings To Answer
Number of Rings to Answer – This programming section sets the number of rings that the Tador Codephone will allow to pass through the system before it picks up the call. Cell number 12, (default one ring). Example:Change the number of ring to answer to 3 rings. - Page 15 Pushbutton delay This is a time that passing after pushbutton pressing to actually lock activation (in standard situation no need to change). The data located in memory cell 05. Usually using when pushbutton located far away from the door Example: Set delay time 3seconds Programming code programming Cell number...
- Page 16 5555 13.1. Add RFID card follow the below instruction: a. Dial from any telephone to the extension of Tador Codephone. b. Press the hash key twice (#, #)(the keypad will blink to confirm programming mode active). c. Press 88# to enable RFID card programming d.
- Page 17 For erasing/replacing RFID card you have know the memory sell number where card have been stored a. Dial from any telephone to the extension of Tador Codephone. b. Press the hash key twice (#, #)(the keypad will blink to confirm programming mode active).
- Page 18 Initiating Tador Codephone –Clear all memory In Order to reset the Tador Codephone from all its memory including dial speed access codes and restore all settings to default values. Follow these steps: 1. Disconnect the power supply from the Codephone.
- Page 19 Drawing CODEPHONE VOLUME For programming and restore move the jumper to DEF Volume To restore device place the jumper on PROXY Board power supply 12VAC LINE RELAY CAMRA Electric lock Pushbutton Extension...
- Page 20 Thank you for choosing our products All rights reserved to Tador TechnologiesLTD©...