Advertisement
Available languages
Available languages
Quick Links
CUIDADO Y MANTENIMIENTO
asegurados.
• Nunca use limpiadores abrasivos ni de base ácida para limpiar el estante.
• Limpie los estantes y las varillas con una solución de agua y detergente suave. Limpie las piezas
con un paño suave o una esponja. Enjuague y seque bien.
LISTA DE PIEZAS DE REPUESTO
Para obtener piezas de repuesto, llame a nuestro Departamento de Servicio al
Cliente al 877-888-8225, de lunes a domingo de 8 a. m. - 8 p.m., hora estándar del Este.
También puede ponerse en contacto con nosotros en partsplus@lowes.com.
PIEZA
DESCRIPCIÓN
A
Estante
B
Varilla superior
C
Varilla inferior
D
Espaciador
AA
Arandela
BB
Ancla de expansión de plástico
CC
Tornillo
AA BB
CC
PIEZA #
1
2 m
3 m
4
5
6
7
Impreso en China
21
STYLE SELECTIONS and logo design are
trademarks or registered trademarks of
LF, LLC. All rights reserved.
A
D
B
C
ATTACH YOUR RECEIPT HERE
Serial Number
Questions, problems, missing parts? Before returning to your retailer, call our customer
service department at 877-888-8225, 8 a.m. - 8 p.m., EST, Monday - Sunday. You could
also contact us at partsplus@lowes.com .
SC22236
ITEM #0868425, 0868426
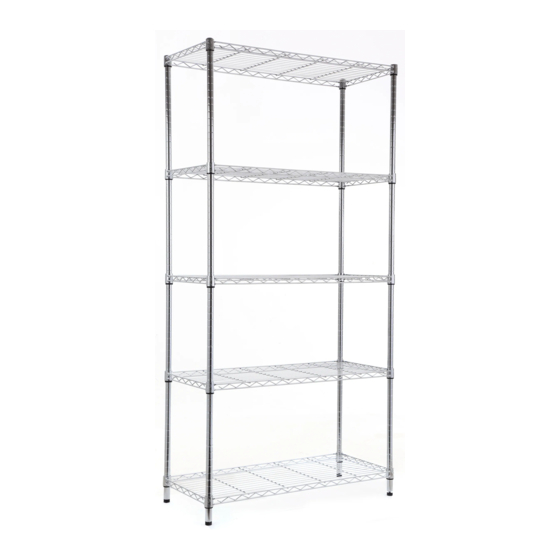
5-TIER WIRE SHELVING UNIT
MODEL #E4090OBH501, E4090OBK501
Purchase Date
1
Français p. 8
Español p. 15
Advertisement

Related Manuals for Style selections E4090OBH501


Summary of Contents for Style selections E4090OBH501
- Page 1 • Limpie los estantes y las varillas con una solución de agua y detergente suave. Limpie las piezas con un paño suave o una esponja. Enjuague y seque bien. Français p. 8 STYLE SELECTIONS and logo design are trademarks or registered trademarks of Español p. 15 LF, LLC.
- Page 2 INSTRUCCIONES DE ENSAMBLAJE 4. Repita el paso 1 para el tercer, el cuarto y el quinto estante (A), según lo desee. Alineadas 5. ADVERTENCIA: Este paso es OBLIGATORIO para garantizar la estabilidad del artículo. Con un lápiz (no se incluye) a través del estante (A), luego, déjelos a un lado (con la ayuda de otra persona).
-
Page 3: Table Of Contents
INSTRUCCIONES DE ENSAMBLAJE TABLE OF CONTENTS 1. Fije dos espaciadores (D) en cada varilla inferior (C) Package Contents..........................3 y asegúrese de que todas estén niveladas y que las Hardware Contents........................... 4 esquinas de un estante (A), luego, presione el estante Safety Information.......................... - Page 4 PACKAGE CONTENTS PART DESCRIPTION QUANTITY Shelf Upper Pole Lower Pole Spacer...
-
Page 5: Hardware Contents
CONTENIDO DEL PAQUETE HARDWARE CONTENTS (not shown actual size) Washer Anchor Screw Qty. 2 Qty. 2 Qty. 2 SAFETY INFORMATION Please read and understand this entire manual before attempting to assemble or install the product. • Two adults required for a safe assembly. •... -
Page 6: Assembly Instructions
ASSEMBLY INSTRUCTIONS ÍNDICE 1. Attach two spacers (D) on each lower pole (C), ensuring they are all level and that the arrows on the spacers (D) Contenido del paquete ........................17 point upward. Place the lower poles (C) through the corner holes of Aditamentos ............................. - Page 7 ASSEMBLY INSTRUCTIONS desired. Aligned 5. WARNING: This step is REQUIRED to ensure the stability of the item. Using a pencil (not included) through the top shelf (A), mark the screw hole locations, then set the item aside (with the help of another person). CC AA Using a 1/4-in.
-
Page 8: Care And Maintenance
• Clean shelves and poles with a solution of mild detergent and water. Use a soft cloth or sponge to ALAMBRE DE 5 NIVELES wipe parts. Rinse and dry thoroughly. STYLE SELECTIONS y el diseño del logotipo son marcas comerciales o marcas registradas MODELO #E4090OBH501, E4090OBK501 de LF, LLC. - Page 9 EN TREILLIS MÉTALLIQUE • Nettoyez les tablettes et les tiges à l’aide d’un nettoyant doux et d’eau. Utilisez un linge doux ou une STYLE SELECTIONS et le logo sont des marques éponge pour essuyer les pièces. Rincez-les à l’eau et séchez-les complètement.
-
Page 10: Top
INSTRUCTIONS POUR L’ASSEMBLAGE 4. Répétez l’étape 1 pour la troisième tablette (A), la quatrième tablette (A) et la cinquième tablette (A) comme vous le désirez. Alignés 5. AVERTISSEMENT : Cette étape est NÉCESSAIRE pour assurer la stabilité de l’article. À l’aide d’un crayon (non fourni), marquez l’emplacement des trous de vis à... - Page 11 TABLE DES MATIÈRES INSTRUCTIONS POUR L’ASSEMBLAGE 1. Fixez deux espaceurs (D) sur chaque tige inférieure (C), Contenu de l’emballage ........................10 en veillant à ce qu’ils soient de niveau et à ce que les Placez les tiges inférieures (C) dans les trous de coin Quincaillerie incluse .........................
- Page 12 CONTENU DE L’EMBALLAGE QUINCAILLERIE INCLUSE (non illustrée à la grandeur réelle) Rondelle Cheville d’ancrage Qté: 2 Qté : 2 Qté : 2 CONSIGNES DE SÉCURITÉ Assurez-vous de lire et de comprendre l’intégralité de ce manuel avant de tenter d’assembler ou d’installer l’article.
Need help?
Do you have a question about the E4090OBH501 and is the answer not in the manual?
Questions and answers