
Related Manuals for Kayak Innovations NATSEQ

Summary of Contents for Kayak Innovations NATSEQ
- Page 2 N O T E S : Cleaning and care NATSEQ will last longer if you wash it off with a soft cloth and lukewarm water after use. So pollution and water particles cannot accumulate permanently. After use in salt water, all components, especially the locking mechanisms, must be rinsed with plenty of clear tap water.
- Page 3 Mounting • If possible, always put them together on a level surface • Not on gravel or split to avoid inclusions • For easier assembly raise the lower part a little - if necessary place an object underneath (e.g. found wood or paddle shaft) EN - 2...
- Page 4 Dismantling • If possible, always on level ground • For easier dismantling lift the upper part a little and put an object underneath (e.g. found wood or paddle shaft) EN - 3...
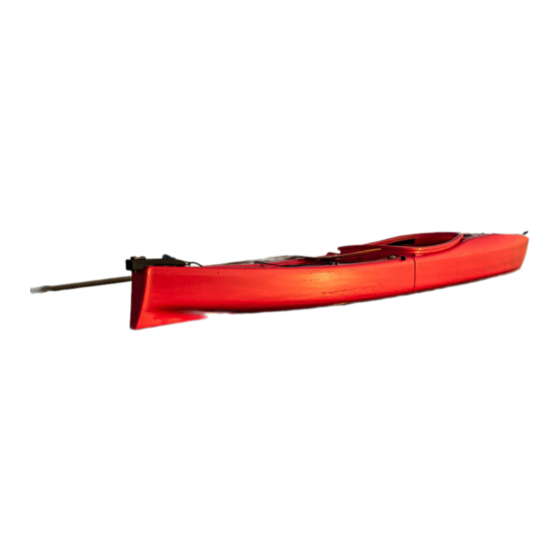
- Page 5 Adjustable backrest Stepless positioning of the backrest Adjustment of the footrests Turn the handlebars upwards, adjust the length and lock again EN - 4...
- Page 6 Steering system - Mounting rudder blade Swivel the rudder blade 90 ° to the left, insert it into the holder at the rear from above and then turn it back to a straight position 90° EN - 5...
- Page 7 Steering system - assembly of steering and pulley ropes (A) Guide the control lines through the line connectors on the left and right and tighten using a loop, (B) put the lines around the deck fittings and (C) readjust using the line tensioner (D) Feed the pulley rope through the line connector on the control blade and fasten it with a loop EN - 6...
- Page 8 Steering system - Functions Controlling the rudder and changing course with the foot pedals: • To starboard - right pedal • To port - left pedal The position of the pedal can be adjusted at any time and does not affect the tension in the steering lines.
- Page 9 Control system - dismantling for transport • Unhook the steering lines and stow them in the cockpit • Loosen the pulley rope and lay it on deck as shown • Turn the rudder blade 90 ° to the left and remove it EN - 8...
- Page 10 Avoid damage when getting in and MINIMUM 10 CM • Please get in and out when the water is at least 10 cm deep • Please no “seal launches” or “seal landings” caused by drifting onto and off the bank, especially on stony banks This way you avoid plastic abrasion.
- Page 11 Carrying the boat • Only carry NATSEQ assembled when it is empty • For longer stretches on land, dismantle the kayak into its individual segments EN - 10...
- Page 12 Transport and space-saving storage • Stow the bow turned on its side in the cockpit • Assemble the second cockpit in opposite directions EN - 11...
- Page 13 Proper use of a kayak cart • In general: never transport when loaded, always tighten the tensioning mechanism and ensure that it is adequately lashed to the kayak trolley (tension belts) SOLO • Solo: fix the cart directly behind the cockpit hatch under the rear section •...
- Page 14 Storage • Despite high-quality UV 24/7 protection, do not store the boat outdoors permanently • Thanks to the modular design, it is always problem-free and space-saving in the basement, garage or even covered on the balcony Paddling in the sea Your boat is ready for use laid out in salt water.
- Page 15 My Notes: EN - 14...
- Page 16 w w w . k a y a k - i n n o v a t i o n s . c o m V04-MM...