
Summary of Contents for Ger Detect RIVER F SMART
- Page 2 Definition of the main unit buttons & LEDs • Section The device features and specifications • Section RIVER F SMART parts assembly • Section RIVER F SMART device operation steps • Section 7 The device parts and accessories • Section 8 The technical specifications...
- Page 3 Critical Warning - Please make sure that all precautions are taken against risks. - Do not use your device while it is raining. - Turn on the device after you make sure that all parts are in place and connected. - Make sure that the device battery is fully charged before you start searching.
- Page 4 Dear customer, “Thank you for choosing RIVER F SMART” ✓ It has been completely developed into a RIVER F SMART device with the addition of more systems and the development of new characteristics, and new professional techniques in finding water resources from long distances with high accuracy and determining the depth with ease and accuracy.
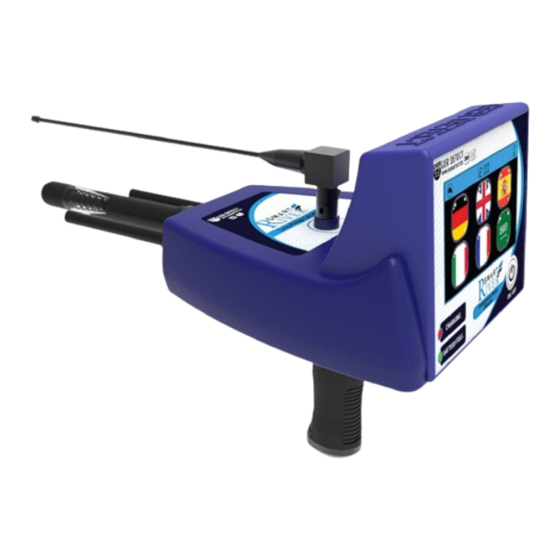
- Page 5 Definition of the main unit buttons & LEDs Recipient antenna Super antenna Enhancer antennas The device handle Charge input Charge indicator It lights up intermittently when the battery is about to run out.
- Page 6 The device features and specifications The RIVER F SMART device has multiple features to search for groundwater, water wells, and water sources underground: -Super speed in finding and locating water sites. -The system for determining the target depth easily and accurately.
- Page 7 RIVER F SMART device parts connection Install the device handle Install the Super Antenna Install enhancer antennas Install recipient antenna...
- Page 8 RIVER F SMART Power Button Turn on the device by pressing the power button for two seconds After turning on the device, the following data will appear on the main screen: Battery level indicator - clock - temperature - activate and mute...
- Page 9 1- Settings icon: It contains the working languages of the device, which are: German - English - French - Spanish - Portuguese - Arabic Device settings icon through which you can set: Sound level - brightness level - time settings - device information Locate and choose the continent icon you want to search in.
- Page 10 2- Search options: Choose the type of target you want to search underground. Determine the front range of the device.
- Page 11 3- Search icon: When you press the search icon, the device will directly start searching, depending on the preset settings saved by the prospector, which are (target type - front range – soil type).
- Page 12 You can choose the type of soil in the search area (clay - mineral - natural - mixed - sandy - rocky). Then choose the water type you want to search for. (Example: Freshwater), which also appears on the front range screen .
- Page 13 Example: If the front range of the target to be searched is expected to be within an area of 500 square meters, it is sufficient to specify the front range within 500 meters. But if the front range of the target to be searched is unknown, you can specify the front range up to 3000 meters.
- Page 14 The balance of the device must be maintained during the search by fixing the grey dot in the middle of the circle icon. The device will start sending and receiving signals directing you towards the target with a continuous sound. When getting any signal, the device will directly turn towards the target with the target direction indicator appearing on the screen and the sound accelerating.
- Page 15 Follow the signal and when the device turns back you will have passed the target Limit the search site by placing a mark that will be the center for target confirmation. Then confirm the location of the target from the four directions (from south to north - from north to south - from west to east - from east to west).
- Page 16 After you have confirmed the location of the target, click on the depth button to determine the depth and then move away from the center of the target a distance of at least meters. Start Point the device towards the target while maintaining the balance of the device, press the start button, wait until you hear a beep from the device, then walk towards the target until the device rotates backwards with the appearance of an icon...
- Page 17 Start Turn in the opposite direction, press the start button, wait until you hear a beep emanating from the device, and the icon shifts from the rotation position to the forward position, then walk until the device rotates backwards, the device will analyze and show the final results automatically.
- Page 18 -Target confirmation 93% Important Note: The ratio to analyze the results in the RIVER F SMART is as follows: If the result of the noise is high and the target confirmation rate is low: The device does not give depth, it is rather to retry the search again.
- Page 19 The device parts and accessories A carrying and protective device case made of shock-resistant plastic The main unit of the device The device handle The device charger The car charger Super antenna Enhancer antennas Recipient antenna...
- Page 20 The technical specifications RIVER F SMART Technical Specifications Dynamic speaker frequency range: 350~5500 Hz Audio Output sound output: 84 ± 3dB Liquid Crystal Display (LCD) Touch screen full color 480 x 272 px Device: 218 mm Length The device with a super antenna of 388 mm...
Need help?
Do you have a question about the RIVER F SMART and is the answer not in the manual?
Questions and answers