Advertisement
Quick Links
Advertisement

Subscribe to Our Youtube Channel
Related Manuals for PCLOCS lockncharge iQ 20 Cart


Summary of Contents for PCLOCS lockncharge iQ 20 Cart
- Page 1 USER INSTRUCTIONS iQ 20 Cart™ www.pclocs.com.au www.lockncharge.com...
- Page 2 iQ 20 Cart Congratulations on your purchase. Follow these instructions for easy and fast set-up of your iQ 20 Cart. PC Locs, LocknCharge and the Padlock device are Trademarks of IWS Global Pty Ltd. Copyright IWS Global Pty Ltd, May 2014. Disclaimer.
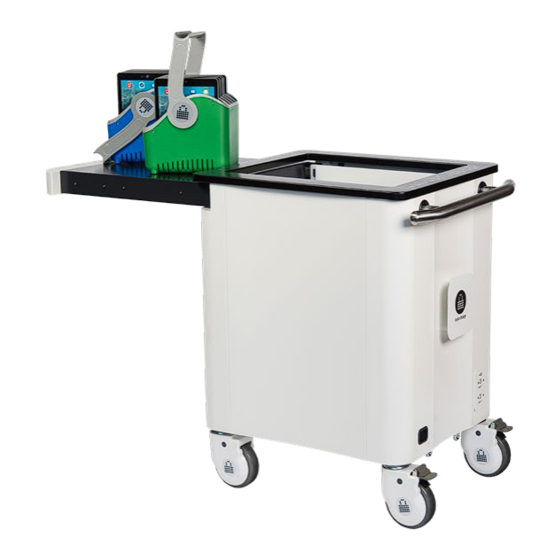
- Page 3 INSTRUCTION MANUAL STEP 1 - Unpacking the iQ 20 Cart After unpackaging, open the sliding lid. Remove the Baskets and the accessories box. NOTE: If you are supplying your own cables, follow Step 2 to install. If you purchased the Cart with cables pre-installed, go to Step 3. STEP 2 - Routing the device cables Undo the two knobs to release the cable After undoing the two knobs, remove the cable...
- Page 4 iQ 20 Cart Insert the device cables into the cable management bracket. Important: To ensure correct external LED status indication (on the top frame of the Cart), cables should be connected to the correct USB ports on the iQ 5 Sync Charge Boxes (see image below). Push the excess cable down behind the cable Fit the cable management bracket back into the management bracket and ensure enough cable is...
- Page 5 INSTRUCTION MANUAL STEP 3 - Connecting your devices and locking the Cart Place the Baskets in the Cart and connect the Insert your devices into the 5-slot Carry Baskets. device cables to each device. Close the sliding top lid and attach a padlock to PLEASE NOTE: For security, close the sliding lid, secure your devices inside.
- Page 6 iQ 20 Cart STEP 4 - Syncing and Charging your devices To charge your devices, unwind the power cable and plug it into the wall socket. Then plug the power cable into Cart. Charging will automatically When not in use, wrap excess power cable around start (may need to switch the wall outlet “on”).
- Page 7 INSTRUCTION MANUAL STEP 5 - Installing the Security Chain Kit. Tools required: The Security Chain Kit contains the following: • Masonry hammer-drill • 1 x 3 holed Anchor Plate and security chain • 10mm masonry drill bit • 3 x 55mm long, 8mm Anchor Bolts •...
-
Page 8: Warranty
Some states do not allow the exclusion or limitation of incidental or consequential damages, so the above limitation or exclusion may not apply to you. Compliances and Approvals CE (Europe) SAA (Australia) UL Compliant (USA and Canada) KCC (Korea) - pending SIRIM (Malaysia) - pending SPRING (Singapore) -pending www.pclocs.com.au www.lockncharge.com...
Need help?
Do you have a question about the lockncharge iQ 20 Cart and is the answer not in the manual?
Questions and answers