Advertisement
- 1 Getting Started
- 2 Omni Toaster Oven Features
- 3 Cooking with the Omni Toaster Oven
- 4 Smart Program Cooking Times and Temperatures
- 5 Rotisserie Cooking
- 6 Cooking Tips
- 7 Recommended Cooking Times For a Variety of Popular Food Options
- 8 Care and Cleaning
- 9 Troubleshooting
- 10 Documents / Resources
Getting Started
Initial Set Up
- Read all Important Safeguards in in this manual. Failure to do so may result in property damage and/or personal injury.
- Remove all packaging material from in and around the toaster oven.
- Remove the crumb tray and check the cooking chamber for loose packing material before first use.
- Follow Care and Cleaning instructions in this manual to clean the toaster oven before first use.
- Place the toaster oven on a stable, level surface, away from combustible material and external heat sources.
- Leave at least 5" of space above and around all sides of the oven.
- Do not place anything on top of the oven and do not block the air vents.
Product and Parts
The Instant™ Omni™ Toaster Oven combines the delicious results of air fryers, toasters and convection ovens into one easy-to-use appliance. The Instant Omni Toaster Oven is a multi-function countertop oven that provides 7 Smart Programs and 2 cooking methods in one small appliance.

Accessories

Note: Illustrations are for reference only and may differ from the actual appliance.

The external metal surfaces will get hot during the cooking process. The oven is equipped with a side fan to cool the appliance. The fan will remain on until the unit is sufficiently cooled. As well, an internal fan is included in the cooking chamber. The internal fan will remain on for 10 seconds after cooking has completed.
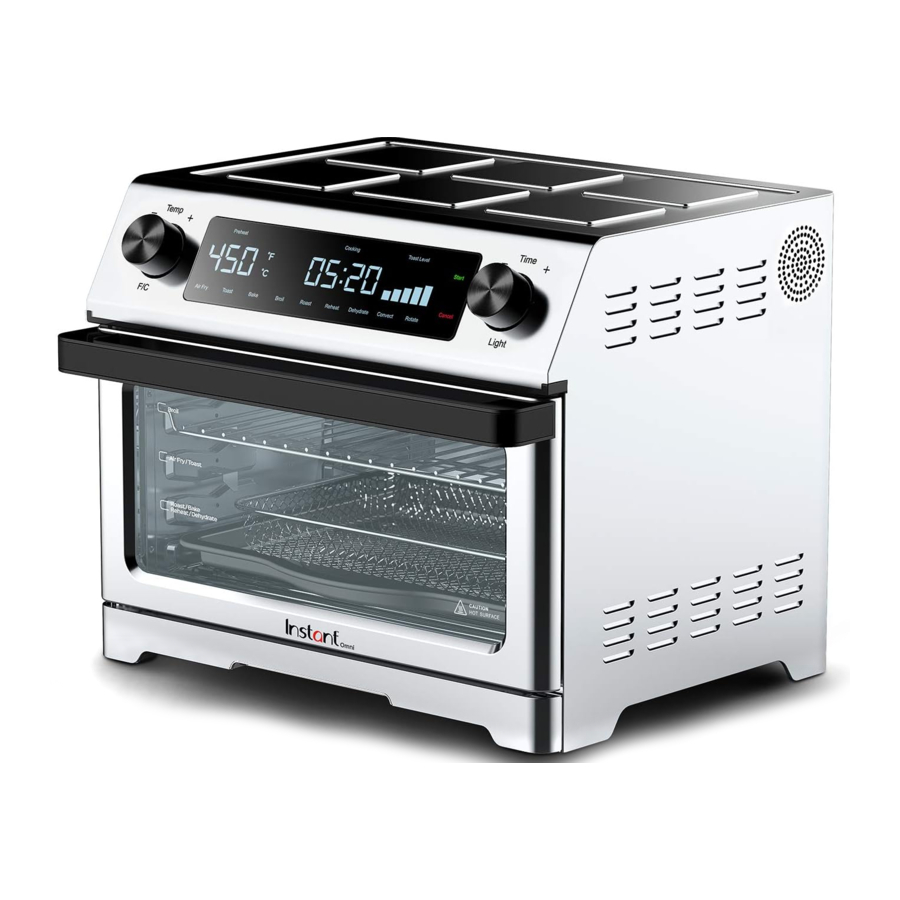
Control Panel
The Omni Toaster Oven control panel features intuitive touch screen controls in an LED display, as well as a left dial that controls the Temperature and Fahrenheit/ Celsius, and a right dial that controls the cooking time and the cooking chamber light.

- Display
The LED display includes the following elements:- Cooking status indicators – Preheating/Cooking/Keep Warm
- Temperature
- # of toast/bagel slices
- Cooking time
- Toasting level
- Smart Programs – select from 7 Smart Programs that provide preset cooking (Air Fry, Toast, Bake, Broil, Roast, Reheat, or Dehydrate).
- Start
- Cancel
- Temp -/+ dial
- Fahrenheit/Celsius dial
- Time -/+ dial
- Light dial
Status Messages

OFF indicates that the Omni Toaster Oven is plugged in and is in "Standby" mode.

On indicates that the Omni Toaster Oven is in Preheat mode.

Turn the dials to adjust Temperature and Time.

Select a Smart Program: Air Fry, Toast, Bake, Broil, Roast, Reheat, or Dehydrate. Cooking time counts down in hours and minutes until 1 minute remains, then counts down in seconds until the Smart Program is complete

turn Food indicates that the food in the cooking chamber should be turned for even cooking.

End indicates that the Smart Program has ended.
Settings
Adjust and Save Smart Program Time and/or Temperature
Smart Programs are programmed with optimal time and temperature settings. Once a Smart Program has been selected the time and temperature can be adjusted using the dials on the left and right of the control panel to customize the cooking to suit individual preferences. The new adjusted time and/or temperature will be saved in memory once the Start key is touched.
Reset Individual Smart Programs
When the oven is in Standby mode the display indicates OFF. Press and hold the desired Smart Program key for 3 seconds. The appliance will beep when the Smart Program has been restored to the factory default setting.
Reset All Smart Programs
When the oven is in Standby mode the display indicates OFF. Press and hold Cancel for 3 seconds. The appliance will beep when all Smart Programs have been restored to the factory default settings.
Turn Sounds On or Off
When the oven is in Standby mode the display indicates OFF. Press and hold both dials (Temp and Time) for 3 seconds to turn the sounds on (S On) and off (S OFF). Note: Error alerts cannot be silenced.
Change Temperature Scale (°F or °C)
Press the Temp dial to change between Fahrenheit and Celsius. Temperature adjustable range: 85-450°F.
Sound Settings
| Status | Action |
| Open door | 1 short beep |
| Close door | 1 short beep |
| Touch a key | 1 short beep |
| Start the program (when touching Start or the program begins after 10s) | 3 long beeps |
| Preheating complete (from On to countdown time) | 1 short beep |
| Full manufacturer default reset | 2 short beeps |
| Smart Program reset | 1 short beep |
| Turn Food | 2 short beeps x 5 |
| Error code | 1 long beep x 5 |
| End | 1 long beep x 5 |
| Smart reminder (5 minutes, 20 minutes and 60 minutes after cooking program End) | 2 short beeps x 5 |
Omni Toaster Oven Features
| Function | Description |
| 7 one touch Smart Programs | The Omni Toaster Oven provides 7 Smart Programs (Air Fry, Toast, Bake, Broil, Roast, Reheat, or Dehydrate). Smart Programs keys at the bottom of the LED display provide preset cooking times and temperatures. Select a Smart Program by touching the key on the control panel. The display indicates On to signify that the Smart Program has been initiated and OFF to signify that a Smart Program has been completed or cancelled and the oven is in Standby mode. Touch Start on the display to begin cooking. |
| 2 cooking methods | With convection cooking, rapid air circulation heats the oven up fast, so that food cooks quickly and evenly. Touch the Convect key on the bottom right of the LED display to select the Convect cooking method. Once cooking has begun touch the Rotate key on the LED display to turn the rotisserie on or off. The key is blue when the Rotate function is off, and white when the Rotate function is on. Note: Applicable to Air Fry and Roast only. The key is blue when the Rotate function is available. |
| User-friendly, text-based display | Indicates cooking time, cooking temperature, cooking status indicators, reminders and error messages as well as Start and Cancel. |
| Quick and easy program adjustments | Easily adjust the cooking time and temperature using the dials on the left and right of the oven, even after cooking has been initiated. |
| Smart Program memory | Time and/or Temperature adjustments made to a preset program will be saved after you press the Start button. See the Reset Individual Smart Programs or Reset All Smart Programs in the Settings section of this document to return to the factory settings. |
| Air Fry | Air Fry ensures the right crispiness without the oil. |
| Toast | The Toast Smart Program lets you select bread or bagels. You can also select the number of slices as well as the toasting level by turning the Temp dial on the left to change the number of slices, up to a maximum of 6 slices and you can adjust the Time dial on the right to change the toast level from 1 – 5. Adjustments can be made to increase or reduce the time during the toasting process. |
| Bake | Baked desserts like brownies and cheesecakes cook quickly and evenly. |
| Broil | The broiler's direct top-down heat is designed to melt cheese, crisp meat, and caramelize fruits and vegetables. Defaults to the highest temperature (450°F). |
| Roast | Customizable one touch Smart Program for roasting meats and vegetables. |
| Reheat | Warm up leftovers without overcooking or drying out the food. |
| Dehydrate | Low temperature heat is circulated to effectively draw moisture from foods. Creating veggie chips, jerky, and dehydrated fruit is a breeze. |
| Standby | When the oven is plugged in, the buzzer will beep (1 sound), the display will turn on and indicate OFF; all the keys will light up for 1 second and then turn off. After one more second the oven moves into Program selection mode with the program keys remaining lit on the display. The Start and Cancel keys are not visible until a program has been selected. |
| Temp / F/C dial | Turn the Temp dial on the left [-] or [+] to adjust the cooking temperature. The interval of adjustment is 1°F. Press the Temp dial to toggle between Fahrenheit and Celsius. Temperature adjustable range: 85-450°F. |
| Time / Light dial | Turn the Time dial on the right [-] or [+] to adjust the cooking time. The interval of adjustment is one minute for Air Fry, Roast, Bake, Broil, Reheat and Dehydrate (under 1H). The exceptions are: 5 minute intervals for Dehydrate times between 1H - 6H; 30 minute intervals for Dehydrate times over 6H. Time adjustable range: 00-72 HR. Press the Time dial to turn the cooking chamber light on or off. |
| Start | The Start key green light will be on when the user is able to start cooking. Touch the Start key to start cooking. When the Start key is pressed, the oven moves into cooking mode. The buzzer will beep (1 second, 3 sounds). The Start key light will turn off and the Cancel key will stay on. If the Cancel key is pressed, the oven will move into Standby mode. |
| Pause | When the door is opened during any cooking program the internal light turns on and the cooking mode is paused. The cooking mode will proceed once the door is closed. |
| Cancel | When Cancel is pressed to stop the cooking mode, the display indicates OFF. The oven will return to Standby mode. If the internal temperature is more than 280°F, the internal fan will run for 10 seconds. If Cancel is held for 3 seconds, the oven will conduct a full manufacturer reset. |
| Preheat | Touch the Start key to begin cooking. The display will indicate On. The oven will move into the preheating stage. A Preheat indicator light will be visible in the upper left corner on the display. Preheat only applies to the Air Fry, Roast, and Bake programs. Toast, Broil, Reheat, and Dehydrate do not have a Preheat function. Once the cooking stage has been initiated by touching the Start key the green light will turn off and the red Cancel key below the Start key will remain visible. |
| Cooking | While in Cooking mode the user can still adjust the Time and Temperature. To execute an adjustment, the user must press Start within 5 seconds after the Time and/or Temperature has been adjusted, or the settings will revert back to the preset program and the program memory will not remember the adjusted cooking time/temp. The Cancel key is visible. The Cooking indicator light is visible on the top center of the display and the cooking time will count down. If the user opens the door at any time the cooking will be paused. |
| turn Food | For the Air Fry, Bake, and Roast programs; when the countdown time reaches 2/3 of the way through the set-time, and the Rotate function has not been selected, the display will indicate turn and Food alternately, to remind the user turn the food within the air fry basket or cooking pan. There will be 2 short beeps per second, followed by 5 buzz sounds. If the oven detects that the door switch has been opened but not closed, the cooking mode will automatically pause. The door switch must open and close, or after 10 seconds with no user action, the turn Food message will terminate and the cooking mode will resume. The cooking time will continue to countdown on the display and the temperature will be indicated. There are no turn Food reminders for the Rotate, Toast, Reheat, and Dehydrate programs. |
| Near End mode | When the time countdown is at 1 minute, the countdown will change to seconds. When countdown is at 30 seconds, the internal light will turn on to remind the user that the cooking process will end soon. For all programs, except for the Toast program, the heating element will turn off when there are 30 seconds remaining in the program. When the cooking time counts down to zero, the display will indicate End. The internal fan will continue running for a short period of time if the internal temp is over 280°F. The buzzer will beep (2 short beeps per second). |
| End mode | When the Cooking mode is complete the display will indicate End and the buzzer will beep (5 times). End will be displayed until the user opens the door and removes the food. The internal light will stay on for an additional amount of time after the cooking program has completed. If the door switch detects that the door is open the display will indicate OFF and the oven will move into Standby mode. If the door is not opened after 5, 20, or 60 minutes, a Smart Reminder sound will be activated at each interval. |
| Auto-shut down | For safety purposes, if the door is open during cooking and not closed within 10 minutes, the oven will return to Standby mode. |
Cooking with the Omni Toaster Oven
Initial Test Run
Follow these steps to ensure your oven is operating properly.
- Open the oven door.
Place the cooking pan on the bottom of the cooking chamber.
Close door. - Plug the power cord into a 120V power source.
Display indicates OFF signifying that the oven is in Standby mode. - Touch the Air Fry Smart Program key on the display.
Note: The default Air Fry Smart Program cooking temperature is 400ºF. - Turn the Time dial [-] or [+] to adjust the cooking time to 20 minutes.
- Touch the green Start key on the right side of the display to begin cooking. The display indicates On when the oven is in Preheat mode.
Note: The Temp and Time are preset by the Air Fry Smart Program, however, you can turn the Temp [-] or [+] and Time [-] or [+] dials to adjust the cooking temperature or time. - When the oven reaches the Smart Program cooking temperature, the cooking time will start to count down on the display.
Note: For the test run, do not add food to the cooking chamber. - Partway through the Air Fry Smart Program cooking time, the oven will beep and indicate turn Food to remind you to turn your food. Open the door to automatically pause the Smart Program then close the door to resume.
Note: The turn Food reminder only appears when using Air Fry, Bake and Roast Smart Programs and only if Rotate is not turned on.
Note: Cooking will recommence after 10 seconds whether food has been turned or not. - The display will count down the last minute of cooking time in seconds. When the Smart Program is complete, the display indicates End and the fan turns on automatically to cool the oven.
Note: The Omni Toaster Oven emits a Smart Reminder sound that the food is ready at 5, 20, and 60 minutes after the Smart Program ends.
The oven will be hot during and after cooking. Do not touch hot surfaces. Always use oven mitts to remove cooking trays. Allow the oven to cool to room temperature, then clean the accessories and cooking chamber. Refer to Care & Cleaning in this manual.
Smart Program Cooking Times and Temperatures
| Smart Programs | Time Range | Temperature Range | Convection |
| Air Fry | 5 – 45 minutes | 180 – 450ºF / 82 – 232ºC | High |
| Toast | Adjusts by quantity | Darkness Level 1-5 | No |
| Bake | 1 minute – 4 hours | 180 – 450ºF / 82 – 232ºC | Low / High |
| Roast | 20 minutes – 4 hours | 180 – 450ºF / 82 – 232ºC | Low / High |
| Broil | 2 – 20 minutes | 350 – 450ºF / 176 – 232ºC | Low / High |
| Reheat | 5 – 60 minutes | 120 – 360ºF / 49 – 182ºC | Low / High |
| Dehydrate | 30 minutes – 72 hours | 85 – 175ºF / 29 – 79ºC | Low / High |
Rotisserie Cooking
Always insert rotisserie accessories and food before preheating the oven.
To use the Rotisserie Spit and Forks
- Remove the forks and screws from the package.

- Push the food item onto the spit.

- Slide the forks onto both ends of the spit, ensuring the prongs are inserted into the food item.


Ensure the food item is able to rotate freely. Do not allow food items to make contact with the heating elements. Insert the cooking tray to catch any grease and/or juices.
Rotisserie Cooking
- With the oven door open, slide the rotisserie spit into the guides in the cooking chamber.

- Insert the rotisserie arm with the pointed end in the rotisserie catch on the right, then place the square end in the rotisserie catch on the left side. Ensure the rotisserie spit is securely in place.

- Close the oven door.

![]()
Ensure the food item is able to rotate freely. Do not allow food items to make contact with the heating elements. - Select "Air Fry" or "Roast".

- Use the "Temp" and "Time" [-] or [+] dials to adjust cooking temperature and time as desired.

- Touch "Start".

- "Rotate" will automatically turn on when "Roast" is selected and will be lit in white. If you want to turn the rotisserie function off, press "Rotate" and it will be lit in blue.

- Convection is automatically on, however, there are 2 settings, "HI" or "LO". Touch "Convect" if you wish to change the setting.


Removing your rotisserie food
- Use caution when opening oven door. Door and accessories will be hot. Position the rotisserie lift hooks beneath the left and right arms of the rotisseries spit where the indents are location (see illustration).

- Lift the rotisserie spit slightly on the left, and slide it left to remove it from the catch on the right.

- Pull the accessory towards you and carefully remove the accessory from the cooking chamber, then place your food on a tray or heat resistant surface.

- Use the oven mitts to unscrew the rotisserie forks and remove them from the food, then remove the food from the spit.
![]()


Rotisserie spit, forks, and basket will be hot during and after cooking. Always use the rotisserie lift to remove rotisserie accessories, and exercise extreme caution when removing hot accessories from the cooking chamber. Always use oven mitts when disassembling hot rotisserie accessories.
Cooking Tips
The Omni Toaster Oven cooks all your favorite fresh and frozen oven-baked and air fried snacks—fast!
- Use the Smart Programs as a starting point and experiment with cooking times and temperatures to get the results you prefer.
- Rotisserie-cooked foods and rotisserie accessories and foods must be placed in the oven before touching Start.
- With the exception of rotisserie-cooked foods, most foods will benefit greatly from a preheated oven.
- When cooking coated food items, choose breadcrumb batters over liquid-based batters to ensure that the batter will stick to the food.
- Flip or rotate food items when the display indicates turn Food to ensure they are evenly cooked on both sides.
- For crispy, golden fries, soak fresh potato sticks in ice water for 15 minutes, pat dry and spray lightly with cooking oil before inserting them into the oven.
- When baking a cake, pie, quiche, or any food with filling or batter, use an oven-safe baking dish and cover the food with foil or an oven-safe lid to prevent the top from overcooking.
- Air frying can cause oil and fat to drip from foods. To prevent excess smoke, carefully remove and empty the cooking pan periodically throughout cooking.
- To ensure seasoning adheres to food items, spray food items with cooking oil before adding seasoning.
- Feel free to use any oven-safe cookware in your Omni Toaster Oven.
- Find dozens of easy to follow recipes at recipes.instantpot.com and download the Instant Pot app at instantpot.com/app.
Do not spray cooking oil into the cooking chamber.
Recommended Cooking Times For a Variety of Popular Food Options
The following cooking times are recommendations only. Always follow a trusted recipe.
| Food | Setting | Cooking Time* | Cooking Temperature* | Accessory & Placement |
| Thin-cut fries (Frozen) | Air Fry / Roast | 14 – 18 minutes | 400°F / 205°C | Rotisserie Basket |
| Thin-cut fries (Fresh) | Air Fry / Roast | 18 – 20 minutes | 400°F / 205°C | Rotisserie Basket |
| Thick-cut fries (Frozen) | Air Fry / Roast | 16 – 20 minutes | 400°F / 205°C | Rotisserie Basket |
| Thick-cut fries (Fresh) | Air Fry / Roast | 20 – 25 minutes | 400°F / 205°C | Rotisserie Basket |
| Chicken wings (Fresh) | Air Fry / Roast | 20 – 30 minutes | 360°F / 182°C | Cooking Tray, Bottom / Rotisserie Basket |
| Whole chicken (up to 4 lbs) | Roast | 50 – 70 minutes | 380°F / 193°C | Rotisserie Spit |
| Chicken nuggets (Frozen) | Broil | 10 – 15 minutes | 400°F / 205°C | Cooking Tray, Middle / Rotisserie Basket |
| Shrimp (Frozen) | Air Fry | 8 minutes | 400°F / 205°C | Cooking Tray, Middle / Rotisserie Basket |
| Shrimp (Fresh) | Air Fry | 8 – 10 minutes | 350°F / 177°C | Cooking Tray, Middle / Rotisserie Basket |
| Fish sticks (Frozen) | Broil | 8 – 12 minutes | 400°F / 205°C | Cooking Tray, Middle |
| Asparagus | Broil / Bake | 7 – 9 minutes | 370°F / 188°C | Cooking Tray, Middle / Rotisserie Basket |
| Cauliflower | Broil / Bake | 6 – 10 minutes | 370°F / 188°C | Cooking Tray, Middle / Rotisserie Basket |
| Cake | Bake | 25 – 35 minutes | 360°F / 182°C | Drip Pan, Bottom (Springform Pan) |
*Note: Cooking times and temperatures are recommendations only. Always follow a trusted recipe.
Always use a meat thermometer to ensure the internal temperature of poultry reaches at least 165°F / 75°C.
Care and Cleaning
Unplug your Omni Toaster Oven and let it cool to room temperature before cleaning. Never use harsh chemical detergents, scouring pads, or powders on any of the parts or components as this may lead to damage. Failure to do so may lead to injury.
| Part / Accessory | Instructions | Cleaning Method |
| Cooking Pan | Optionally, prior to use, spray with non-stick cooking spray or line the pan with aluminum foil for easier cleaning. | Dishwasher Safe / Hand Washable (May be submerged) |
| Rotisserie Spit and Forks | Disassemble and clean after each use. | |
| Rotisserie Lift | Clean as needed. | |
| Oven Rack | Do not cover the oven rack when cooking. | |
| Air Fry Basket | Optionally, spray with non-stick cooking spray before adding food. | |
| Crumb Tray | Remove and clean after each use and ensure all grease and food debris is fully removed. Optionally, prior to use, line the pan with aluminum foil for easier cleaning. | |
| Cooking Chamber | Clean after each use once the cooking chamber is cool. Use a damp cloth or sponge to ensure the heating element, surrounding area, and chamber walls are free of grease and food debris. You may use any commercial oven cleaner to remove stubborn grease residue. | Damp Cloth Only |
| Toaster Oven Exterior | Clean with a soft, damp cloth or sponge, and wipe dry to avoid streaking. |
Note: To remove baked on grease residue from accessories and the cooking chamber, unplug the appliance and wait for it to cool. Then spray the affected area with a mixture of baking soda and vinegar, and wipe clean. For stubborn stains, allow the mixture to sit on the affected area for several minutes before removing residue.
| | ||
| Do not immerse the appliance in water. Do not rinse the appliance under a tap. Do not wet prongs of power cord. | Without proper cleaning, food and grease splatter may build up around the heating element, leading to a risk of smoke, fire, and personal injury. | If you see or smell smoke, touch Cancel and unplug the appliance. Once cool, remove food splatter or grease with a soft cloth and mild detergent. |
| | ||
| Failure to follow these instructions may result in injury. | ||
Troubleshooting
Register your product today at instantappliances.com/support/register
| Scenario | Possible Reason | Possible Solution | |
| Toaster Oven is plugged in but will not turn on | The appliance is not properly plugged in. | Ensure the power cord is plugged firmly into a 120V outlet. | |
| Bad power connection or no power. | Plug in another appliance to the same outlet to check the outlet for power. | ||
| Move the Toaster Oven to another outlet to ensure there is nothing else plugged in on the same circuit or in the general area. | |||
| Inspect power cord for damage. If damage is noticed discontinue use and contact Customer Care. | |||
| Condensation is forming on countertops | Toaster Oven does not have proper ventilation. | Ensure the Toaster Oven has at least 5 inches of space around all sides while in use. | |
| Water is dripping onto the counter from under the door | |||
| Oven light will not turn on | Oven is not plugged in. | Ensure that the Toaster Oven is plugged in securely and the oven is in Standby. | |
| Black smoke is coming from the Toaster Oven | Using an oil with a low smoke point. | Press Cancel, then unplug the appliance and allow it to cool to room temperature. Choose a neutral oil with a high smoke point, such as Canola, Avocado, Soybean, Safflower, or Rice Bran. | |
| Food particles or residue on the bottom of the cooking chamber, air fry basket, oven rack, cooking pan, rotisserie spit and forks, or crumb tray. | Press Cancel, then unplug the oven and allow it to cool to room temperature. Remove all accessories from the cooking chamber and clean the area as well as all accessories thoroughly. Line the crumb tray of your Toaster Oven with aluminum foil for easier clean-up. | ||
| Faulty circuit or heating element. | Stop using appliance immediately. Press Cancel, then unplug the toaster oven and allow it to cool. Contact Customer Care. Note: Do not attempt to repair the appliance. | ||
| White smoke is coming from Toaster Oven | Cooking foods with excess fat, such as bacon, sausage, and burgers may result in white smoke. | Avoid air frying foods with a high fat content. | |
| Check the cooking pan for excess oil or fat and carefully remove as needed after cooking. | |||
| Water is vaporizing producing thick steam. | Pat dry moist food ingredients before air frying. Do not add water or other liquid to the oven's cooking chamber. | ||
| Seasoning on food has blown into element. | Be mindful when seasoning food. Spray vegetables and meats before adding seasoning so they adhere to the ingredients. | ||
| Error code appears on display | E1 | Open circuit | Contact Customer Care: 1-800-828-7280 support@instantappliances.com instantappliances.com/#Chat |
| E2 | Short circuit | ||
| E3 | Abnormal circuit | ||
| E6 | Abnormal function | ||
| E7 | Abnormal function | ||
Any other servicing should be performed by an authorized service representative. Contact customer care:
1-800-828-7280
support@instantappliances.com
instantappliances.com/#Chat
Read this manual carefully and completely, and retain for future reference. Failure to adhere to safety instructions may result in serious injury.

Documents / Resources
References
Instant Pot Recipes – The official curated Instant Pot recipes
![instantpot.com]() Instant Pot® | Instant Home
Instant Pot® | Instant Home![instantappliances.com]() Instant Brands Product Registration | Instant Home
Instant Brands Product Registration | Instant Home
Download manual
Here you can download full pdf version of manual, it may contain additional safety instructions, warranty information, FCC rules, etc.
Advertisement
Thank you! Your question has been received!

Need Assistance?
Do you have a question about the Omni that isn't answered in the manual? Leave your question here.